Hitachi Koki Tanaka THB-260PF Скачать руководство пользователя страница 8

GB-6

Maintenance

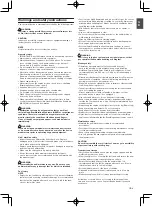
MAINTENANCE, REPLACEMENT OR REPAIR OF  THE 
EMISSION CONTROL DEVICES AND SYSTEMS MAY 
BE PERFORMED BY ANY NON-ROAD ENGINE REPAIR 
ESTABLISHMENT OR INDIVIDUAL.

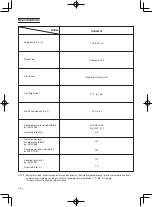
Carburetor adjustment (Fig. 11)

In the carburetor, fuel is mixed with air. When the engine is test run 
at the factory, the carburetor is adjusted. A further adjustment may 
be required, according to climate and altitude. The carburetor has 
one adjustment possibility:   

T = Idle speed adjustment screw.

Idle speed adjustment (T) 

Check that the air filter is clean. If adjustment is required, turn
IDLE speed Adjustment Screw (T) close (clockwise) to increase
engine speed, open (counterclockwise) to decrease engine speed.
Standard Idle rpm is 2800-3200rpm. 

CAUTION

The above adjusting procedure must be followed when adjustment 
is MADE or DAMAGE to engine will occur because of the incorrect 
condition. 

NOTE

Some models sold areas with strict exhaust emission regulation 
do not have high and low speed carburetor adjustments. Such 
adjustments may allow the engine to be operated outside of their 
emission compliance limits. For these models, the only carburetor 
adjustment is idle speed.      

RECOMMENDATION: 

CARBURETOR ADJUSTMENT NEEDS THE SKILL OF EXPERIENCED 
OR WELL TRAINED PEOPLE, OR IS RECOMMENDED TO TAKE 
THE UNIT TO Tanaka DEALER.

Air filter (Fig. 12)

The air filter must be cleaned from dust and dirt in order to avoid:
• Carburetor malfunctions. 
• Starting problems.
• Engine power reduction.
• Unnecessary wear on the engine parts. 
• Abnormal fuel consumption. 
Remove the air cleaner cover by pushing and pulling back the tab 
on the top. (Fig. 12) 

Cleaning the air filter


Clean the cleaner element every day or every 8 hours of operation. 
More frequent cleaning is recommended under very dusty 
conditions.  Wash the element in liquid detergent and water. 
Squeeze the element to remove the dirt. Press the element in a dry 
rag until it is completely dry. Saturate the element in 2 cycle oil. 
Squeeze the element to distribute the oil completely and to remove 
any excess oil. Replace the element and install the cover. (Fig. 13)
An air filter that has been used for some time cannot be cleaned 
completely. Therefore, it must regularly be replaced with a new 
one. A damaged filter must always be replaced.

Fuel filter (Fig. 14)

Drain all fuel from fuel tank and pull fuel filter line from tank. Pull 
filter element out of holder assembly and rinse element in warm 
water with detergent. Rinse thoroughly until all traces of detergent 
are eliminated. Squeeze, do not wring, away excess water and 
allow element to air dry.

NOTE

If element is hard due to excessive dirt buildup, replace it.

Spark plug (Fig. 15)

The spark plug condition is influenced by: 
• An incorrect carburetor setting.
• Wrong fuel mixture (too much oil in the gasoline)
• A dirty air filter.
• Hard running conditions (such as cold weather).
These factors cause deposits on the spark plug electrodes, which 
may result in malfunction and starting difficulties. If the engine 
is low on power, difficult to start or runs poorly at idling speed, 
always check the spark plug first. If the spark plug is dirty, clean it 
and check the electrode gap. Re-adjust if necessary. The correct 
gap is 0.6 mm. The spark plug should be replaced after about 100 
operation hours or earlier if the electrodes are badly eroded.

NOTE

In some areas, local law requires using a resistor spark plug to 
suppress ignition signals. If this machine was originally equipped 
with resistor spark plug, use same type of spark plug for 
replacement.

Maintenance schedule

Below you will find some general maintenance instructions.  For 
further information please contact Tanaka dealer.

Daily maintenance

• Clean the exterior of the unit.
• Check that the air intake at the dust cover is not clogged.
• Check the dust cover for damage or cracks. Change the cover in 

case of impacts or cracks. 

• Check that nuts and screws are sufficiently tightened.

Weekly maintenance

• Check the starter, especially cord.
• Clean the exterior of the spark plug.
• Remove it and check the electrode gap. Adjust it to 0.6 mm, or 

change the spark plug.

• Clean the air filter.

Monthly maintenance

• Rinse the fuel tank with gasoline, and clean fuel filter.
• Clean the exterior of the carburetor and the space around it.

Quarterly maintenance

• Clean the cooling fins on the cylinder.
• Clean the fan and the space around it.
• Clean the muffler of carbon.

CAUTION

Cleaning of cylinder fins, fan and muffler shall be done by a
Tanaka dealer.

NOTE

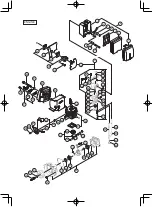
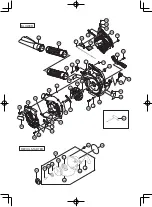
When ordering the parts to your nearest dealer, please use
the item No. showing on the parts breakdown section in this
instruction.

Содержание Tanaka THB-260PF

Страница 1: ...entivement le manuel avant d utiliser la machine Antes de utilizar esta máquina lea cuidadosamente el manual Designed for operating in USA Canada only When this product is used in areas other than the USA Canada we cannot guarantee the product quality and performance E S F R G B Blower Souffleur Soplador THB 260PF THB 260PF ...

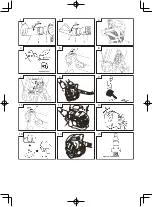
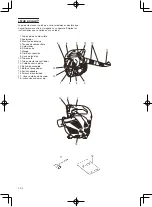
Страница 2: ...T 1 2 3 4 5 6 7 8 9 10 11 12 13 14 15 ...

Страница 3: ...ear protectors when using this unit Explains choke position Upper sign indicates choke closed and the lower fully open WARNING DANGER Keep hands off from rotating fan For vacuum vacuum pipe and bag must be in place For blower dust cover must be securely installed WARNING DANGER Hot surfaces The muffler or catalytic muffler and surrounding cover may become extremely hot Always keep clear of exhaust...

Страница 4: ...ly to your unit 1 Fuel cap 2 Throttle trigger 3 Starter handle 4 Fuel tank 5 Carburetor 6 Air cleaner 7 Handle 8 Suspension eyelet 9 Ignition switch 10 Straight pipe 11 Fan headed pipe 12 Dust cover 13 Spark plug 14 Choke knob 15 Priming bulb 16 Cruise lever 17 Combi box spanner 18 Handling instructions 17 18 6 2 13 10 8 14 15 1 4 3 5 11 12 7 9 16 ...

Страница 5: ... your body Always pay attention when handling fuel Always have good ventilation when handling fuel inside building Mix and pour fuel outdoors and where there are no sparks or flames Use a container approved for fuel Do not smoke or allow smoking near fuel or the unit machine or while using the unit machine Wipe up all fuel spills before starting engine Move at least 3 m away from fueling site befo...

Страница 6: ...nd pressure level LpA dB A by ISO 22868 Uncertainty dB A Sound power level Lw measured dB A by ISO 22868 Sound power level LwA dB A by 2000 14 EC Vibration level m s2 by ISO 22867 Uncertainty m s2 NOTE Equivalent noise level vibration level are calculated as the time weighted energy total for noise vibration levels under various working conditions with the following time distribution 1 7 idle 6 7 ...

Страница 7: ...wly open the fuel tank when filling up with fuel so that possible over pressure disappears Tighten the fuel cap carefully after fueling Always move the unit at least 3 m 10 ft from the fueling area before starting Do not smoke and or allow flames or sparks near fuel when handling or filling fuel Always wash any spilled fuel from clothing immediately with soap Be sure to check for any fuel leaking ...

Страница 8: ...d with a new one A damaged filter must always be replaced Fuel filter Fig 14 Drain all fuel from fuel tank and pull fuel filter line from tank Pull filter element out of holder assembly and rinse element in warm water with detergent Rinse thoroughly until all traces of detergent are eliminated Squeeze do not wring away excess water and allow element to air dry NOTE If element is hard due to excess...

Страница 9: ...si qu une protection pour la tête et les oreilles lorsque vous utilisez ce produit Explique la position de l étrangleur La marque supérieure indique que l étrangleur est fermé et la marque inférieure qu il est complètement ouvert Maintenez les enfants spectateurs et aides à plus de 15 m de l appareil Si quelqu un s approche de vous coupez immédiatemment le moteur AVERTISSEMENT DANGER Ne pas touche...

Страница 10: ...t 2 Levier de commande des gaz 3 Poignée de lanceur 4 Réservoir de carburant 5 Carburateur 6 Filtre à air 7 Poignée 8 Oeillet d accrochage 9 Interrupteur marche arrêt 10 Tuyau droit 11 Tuyau de tête du ventilateur 12 Couvercle antipoussière 13 Bougie d allumage 14 Bouton étangleur 15 Poire d amorçage 16 Levier du réglage de vitesse 17 Clé à douille multiple 18 Mode d emploi 17 18 6 2 13 10 8 14 15...

Страница 11: ...proximité du carburant ou de la machine ni lorsque vous utilisez la machine Essuyez soigneusement toutes les traces de carburant avant de mettre le moteur en marche Pour démarrer la tronçonneuse écartez vous d au moins 3 mètres de l endroit où vous avez fait le plein Arrêtez le moteur avant de dévisser les bouchons des réservoirs de carburant ou d huile Rangez la machine et le carburant dans un en...

Страница 12: ...titude dB A Niveau de puissance sonore Lw mesuré dB A par ISO22868 Niveau de puissance sonore LwA dB A par 2000 14 EC Niveau de vibrations m s2 par ISO22867 Incertitude m s2 A huilé le système de filtre de mousse REMARQUE Les niveaux de bruit vibrations équivalents sont calculés comme total d énergie pondérée en fonction du temps pour les niveaux de bruit vibrations dans diverses conditions de tra...

Страница 13: ...échapper une surpression éventuelle Serrer le bouchon soigneusement aprés avoir rempli le réservoir de carburant Avant de redémarrer le moteur toujours s éloigner d au moins trois métres de l endroit ou vous avez fait le plein de carburant Ne fumez pas et ou évitez tout risque de flamme ou d étincelle lorsque vous manipulez le carburant ou faites l appoint du réservoir En cas de projection acciden...

Страница 14: ... filtre de l ensemble et rincer la cartouche dans de l eau chaude contenant un produit détersif Rincer soigneusement jusqu à ce que toutes traces de détergent aient été éliminées Presser la cartouche sans la tordre afin d éliminer l excès d eau et laisser celle ci sécher à l air libre REMARQUE Si le filtre a durci à cause des impuretés contenues dans le carburant il convient de le remplacer Bougie...

Страница 15: ...ferior indica totalmente abierto Haga que los niños sus ayudantes o cualquier otra persona se mantengan a una distancia de 15 m del aparato Si alguien se acerca a usted detenga el motor de inmediato ADVERTENCIA PELIGRO No se arríme al ventilador giratorio con la mano El tubo de vacío y la bolsa tienen que hallarse en su lugar para el vacío Hay que instalar seguramente la tapa contra el polvo para ...

Страница 16: ... se apliquen a su unidad 1 Tapón del de combustible 2 Acelerador 3 Manilla de arranque 4 Tanque de combustible 5 Carburador 6 Filtro de aire 7 Mango 8 Ojal de suspensión 9 Llave de ignición 10 Tubo recto 11 Tubo colector de ventilador 12 Cubierta contra polvo 13 Bujía de encendido 14 Botón estrangulador 15 Perilla cebadora 16 Palanca de velocidad 17 Llave combinada de cubo 18 Instrucciones de mane...

Страница 17: ...ión cuando maneje combustible dentro de un edificio Mezcle y cargue el combustible al aire libre en lugares donde no se produzcan chispas ni fuegos Utilice para el combustible un recipiente adecuado No fume ni deje fumar a otras personas en las cercanías del combustible o de la unidad de maquina mientras esta está en marcha Limpie los residuos de combustible antes de poner en marcha el motor Antes...

Страница 18: ...dumbre dB A Nivel de potencia de sonido Lw medido dB A por ISO22868 Nivel de potencia acústica LwA dB A por 2000 14 EC Nivel vibratorio m s2 por ISO22867 Incertidumbre m s2 Sistema engrasado de filtro de espuma Especificaciones NOTA Los niveles de ruido vibración equivalentes se calculan como la energía ponderada en tempo en varias condiciones de trabajo con la distribución de tiempo siguiente 1 7...

Страница 19: ...ara que escape la sobrepresión que pueda con tener Después de haber repostado apretar bien la tapa Antes de arrancar la unidad deberá alejarse por lo menos 3m 10 pies del áre ade carga de combustible No fume ni tampoco permita llamas ni chispas cerca cuando esté manejando o cargando combustible Lave siempre inmediatamente con jabón cualquier combustible vertido sobre la ropa Asegúrese de verifi ca...

Страница 20: ...intervalos regulares Reemplace los filtros que estén dañados Filtro de gasolina Fig 14 Vaciar todo el combustible del tanque de gasolina y sacar la línea de filtro de gasolina del tanque Sacar el elemento de filtro de la unidad de soporte y lavar el elemento en el agua caliente con detergente Lavar bien hasta que el detergente se haya eliminado completamente Exprimirlo sin torcer para quitar el ex...

Страница 21: ...4 15 16 17 18 19 20 21 22 23 24 25 26 27 28 33 34 35 29 36 30 31 32 37 38 41 42 39 40 52 53 54 56 57 64 65 66 67 68 69 70 71 72 50 51 55 12 1 2 3 4 5 6 7 8 9 10 11 58 59 60 61 62 63 73 74 75 76 77 78 79 80 81 82 81 80 83 ...

Страница 22: ...ECOIL STARTER 122 123 124 125 127 128 130 131 121 122 133 134 160 136 138 137 139 140 141 142 143 145 146 147 155 150 153 154 152 156 159 162 161 183 184 186 187 189 185 182 191 188 190 501 157 126 149 151 181 132 135 129 158 164 163 144 148 192 ...

Страница 23: ...MEMO ...

Страница 24: ...e d exécution de ce genre de travail Pour réduire l exposition à ces produits chimiques travailler dans un lieu bien ventilé et porter un équipement de protection agréé par exemple un masque anti poussière spécialement conçu pour filter les particules microscopiques ADVERTENCIA Algunos polvos creados por el lijado mecánico el aserrado el esmerilado el taladrado y otras actividades de construcción ...

Отзывы: