background image

 Page 1

GET THE MOST OUT OF YOUR TV

For easy-to-follow instructions and beneficial information to help you maximize the features of your 

TV, access the online 

User Manual

 at 

www.hisense-usa.com/support

.

To access the user manual, you will need to enter your model number (located on the side and back 

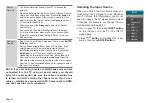
of the TV). You can also find the model number on the outside of the box.

From the 

Support

 page, you can also:

  Access Frequently Asked Questions
  Download the latest software for your product and
  Order Accessories

To speak to a representative in our Electronics Consumer Care Center, call 1-888-935-8880 Monday 

through Friday from 8 A.M. to 8 P.M. EST and Saturday through Sunday from 9 A.M. to 6 P.M. EST.
You can also send an email to [email protected].

This Quick Start Guide is intended as a general description of setting up and connecting your TV. Images throughout this Quick 

Start Guide are for illustrative purposes only and may differ from the actual product.

Содержание 75H9

Страница 1: ...Quick Start Guide Help Hisense improve the environment by reducing paper waste For detailed instructions and feature descriptions access the full User Manual online at www hisense usa com support H9 Series TV 75H9 ...

Страница 2: ...upport page you can also Access Frequently Asked Questions Download the latest software for your product and Order Accessories To speak to a representative in our Electronics Consumer Care Center call 1 888 935 8880 Monday through Friday from 8 A M to 8 P M EST and Saturday through Sunday from 9 A M to 6 P M EST You can also send an email to Service hisense usa com This Quick Start Guide is intend...

Страница 3: ...d will not impact the Warranty or level of service that we provide PACKAGE CONTENTS Your package in which you purchased this TV contains the following items TV Quick Start Guide this document Remote Control Important Safety Information and Warranty Card 2 AAA batteries IMPORTANT Look inside the styrofoam within the upper and bottom parts of the box to make sure that you have removed all items that...

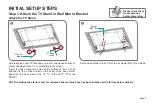
Страница 4: ...d into holes at the bottom of the TV Pay attention to the words written on the bezel of the base stand based on the back view of the TV L is the LEFT R is the RIGHT Fix the base stand to the TV with the 4 screws M5 12 provided Please check foam for accessories before discarding R base stand L base stand 1 2 Screw M5 12 NOTE Installing the stand is only for reference the machine base has been insta...

Страница 5: ...to use fixing screws not provided that are 9 10 mm in length when measured from the attaching surface of the mounting hook Wall mount hole pattern VESA mm 1000 400 Wall mount screw size mm M8 Follow instructions provided with the Wall Mount bracket contact a professional installer or service technician for assistance Hisense is not responsible for any damages or injuries that occur due to mishandl...

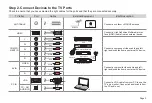
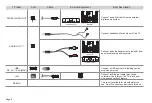
Страница 6: ...llite Receiver Satellite antenna cable VCR Video Camera Connect a High Definition Multimedia Inter face HDMI cable from an external device COMPO NENT IN Y Green Connect a component video cable and left right audio cables from an external AV device PB Blue PR Red L White R Red AV IN VIDEO Yellow Connect a composite video cable and left right audio cables from an external AV device L White R Red PC ...

Страница 7: ...ut of the TV Speaker Audio Amplifier Connect an audio adapter not provided from an external analog audio system USB DC 5V 0 5A MAX Connect a USB device for browsing photos music and movies LAN LAN Connect an Ethernet cable to access a network or the Internet The TV also has a wireless connectivity feature DEBUG This is only available for manufacturers to use Do not connect any devices to this port...

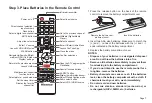
Страница 8: ...ly Do not mix old and new batteries Do not mix alkaline standard carbon zinc or rechargeable NiCd NiMH etc batteries Insert the batteries Remove the battery com partment cover Infrared transmitter Power on off Direct channel selection input numbers Media content control function buttons Dash button Select a digital sub channel Navigate Up Down Left Right or adjust OSD On Screen Display settings Ad...

Страница 9: ...f Hisense codes for the most common Cable and Satellite providers are listed below Use the Hisense code that is associated with your Cable or Satellite provider if applicable DIRECTV 0178 or 10019 Time Warner Cable 386 or 0178 Comcast 0178 or 10178 Cox Communications 0178 Dish Network 627 or 505 If the Hisense code associated with your Cable or Satellite provider is not listed does not work or you...

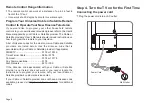
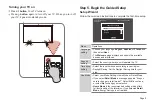
Страница 10: ...s Country setting Select the country where you will operate the TV Time zone setting Select the local time zone according to your region Daylight Saving Set the Daylight Saving time for your area Use Mode Select your Mode Setting Home Mode or Retail Mode If you select Retail Mode a message appears Are you sure to change to retail mode Select OK to continue or select No to change your selection Hom...

Страница 11: ...epending on the reception condition it may take up to 30 minutes or more to complete memorizing channels Please allow the process to complete without interruption After the TV has completed scanning for channels select Go to exit the wizard NOTE If you are using a cable or satellite box and you have connected it to the TV using a coaxial cable you should select the cable option Be sure the cable o...

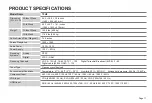
Страница 12: ...Hz Receiving systems Analog NTSC Digital ATSC QAM Receiving Channels VHF 2 13 UHF 14 69 CATV 1 125 Digital Terrestrial Broadcast 8VSB 2 69 Digital cable 64 256 QAM 1 135 Tuner Type Frequency synthesized Environmental Conditions Temperature 41 F 95 F 5 C 35 C Humidity 20 80 RH Atmospheric pressure 86 kPa 106 kPa Component Input 480 I 60 Hz 480 P 60 Hz 720 P 60 Hz 1080 I 60 Hz 1080 P 60 Hz VGA Input...

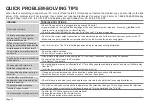
Страница 13: ...setting information The picture is normal but there is no sound Check the volume settings Check if Mute mode is set to On Sound but no picture or black and white picture If the picture is black and white unplug the TV from the AC outlet and replug it after 60 seconds Check that the Color is set to 50 or higher Try different TV channels The sound and or picture is distorted or appears wavy An elect...

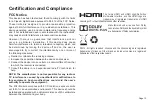
Страница 14: ... device and receiver Connect the device into an outlet on a circuit different from that to which the receiver is connected Consult the dealer or an experienced radio TV technician for help NOTE The manufacturer is not responsible for any radio or TV interference caused by unauthorized modifications to this equipment Such modifications could void the user s authority to operate the equipment The Wi...

Отзывы: