background image

Drawings 

© Hirschmann Rev. I 05/22/17 

190154_I.DOC 

43 

15.5.4 

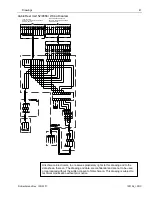
Luffer Extension Wiring Diagram 

BOOM TIP CONNECTION

TO LWG520/0002

REFER TO CABLE REEL 

(LWG520/0002) WIRING DIAGRAM


Содержание PAT IFLEX5

Страница 1: ...www hirschmann com HIRSCHMANN P N 031 300 190 154 REV I 05 22 2017 LOAD MOMENT INDICATOR iFLEX5 SERVICE MANUAL ...

Страница 2: ......

Страница 3: ... reproduced or translated to another language without the prior written consent of Hirschmann Hirschmann reserves proprietary rights to all drawings photos and the data contained therein The drawings photos and data are confidential and cannot be used or reproduced without the written consent of Hirschmann The drawings and or photos are subject to technical modification without prior notice All in...

Страница 4: ...VE AN A2B PROBLEM 4 4 8 I HAVE A CAN BUS PROBLEM 4 4 9 I NEED TO IDENTIFY A SPARE PART 4 4 10 I HAVE NOTICED WATER IN SOME PART OF THE SYSTEM 4 5 Angle Sensing 5 5 1 ANGLE SENSING ERROR FLOW CHART 6 6 Length Sensing 8 6 1 LENGTH SENSING ERROR FLOW CHART 9 7 Pressure Sensing 11 7 1 PRESSURE SENSING ERROR FLOW CHART 11 8 Slewing Sensing 12 8 1 SLEW SENSING ERROR FLOW CHART 13 9 Load sensing 14 9 1 L...

Страница 5: ...ART NO 021 020 060 003 44 16 2 GRAPHIC CONSOLE ASSY VERTICAL PART NO 050 350 061 356 45 16 3 GRAPHIC CONSOLE ASSY PART NO 050 350 061 376 46 16 4 CABLE REEL LWG508 PART NO 068 508 060 001 47 16 5 CABLE REEL LWG521 PART NO 068 521 060 002 49 16 6 CABLE REEL LWG152 PART NO 067 152 060 056 50 16 7 PRESSURE TRANSDUCER BLOCK DAV314 0014 PART NO 044 314 060 014 51 16 8 CABLE ASSEMBLY 11M PART NO 031 010...

Страница 6: ......

Страница 7: ...g procedures The responsibility for the safe crane operation shall remain with the crane operator who shall ensure that all warnings and instructions supplied are fully understood and observed Prior to operating the crane the operator must carefully and thoroughly read and understand the information in this manual to ensure that he knows the operation and limitations of indicator and crane Proper ...

Страница 8: ...e which also serves as an electrical conductor for the anti two block switches The crane load is measured by pressure transducer block attached to the piston and rod side of the hoist cylinders The interactive user guidance considerably simplifies the input of operating modes as well as the setting of geometry limit values 3 2 DESCRIPTION OF A CAN BUS SYSTEM CAN stands for Controller Area Network ...

Страница 9: ...here applicable To check the cable for damage short circuit to ground there is a 4 7k resistor between ground and the contact of the switch to give a signal back to the central unit The weight at the anti two block switch keeps the switch closed until the load block strikes it Console The graphic console displays all geometrical information such as length and angle of main boom working radius and ...

Страница 10: ...nsor 4 5 THE DISPLAYED LOAD DOES NOT MATCH THE ACTUAL LOAD Please note that the indicated load is calculated by the system from the geometry information in the computer the operator s selections and all the sensor inputs If the load display is off it can therefore be due to an error in any or several of these inputs Refer to section Load sensing to narrow down the source of your problem 4 6 THE CO...

Страница 11: ...the section Troubleshooting A Sensor Problem Using The Display to call up the sensor signal on your console display The CAN Bus is digital and as such will either transmit the signal correctly or not at all If your readings are off you have to determine what is causing the problem reference the following flow charts CAN Bus electronics in cable reel The angle sensor has a potentiometer built in th...

Страница 12: ...nd CAN Bus converter board left Verify that the sensor is being supplied with 5V by measuring between pin 5 GND and Pin 1 of terminal X21 Is the voltage between the range of 4 75 to 5 25V Replace converter board If unplugging the angle sensor made the voltage return to the acceptable range replace the angle sensor Follow procedure for angle sensor installation and calibration compare YES YES NO NO...

Страница 13: ...ctual angle replace the angle sensor YES Ensure correct software has been installed and crane operator is not in error NO Verify the voltage by measuring Between Pin 5 GND and Pin3 signal of terminal X21 Angle Sensor Signal On Pin 3 Angle Voltage 90 1 875 75 2 083 60 2 292 45 2 500 30 2 708 15 2 917 0 3 125 Note Actual voltages will vary slightly Note If you need to determine the angle for voltage...

Страница 14: ...leshooting A Sensor Problem Using The Display to call up the sensor signal on your console display The CAN Bus is digital and as such will either transmit the signal correctly or not at all If your readings are off you have to determine what is causing the problem reference the following flow charts CAN Bus electronics in cable reel The length sensor has a potentiometer built in that is driven by ...

Страница 15: ...verter board left Does the indicated length vary significantly from the actual length more than 0 3 feet Replace length sensor Proceed to next length sensing flow chart NO YES Ensure the cable reel has 5 8 turns of preloading on the reel Fully retract the boom and turn the screw of the length potentiometer with a small screwdriver counter clockwise to a soft stop bringing the sensor voltage to 0V ...

Страница 16: ... 0 0 00 0 16 1 0 46 0 62 2 0 93 1 09 3 1 40 1 56 4 1 87 2 03 5 2 34 2 50 6 2 81 2 97 7 3 28 3 44 8 3 75 3 91 9 4 22 4 38 10 4 68 4 84 Note Actual voltages will vary slightly For the boom control system the length sensors are the same as described above with the exception of cable reel internals location of hardware wiring and gear wheels Refer to the LWG520 and LG152 spare part list for these diff...

Страница 17: ...essure transducer block BOTH transducer channels need to be zeroed see procedure Zero Setting The Transducer Inputs iFLEX5 CU Pressure Transducer 2 Pressure Measuring Cells CAN Bus Converter Pressure Sensing Error First verify the pressure displayed through the console by using the sensor output screen Press the info button twice Pressure transducers are functioning correctly Does the displayed va...

Страница 18: ...ressing i info twice to show all sensor inputs The table to the right show measured millivolt reading for the slew potentiotmeter 0 500 1000 1500 2000 2500 3000 3500 4000 0 45 90 135 180 225 270 315 360 SLEW ANGLE MILLIVOLTS Potentiometer 1 Potentiometer 2 0 45 90 135 180 135 90 45 0 ANGLE deg SL ANG 1 mv SL ANG 2 mv 0 717 2161 30 3 1174 2645 60 1680 3150 89 9 2158 3595 120 1 2641 3141 150 1 3144 ...

Страница 19: ...Slew potentiometer is functioning correctly Does the displayed value differ from the actual value The slew unit output can be found on pins 8 and 9 In order to measure current however you must disconnect a pin and measure in line between the cable from the slew unit and the central unit The two outputs will vary as shown in chart below NO YES Ensure that the slew pot unit is supplied with crane vo...

Страница 20: ...ng Rigging parts such as Hookblock weight Sling weights etc Tip height length of load line used Boom weights Boom attachments such as Stowed jibs Auxiliary boom nose etc 9 1 LOAD SENSING ERROR FLOW CHART Correct whichever value differs Load Sensing Error Verify operator s settings are correct Verify angle length and pressure readings Press the info button twice Do the displayed values differ from ...

Страница 21: ...ard Are fuses in line NO Replace fuse YES Check for power on connector X6 of the connection board Pin 1 is Ub 12V and Pin 2 is GND Is power being supplied NO YES Follow power from this connector to the console computer board connector X1 Pin 1 is Ub 12V and Pin 2 is GND Is power being supplied NO Connecting cable is loose or defective YES If voltage is present on all pins and connector are in plac...

Страница 22: ...Remove wires and measure the A2B signal in the cable reel between terminal 7 and 8 with an ohmmeter Switch closed 4700 500 Ohms Switch open 1 Megaohm YES Are the ohmmeter readings correct YES Plug the bypass plug into the boom nose box and refer to system wiring to check wire connections in boom nose box NO Check for damaged length cable and wiring If broken length cable refer to system wiring Are...

Страница 23: ...f the CU does not see any CAN Bus component it will report an E61 If it sees only the cable reel it will report an E62 pressure transducer missing If it sees only the pressure transducer it will report an E64 cable reel missing E63 means that the pressure transducer is available but is reporting an internal error E65 means that the cable reel unit is available but is reporting an internal error So...

Страница 24: ...f an E64 remains use the Ohm meter to check the connector in the cable reel Either the connector has failed or the can bus converter boards must be replaced 12 1 1 E61 Flow Chart E61 Connect the two cables on the Transducer block together E61 Yes Disconnect cables and connect cable from c u to transducer block E61 Yes No Ohm cable from c u to the transducer block If cable checks good replace c u C...

Страница 25: ...eplace the pressure transducer 12 4 E64 In case of an E64 the CU is reporting no signal from the cable reel unit Start by connecting the two cables on the transducer block together If an E62 occurs the transducer block must be replaced If an E61 occurs measure the cable from the transducer block to the cable reel with an Ohm meter Check all pins of the CAN bus cable for continuity and cross check ...

Страница 26: ...entiometer or A2B wiring Go to those chapters Angle Sensing Length Sensing A2B PROBLEM to continue trouble shooting E64 Connect the two cables on the Transducer block together E61 Yes Ohm cable from the transducer block to cable reel Cable checks good No Yes Replace cable Check connector at cable reel Connector checks good No Yes Replace connector Replace can bus board in cable reel E62 Replace tr...

Страница 27: ... button once 10 To EXIT the sensor output screen press the INFO button once from the software version screen to return to the operating screen 10 The screen will show all sensor inputs as in the example below For each sensor an equivalent voltage is shown in millivolts along with the physical sensor value that that voltage refers to Pressure sensors are shown with physical values of bar angle sens...

Страница 28: ...le sensor 4500mV at 0 2500mV at 45 or 500mV at 90 Please refer to table below for more values Voltage Values displayed mV 10mV Value displayed Value Pressure Transducers 300 bar type 314 PSI Bar 500 0 0 1500 1088 75 2500 2176 150 3500 3263 225 4500 4351 300 Angle Sensor degrees 500 90 boom vertical 1500 67 5 2500 45 3500 22 5 4500 0 boom horizontal Length Sensor feet 500 0 fully retracted 1500 250...

Страница 29: ... more powerful diagnostic tool During initialization after reset the LED shows some of the initialization steps so if the reset procedure hangs it is easier to find out where The cycle is RESET red small red for approx 5 us Wait for RAM green for approx 200 ms Clear RAM yellow for approx 1 s CRC Check System program light yellow 2 5 s Init RS232 RS485 yellow 1 s Start RTOS green 0 5 s After start ...

Страница 30: ... section Cable reel to measure inner mid length located on boom base section Proximity switch to sense inner mid fully retracted located on boom base section Proximity switch to sense center mid fully retracted located on boom inner mid section Auto Manual switch located on the right hand arm rest in the cab Section selector switch located on the right hand arm rest in the cab Boom out of sequence...

Страница 31: ...end from fully retracted the BCS realizes DI 19 1 extend pressure switch on and simultaneously activates DO 2 9 IM extend and DO 3 PWM 2 IM proportional solenoid DO 9 energizes a relay in the BCS relay junction box assy to direct DO 3 to the IM pilot operated 4 way directional control extend proportional solenoid Figure 1 illustrates how DO 3 is directed to the solenoid valve DO 3 is a PWM output ...

Страница 32: ...er Mid Retracted boom proximity switch 55 R90 8 Luffing Extension Raise cab switch 56 R91 9 Luffing Extension Lower cab switch 57 R92 10 Luffing Extension Raise remote switch on ext 58 R93 11 Luffing Extension Lower remote switch on ext 59 R94 16 A Mode cab switch 64 R100 17 Auto Mode cab switch 65 R101 18 Boom Retract pressure switch 66 R102 19 Boom Extend pressure switch 67 R103 Mode B Extend Se...

Страница 33: ...Coil in Junction Box 7 7 PWM 4 Luffing Extension Proportional Solenoid 8 8 IM Extend Relay K2 Coil in Junction Box 9 9 Luffing Extension Raise Solenoid 14 10 External LMI Alarm Option on Boom 15 11 Luffing Extension Lower Solenoid 16 12 Rear Axle Oscillate Signal 17 13 Tele Rod Drain Solenoid 18 14 Boom Out of Sequence Lamp 19 15 Tele Two Stage Relief Solenoid 20 C U Central Unit MP Measuring Poin...

Страница 34: ...e Hex Bin Hex Bin NoLoad Basis 0 1 NORMAL 00 00000000 05 00000101 0000 1 Basis 1 2 NORMAL 00 00000000 82 10000010 0011 0 Basis 2 3 NORMAL 98 10011000 00 Erw 0 4 NORMAL 00 00000000 00 00000000 1111 1 Erw 1 5 NORMAL 00 00000000 00 00000000 1111 1 Erw 2 6 NORMAL 00 00000000 00 00000000 1111 1 Baugruppencodierung Basis 0F 00001111 Baugruppencodierung Erweiterung FF 11111111 Hubendschalter UNTB OFFEN O...

Страница 35: ...stor C U 70 pass connector pins X2 14 5 IFLEX5 BCS ANALOG INPUTS AND PWM OUTPUTS Another useful tool to monitor analog inputs and PWM outputs is utilizing the iTOOL5 or iFLASH terminal function At the flashing command prompt press and hold Ctrl and A to enter the RTOS an asterisk will display Type adctest and press Enter The result should be the screen shown below ...

Страница 36: ...5 2 ok 000D 0000 0 0 I_Kanal 7 0 000 mA 5 3 ok 000D 0000 0 0 I_Kanal 8 0 000 mA 5 4 ok 000D 0098 152 152 I_PWM 1 0 mA 5 5 ok 000D 0014 20 20 I_PWM 2 10 mA 5 6 ok 000D 0000 0 0 I_PWM 3 0 mA 5 7 ok 000D 0000 0 0 I_PWM 4 0 mA OPERATINGMODE X Exit Blank Redraw S Slow F Fast P PWM Settings T Test mode O Operating mode C ADC Clock set E Extension module T E S T D E R A N A L O G E I N G A E N G E Kanal ...

Страница 37: ...ltaneously To return to the normal screen push button F1 or F4 Status No Description 1 11 Mode B extend 29 Error Mode B extend 31 41 Mode B retract 59 Error Mode B retract 61 67 Mode A extend 79 Error Mode A extend 81 85 Mode A retract 99 Error Mode A retract 100 Manual Mode A neutral or extend 101 Manual Mode B neutral or extend 102 108 Manual Mode retract at overload A2B error condition 110 Mode...

Страница 38: ...nk The Boom Control System energizes this valve at all times unless the boom is fully retracted or the retract pressure switch is activated See the logic chart below Digital Output 13 is on unless Tele Rod Drain Solenoid IM retract sw CM retract sw Retract pressure sw DO13 DI 7 DI 6 DI 18 0 1 1 0 1 14 9 TELE TWO STAGE RELIEF VALVE The two stage tele relief valve is a normally closed valve that whe...

Страница 39: ...ing extension The first is two switches located in the left hand armrest One switch is a luffing system ON OFF switch The other is a RAISE LOWER switch This switch has momentary positions on either side and a return to center position It raises or lowers the extension by controlling the raise and lower solenoids on the four way three position directional valve This switch also sends an actuation s...

Страница 40: ... Rev I 0522 17 190154_I DOC 34 15 DRAWINGS 15 1 COMPONENTS OF THE LMI SYSTEM PAT IFLEX5 1 Central Micro Processor Unit 2 Operating Console 3 Pressure Transducers 4 Length Angle Sensor 5 Anti Two Block Switch es POWER LOCKOUT OTHER PAT ...

Страница 41: ...data are confidential and are not to be used or reproduced without the written consent of Hirschmann This drawing is subject to technical modification without prior notice CAN BUS RS 485 Serial Interface Current 4 20mA CAN connector iflex5 Central Unit Dual Pressure Graphic Console Length Angle Sensor A2B Switch Slew Sensor 70 pin Connector Crane Power CAN connector CAN connector Lockout ...

Страница 42: ...it to Crane and Console Wiring Diagram Hirschmann Electronics Inc reserves proprietary rights to this drawing and to the data shown there on The drawing and data are confidential and are not to be used or reproduced without the written consent of Hirschmann This drawing is subject to technical modification without prior notice ...

Страница 43: ...Diagram Hirschmann Electronics Inc reserves proprietary rights to this drawing and to the data shown there on The drawing and data are confidential and are not to be used or reproduced without the written consent of Hirschmann This drawing is subject to technical modification without prior notice ...

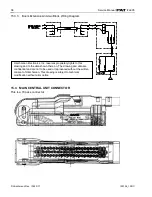
Страница 44: ... UNIT CONNECTOR This is a 70 pass connector Hirschmann Electronics Inc reserves proprietary rights to this drawing and to the data shown there on The drawing and data are confidential and are not to be used or reproduced without the written consent of Hirschmann This drawing is subject to technical modification without prior notice ...

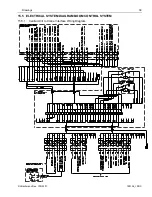
Страница 45: ...Drawings Hirschmann Rev I 05 22 17 190154_I DOC 39 15 5 ELECTRICAL SYSTEM DIAGRAM BOOM CONTROL SYSTEM 15 5 1 Central Unit to Crane Interface Wiring Diagram ...

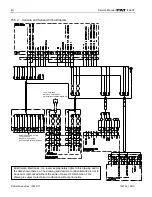
Страница 46: ...56 WIRING DIAGRAM TO LWG520 0002 REFER TO CABLE REEL LWG520 0002 WIRING DIAGRAM Hirschmann Electronics Inc reserves proprietary rights to this drawing and to the data shown there on The drawing and data are confidential and are not to be used or reproduced without the written consent of Hirschmann This drawing is subject to technical modification without prior notice ...

Страница 47: ...M TO LWG520 0002 REFER TO CABLE REEL LWG520 0002 WIRING DIAGRAM Hirschmann Electronics Inc reserves proprietary rights to this drawing and to the data shown there on The drawing and data are confidential and are not to be used or reproduced without the written consent of Hirschmann This drawing is subject to technical modification without prior notice ...

Страница 48: ...54_I DOC 42 15 5 3 Cable Reel LWG520 0002 Wiring Diagram LUFFING JIB CONNECTION REFER TO LUFFING EXTENSION WIRING DIAGRAM TO LG152 0056 REFER TO CABLE REEL LG152 0056 WIRING DIAGRAM TO PRESSURE TRANSDUCER BLOCK REFER TO CONSOLE AND SENSOR WIRING DIAGRAM ...

Страница 49: ...Drawings Hirschmann Rev I 05 22 17 190154_I DOC 43 15 5 4 Luffer Extension Wiring Diagram BOOM TIP CONNECTION TO LWG520 0002 REFER TO CABLE REEL LWG520 0002 WIRING DIAGRAM ...

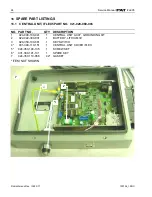
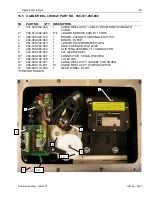
Страница 50: ...021 020 060 003 NO PART NO QTY DESCRIPTION 1 024 000 100 041 1 CENTRAL UNIT ACCY GROUNDING KIT 2 022 022 300 031 1 BATTERY LITHIUM 3V 3 024 350 100 661 1 KEY SWITCH 4 031 300 110 151 1 CENTRAL UNIT COVER iFLEX 5 024 350 100 135 1 SCREW SET 6 031 300 101 131 1 SPARE KEY 7 024 350 110 066 42 GASKET ITEM NOT SHOWN 1 2 3 7 ...

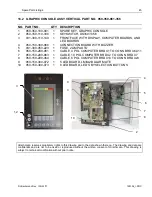
Страница 51: ...150 290 061 1 CABLE 4 POL COMPUTER BRD X1 TO CONN BRD X6 X11 7 050 150 290 063 1 CABLE 10 POL COMPUTER BRD X2 TO CONN BRD X7 8 050 150 290 064 1 CABLE 6 POL COMPUTER BRD X10 TO CONN BRD X23 9 050 150 300 072 1 5 LED BOARD LMI A2B ALARM LITE 10 050 150 300 073 1 8 LED BOARD LED S BY SELECTION BUTTONS Hirschmann reserves proprietary rights to this drawing and to the data shown there on The drawing a...

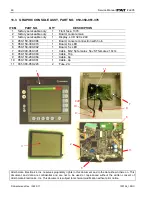
Страница 52: ...rd 6 x LED 6 050 150 300 092 1 Board 5 x LED 7 092 000 060 391 1 Cable M12 5p female x 5p JST female x 10cm 8 050 150 290 063 1 Cable 10p 9 050 150 290 064 1 Cable 6p 10 050 150 290 061 1 Cable 4p 11 031 300 050 223 2 Fuse 2A Hirschmann Electronics Inc reserves proprietary rights to this document and to the data shown there on This document and data are confidential and are not to be used or repro...

Страница 53: ...NGTH AND ANGLE OUTPUT 4 067 000 300 012 1 LENGTH POTENTIOMETER LWG508 5 064 143 060 009 1 ANGLE SENSOR WG143 09 6 068 000 110 107 1 SLIP RING ASSEMBLY 2 CONDUCTOR 7 006 800 005 001 1 25T GEAR WHEEL 8 068 000 110 038 1 75T GEAR WHEEL 9 092 000 060 387 1 CONNECTOR 5 POLE W WIRES 10 068 000 100 196 1 LID BLACK 11 068 000 110 003 1 CABLE REEL ACCY GASKET FOR COVER 12 068 000 110 031 10 CABLE REEL ACCY...

Страница 54: ...n reserves proprietary rights to this drawing and to the data shown there on The drawing and data are confidential and are not to be used or reproduced without the written consent of Hirschmann This drawing is subject to technical modification without prior notice 3 4 5 6 8 ...

Страница 55: ...GTH AND ANGLE OUTPUT 4 068 000 300 063 1 BOARD FILTER 5 067 000 300 013 1 LENGTH POTENTIOMETER LWG 6 064 143 060 009 1 ANGLE SENSOR WG143 09 7 068 000 060 072 1 SLIP RING ASSEMBLY 11 CONDUCTOR 8 006 800 005 002 1 24T GEAR WHEEL 10 092 000 060 387 1 CONNECTOR 5 POLE W WIRES 11 068 000 100 196 1 LID BLACK 12 002 090 100 031 1 CABLE REEL ACCY GASKET FOR COVER 13 068 000 110 031 10 CABLE REEL ACCY SCR...

Страница 56: ... 300 063 1 BOARD FILTER 5 067 000 300 012 1 LENGTH POTENTIOMETER LWG 6 068 000 100 066 1 SLIP RING ASSEMBLY 4 CONDUCTOR 7 067 000 050 075 1 55T GEAR WHEEL ON POTENTIOMETER 8 068 000 050 083 1 45T GEAR WHEEL ON CENTER SHAFT 9 000 268 030 003 4 HARDWARE STANDOFF 6MM X 117MM MM 10 067 000 110 020 1 HARDWARE GASKET 11 067 000 050 059 1 SENSOR ACCY COVER KT152 12 067 000 110 025 1 SENSOR ACCY NUTS 4 WA...

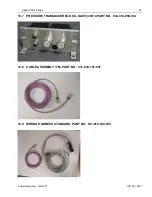
Страница 57: ...tings Hirschmann Rev I 05 22 17 190154_I DOC 51 16 7 PRESSURE TRANSDUCER BLOCK DAV314 0014 PART NO 044 314 060 014 16 8 CABLE ASSEMBLY 11M PART NO 031 010 101 007 16 9 WIRING HARNESS STANDARD PART NO 031 010 100 549 ...

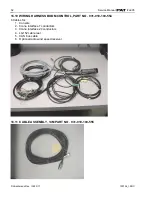
Страница 58: ...16 10 WIRING HARNESS BOOM CONTROL PART NO 031 010 100 554 6 Cables for 1 Console 2 Crane interface 7 conductors 3 Crane interface 24 conductors 4 LG152 cable reel 5 CAN bus cable 6 Optional radio wind speed receiver 16 11 CABLE ASSEMBLY 14M PART NO 031 010 100 555 ...

Страница 59: ...hmann Rev I 05 22 17 190154_I DOC 53 16 12 TRS05 REPEATER RADIO WINDSPEED KIT 031 300 104 087 031 300 060 596 TRS 05 REPEATER 031 300 050 688 ANTENNA 918 MHz RCL 90 031 300 060 601 CABLE ASSY 15 2 COND SS 20AWG W 12 SKT DEUTSCH ...

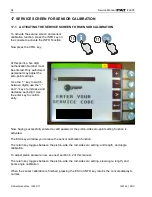
Страница 60: ...ween digits use the and keys to increase and decrease each digit Use the enter key to confirm entry Now having successfully entered a valid password the piston side zero point setting function is activated The ESC key will allow you to leave the sensor calibration function The return key toggles between the piston side the rod side zero setting and length and angle calibration To adjust piston pre...

Страница 61: ...y pressing the minus key the input value is adjusted downwards When the plus and minus keys are pressed simultaneously the zero setting occurs automatically Manual adjustments may be preformed using or 17 3 ZERO SETTING THE SLEWING INPUTS Now having successfully entered a valid password the piston side zero point setting function is activated Press enter through the piston and rod zero adjustment ...

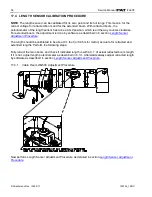
Страница 62: ...are as described in 6 section Length Sensor Adjustment Procedure The length should be calibrated to be about 0 1 feet or 0 05m for metric accurate for retracted and extended lengths Perform the following steps Fully retract the main boom and check if indicated length is within 0 1 of actual retracted boom length If it is not adjust length potentiometer as described in 6 3 1 Afterwards always adjus...

Страница 63: ...en will change now and show the picture to the right Fully retract the main boom and verify the indicated boom length matches the retracted boom length of your crane If incorrect make sure you have adjusted the length pot in cable reel see section Cable Reel LWG508 Adjustment Procedure Now press the OK button to calibrate retracted length The indication will change to show your correct retracted b...

Страница 64: ...lief and push it through the axle of the reeling drum Tighten new strain relief to ensure sealing 8 Reconnect the length cable to the slip ring 9 Remount cable reel to the boom 10 Turn reeling drum clockwise to spool the new cable neatly onto the drum 11 Set pre load on cable reel by turning the drum counter clockwise 5 to 8 turns 12 Run the new length cable through the cable guides and wrap the l...

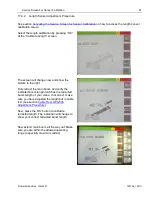
Страница 65: ... 59 17 5 ANGLE SENSOR CALIBRATION PROCEDURE Material required calibrated inclinometer See section Activating the Service Screen for Sensor Calibration on how to access the angle sensor calibration screen Select the angle calibration by pressing OK at the calibrate angle screen ...

Страница 66: ...calibration range compare the measured angle to the displayed angle If the indicated angle is within 0 1 degrees of the measured angle confirm with OK Otherwise select SET to adjust the angle Once you push SET the screen is going to change to the angle adjustment screen Use the and buttons to adjust the indicated angle to match the measured angle When the display shows the correct angle press OK R...

Страница 67: ...potentiometer the super structure must be positioned so the boom is in the zero degree position over the front and the house lock pin engaged Using graphic console for zero setting of slew pot potentiometer Press return until the slew adjustment screen is displayed The display shows a scale from 10 to 10 degree a horizontal mark shows the current position of the slew pot wiper By pressing the and ...

Страница 68: ...slewing zone with load is not permitted Slew to permitted area E04 Operating mode not acknowledged or non permitted slewing zone A non existing operating mode has been selected Set the correct operating mode for the operating state in question The boom is in a non permitted slewing zone Slew the boom to a permitted area E05 Prohibited length range Boom has been extended either too far or not far e...

Страница 69: ...hannel length main boom Length potentiometer is defective Replace length potentiometer Electronic component in the measuring channel is defective Replace sensor unit E12 Fallen below the lower limit value in the measuring channel pressure piston side Pressure transducer is defective Replace pressure transducer Electronic component in the measuring channel is defective Replace sensor unit E13 Falle...

Страница 70: ...ont outrigger overloaded E1A Fallen below lower limit value in measuring channel slewing angle 1 Cable between the central unit and the slewing angle sensor defective or loose Water inside the plug of the angle sensor Check cable as well as plugs replace if need be Slewing angle potentiometer is defective Replace slewing angle sensor Electronic component in the measuring channel defective Replace ...

Страница 71: ... limit value in measuring channel main boom angle has been exceeded refer to E15 refer to E15 E26 Upper limit value in measuring channel angle 2 has been exceeded refer to E16 refer to E16 E27 Upper limit value in measuring channel length telescope I II has been exceeded refer to E17 refer to E17 E2A Upper limit value in measuring channel slewing angle 1 has been exceeded refer to E1A refer to E1A...

Страница 72: ...ry RAM Write read memory RAM or central unit defective Replace central unit E47 Error in the monitored write read memory The CRC verification of the monitored write read memory provides an incoherent result The CRC sign of the monitored write read memory is wrong The buffer battery is decharged 2V at 1kOhm Central unit defective Restart the LMI Replace buffer battery on the central unit Replace ce...

Страница 73: ...rror in the can bus data transfer of the pressure transducer sensor unit Cable between the central unit and the sensor unit defective Check the cable to the sensor unit Can bus port in the central unit defective Replace the central unit Can bus port in the sensor unit is defective Replace the sensor unit Sensor unit is defective Replace the sensor unit E63 Error in the can bus pressure transducer ...

Страница 74: ...l task The boom control task is not running Restart the system Load the boom control task E84 Wrong rigging condition The selected rigging condition is not contained in the crane data file Select another rigging condition Check the programming in the crane data file E85 Error in the radius determination The computed radius is too small negative deflection Check the programming in the crane data fi...

Страница 75: ...nsole electronics and central unit Transmitter receiver module is defective Check the connection between console electronics and central unit Exchange console electronics or LMI main board resp E93 Error in the data transmission from the central unit to the console refer to E92 refer to E92 E94 No data trans mission from the central unit to the console Interruption or accidental ground in the line...

Страница 76: ...t in the A2B switch circuit Short circuit in the A2B switch Short circuit in the cable to the A2B switch Replace A2B switch Replace cable to the A2B switch EAC A2B switch circuit disconnected Disconnected cable in the A2B switch Disconnected cable to the A2B switch Connect or replace cable in the A2B switch Connect or replace cable to the A2B switch EAD No valid A2B switch status Sensor wrong func...

Страница 77: ... watchdog activated datalogger processing time limit exceeded Reset system Connect PC terminal and watch error messages EDD Battery empty Battery check detected a low voltage of the battery change battery after this setup of RTC Temporary Press horn quit button to work without datalogger EDE Record lost Not possible to save data because other task saves data at the same time Message disappears aft...

Страница 78: ...ough External Cabling It is possible to find out the source of water ingress by going through the following steps and ruling out one possibility after the other until the cause is identified 1 Spray Cleaning The enclosures used for the PAT LMI system are water protected to IP 65 This means protection against the environment such as rain However through the use of spray cleaner at short distances i...

Страница 79: ...train relief water may still enter the box through the inside of the cable In this case you have to find out why and where water enters the cable Look for damages to the cable itself and inspect the opposite side of the cable In example if the cable comes from a connector that is full of water the water will run through the inside of the cable and fill up the central unit too 19 2 CONDENSATION In ...

Отзывы: