6.4 Replacing the Fuses
83
1
2
3
4
5
6
7
8
9
10
11
Ma
inte
na
nc
e
a
nd S
e
rv
ic
e
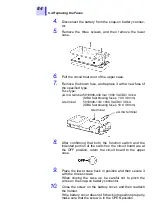
1.
Disconnect the test leads from the unit and set the
function switch to OFF.
2.
Detach the holster from the unit.
3.
Using a Philips screwdriver, turn the battery cover screw
to the OPEN position, slide the battery cover to the side,
then lift the battery cover and remove it from the unit.
6.4 Replacing the Fuses
• To avoid electric shock, turn off the power and dis-
connect the test leads before replacing the fuses.
After replacing the fuses, replace the cover and
screws before using the instrument.
• Replace the fuse only with one of the specified
characteristics and voltage and current ratings.
Using a non-specified fuse or shorting the fuse
holder may cause a life-threatening hazard.
Fuse type:
μ
A.mA terminal 5019906-440 mA/ 1000 VACDC/ 30 kA
(SIBA fast blowing fuse
φ
10 X 38 mm)
A terminal
5019906-11A/ 1000 VACDC/ 30 kA
(SIBA fast blowing fuse
φ
10 X 38 mm)
• In order to avoid electric shock and damage to the
unit, make sure that the position of the function
switch matches the display screen after turning on
the power for the first time after replacing the fuse.
It is dangerous to use this unit if the function
switch does not match the display, so be sure to
perform step 8 carefully.
OFF
(1)
(2)
Содержание 3801-50
Страница 1: ...3801 50 DIGITAL HiTESTER Instruction Manual...
Страница 2: ......
Страница 40: ...36 2 12 Pulse Output Function...
Страница 90: ...86 6 5 Checking the Instrument Software Version...
Страница 91: ......
Страница 92: ......


