


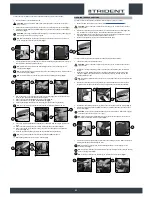


REPLACING THE SQUEEGEE BODY RUBBER BLADES
Ensuring the good condition of the squeegee body rubber blades guarantees better floor cleaning and
drying results, as well as a longer service life for the vacuum motor. To replace the squeegee body
rubber blades, proceed as follows:
1. Take the machine to the maintenance area.
2. Make sure the machine is in a safe condition (see “
MACHINE SAFETY MEASURES
”).
CAUTION
: these operations must be carried out using protective gloves to avoid any possible
contact with the edges or tips of metal objects.
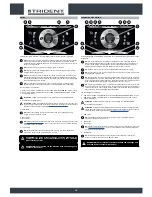
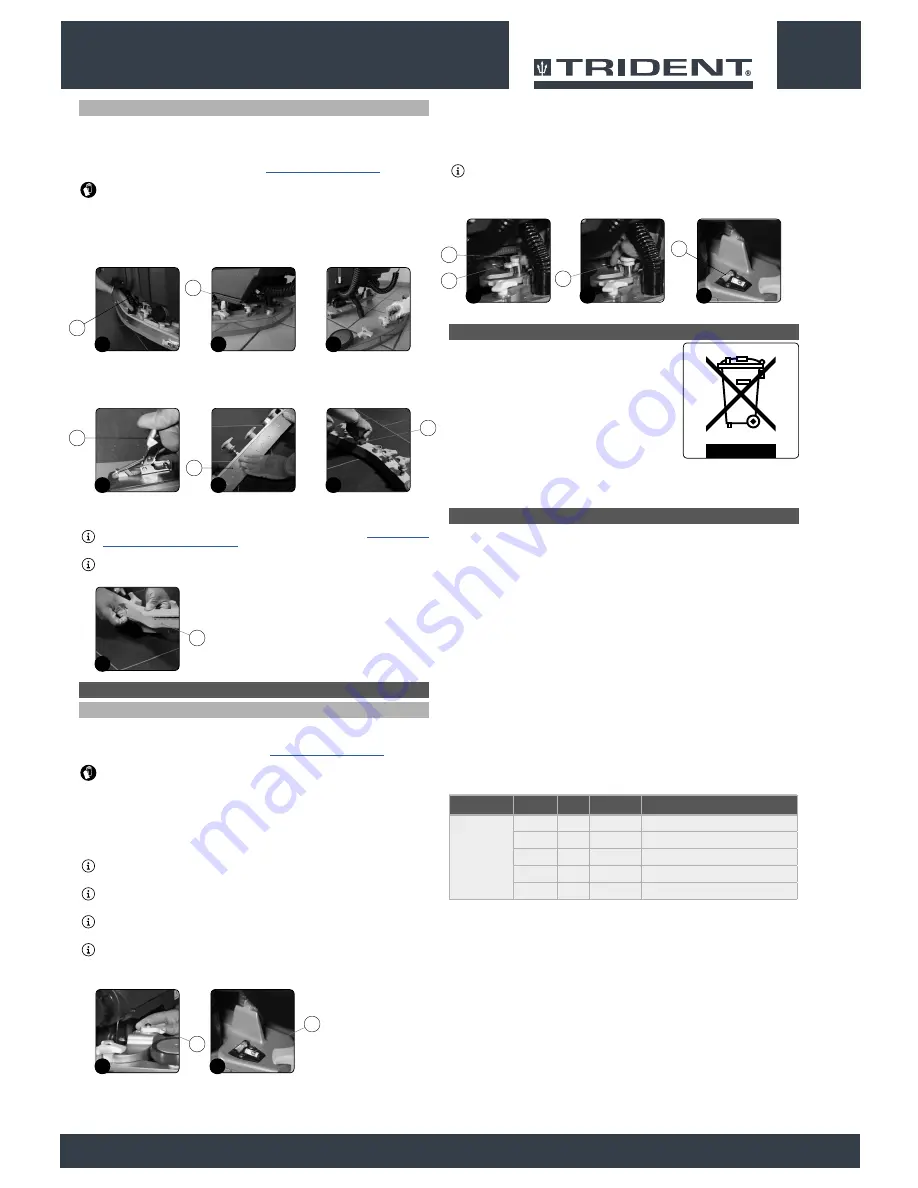
3. Remove the vacuum tube (1) from the vacuum nozzle on the squeegee body (
Fig.1
).
4. Completely unscrew the knobs (2) in the squeegee body pre-assembly (
Fig.2
).
5. Remove the squeegee body from the slits in the squeegee connector (
Fig.3
).
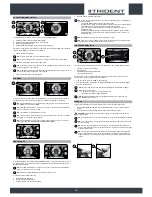
6. Remove the rear rubber-pressing blade by releasing the retainer (3) on the back of the squeegee
(
Fig.4
).
7. Remove the rear rubber blade (4) from the squeegee body (
Fig.5
).
8. Completely unscrew the knobs (5) in the squeegee body pre-assembly (
Fig.6
).
9. Remove the front rubber blade (7) from the inside of the squeegee (
Fig.7
).
10. Repeat the operations in reverse order to reassemble all the parts.
NB
: before using the machine, remember to adjust the squeegee body (see
“
ADJUSTING THE
SQUEEGEE BODY RUBBER BLADES
”
).
NB
: you are advised to replace both squeegee body blades in order to ensure good results when
drying the floor.
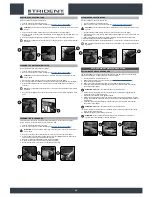
ADJUSTMENT INTERVENTIONS
ADJUSTING THE SQUEEGEE BODY RUBBER BLADES
Careful adjustment of the squeegee body rubber blades guarantees better cleaning of the floor.
To adjust the squeegee body blades, proceed as follows:
1. Make sure the machine is in a safe condition (see “
MACHINE SAFETY MEASURES
”).
ATTENTION
: these operations must be carried out using protective gloves to avoid any
possible contact with the edges or tips of metal objects.
2. Stand at the back of the machine.
Adjusting the height of the squeegee body:
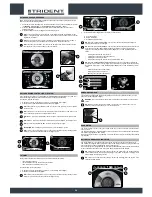
3.
Adjust the height of the rubber blade in relation to the floor by loosening or tightening the knobs
(1) (
Fig.1
).
NB
: Figure 1 indicates the rotation direction for decreasing the distance between the squeegee
support and the floor. This distance can be increased by turning it in the opposite direction.
NB
: by decreasing the distance between the squeegee support and the floor, the rubber blades
present in the squeegee body move closer to the floor.
NB
: the right-hand and left-hand knobs must be rotated the same number of times, so that the
squeegee is parallel to the floor when it is working.
NB
: make sure the adjustment is correct by looking at the instrument (2) on the squeegee body
(
Fig.2
).
Adjusting the tilt of the squeegee body:
4.
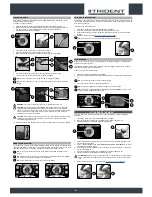
Loosen the retainer knob (3) of the squeegee tilt adjustment knob (4) (
Fig.3
).
5.
To adjust the tilt of the squeegee body rubber blades in relation to the floor, tighten or loosen the
knob (5) (
Fig.4
) until the blades are bent outwards by about 30° in relation to the floor, in an even
manner along their entire length.
NB
: make sure the adjustment is correct by looking at the instrument (6) on the squeegee body
(
Fig.5
).
6.
Once the adjustment has been completed, tighten the retainer knob (3).
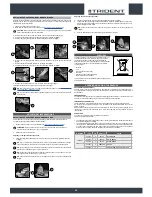
CHOOSING AND USING THE BRUSHES
POLYPROPYLENE BRUSH (PPL)
Used on all types of floors. Good resistance to wear and tear, and hot water (no greater than 50°C.).
The polypropylene is non-hygroscopic and therefore retains its characteristics even when working in
wet conditions.
ABRASIVE BRUSH
The bristles of this type of brush are charged with highly aggressive abrasives. It is used to clean very
dirty floors. To avoid floor damage, work only with the pressure strictly necessary.
THICKNESS OF THE BRISTLES
Thicker bristles are more rigid and are therefore used on smooth floors or floors with small joints.
On uneven floors or those with deep joints, it is advisable to use softer bristles which can enter the
gaps more easily.
Remember that when the bristles are worn and therefore too short, they will become rigid and are no
longer able to penetrate and clean deep down. In this case, like with over-large bristles, the brush
tends to jump.
PAD HOLDER
The pad holder is recommended for cleaning shiny surfaces.
There are two types of pad holder:
1.
The traditional pad holder is fitted with a series of anchor points that allow the abrasive floor pad to
be held and dragged while working.
2. The CENTRE LOCK type pad holder not only has anchor points, but also a snap-type central
locking system in plastic that allows the abrasive floor pad to be perfectly centred and held without
any risk of it becoming detached. This type of pad holder is recommended above all for machines
with more than one brush, where the centring of the abrasive discs is difficult.
25
2
3
1
1
2
5
6
4
3
4
5
7
6
2
1
1
2
4
3
5
3
4
4
5
DISPOSAL
To dispose of the machine, take it to a demolition centre or an
authorised collection centre. Before scrapping the machine,
it is necessary to remove and separate out the following
materials, then send them to the appropriate collection centres
in accordance with the environmental hygiene regulations
currently in force:
• Brushes
• Felt
• Electric and electronic parts*
• Batteries
• Plastic parts (tanks and handlebars)
• Metal parts (levers and frame)
(*) In particular, contact your distributor when scrapping electric
and electronic parts.
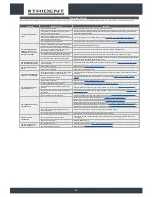
MACHINE
CODE
QTY
BRISTLE
NOTES
TRIDENT
T26SC PLUS
422189
2
PPL 0.3
BLUE BRUSH
422971
2
PPL 0.6
WHITE BRUSH
422972
2
PPL 0.9
BLACK BRUSH
422981
2
ABRASIVE
BRUSH
422973
2
PAD HOLDER WITH CENTRE LOCK
Содержание TRIDENT T26 SC PLUS
Страница 2: ......
Страница 27: ......
Страница 28: ...HILLYARD INDUSTRIES PO Box 909 St Joseph Missouri 64502 0909 U S A Telephone 816 233 1321 www hillyard com ...


