HIKVISION DS-TPM400 Series Скачать руководство пользователя страница 15

Guidance Terminal User Manual 

14 


The default user account: admin. 

3.2.1


Activating via SADP 


SADP software is  enclosed on  the  compact  disc.  You can also  download it  from  the 

company website. 

Steps: 

1.


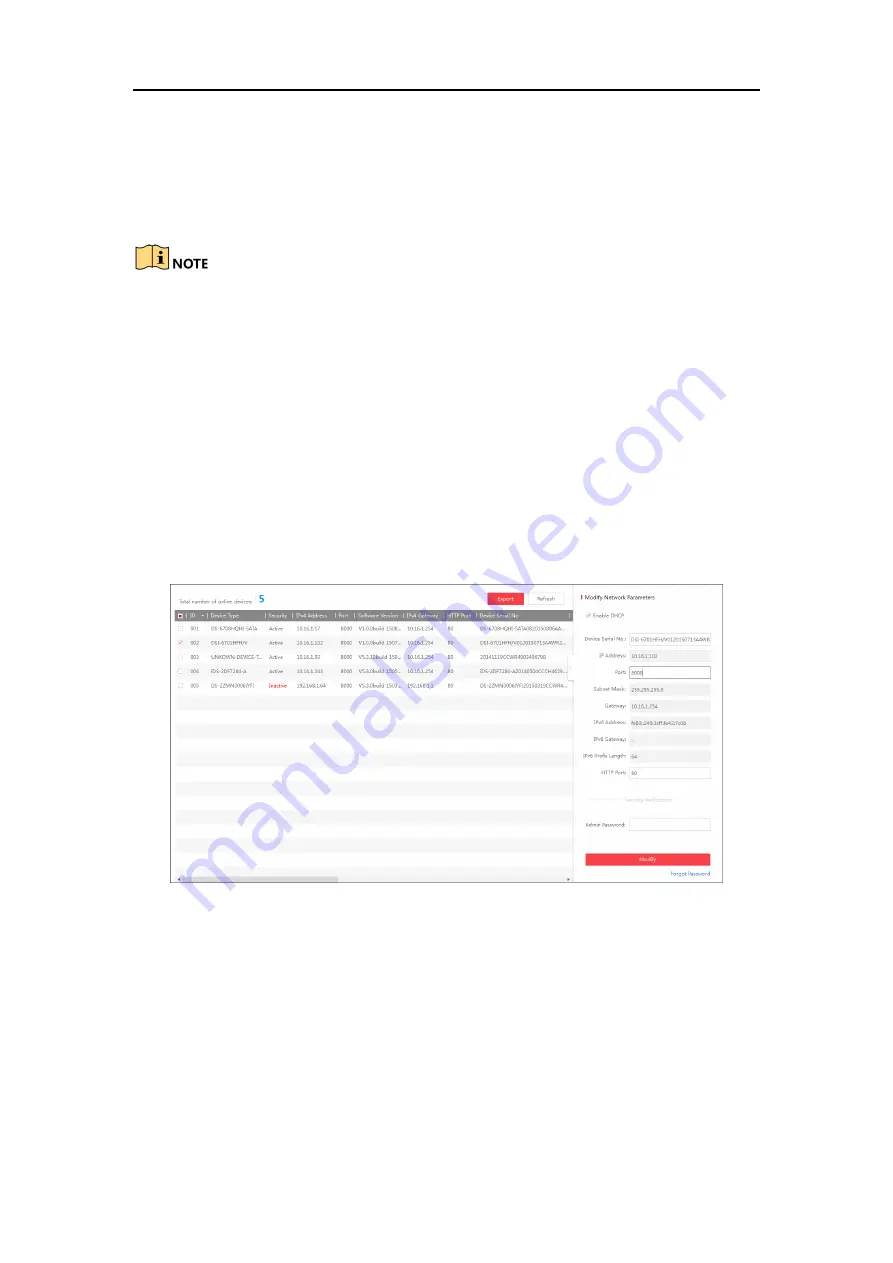
Install SADP software. After launching the SADP software, it automatically 

searches the online devices every 1 minute from the subnet where your computer 

locates. It displays the total number and information of the searched devices in the 

device list. Device information including the device type, IP address, port number, 

gateway, etc. will be displayed as the figure below. 


Figure 3-2


SADP Activation 

2.


Select the device which you need to activate by checking the checkbox and the 

device information will be displayed in a list on the right side. In 

Activate the 

Device

 panel, create a password for the device and confirm the password. The 

system will judge password strength automatically, and we highly recommend you 

to use a strong password to ensure your data security. 

Содержание DS-TPM400 Series

Страница 1: ...User Manual UD06351B Guidance Terminal...

Страница 2: ...mentioned below are the properties of their respective owners Legal Disclaimer TO THE MAXIMUM EXTENT PERMITTED BY APPLICABLE LAW THE PRODUCT DESCRIBED WITH ITS HARDWARE SOFTWARE AND FIRMWARE IS PROVID...

Страница 3: ...o the power supply circuit for convenient supply interruption If the product does not work properly please contact your dealer or the nearest service center Never attempt to disassemble the camera you...

Страница 4: ...a Web Browser 16 3 3 Logging in via Web Browser 17 Chapter 4 Configuration 20 4 1 Local Configuration 20 4 2 Remote Configuration 21 4 2 1 Configuring Device Parameters 21 4 2 2 Managing Camera 23 4 2...

Страница 5: ...Playback Interface 55 6 2 Searching Record Files 56 Chapter 7 Log 57 7 1 Searching Log Files 57 Chapter 8 Data Search 59 Chapter 9 Status 60 Chapter 10 Statistics 62 10 1 Viewing Parking Space Inform...

Страница 6: ...and vehicle searching time of customers and improves the utilization of the spare parking spaces The models and description are shown in the following table Model Description DS TPM400 Connectable to...

Страница 7: ...parking cameras connection Another 4 1000M network interfaces are supported 2 RS 485 serial ports to connect to the RS 485 control devices such as guidance screen Supports up to 18 TB HDD storage 1 3...

Страница 8: ...ure 1 2 Application Scenario for DS TPM400 P Refer to User Manual of Parking Camera for the installation When PoE parking camera is connected to DS TPM400 P guidance terminal it can be powered by the...

Страница 9: ...E parking cameras 2 10 100M 8 100M network interfaces for connecting to parking cameras in hand in hand mode They do not support PoE 3 10 100 1000M 4 1000M network interfaces for platform software or...

Страница 10: ...rd description 1 2 2 3 Figure 2 2 Power Cord Table 1 2 Power Cord No Name Description 1 Power Output 220 VAC power output 2 Air Switch 1 air switch for controlling the circuit connected or disconnecte...

Страница 11: ...minal with 12 VDC The lower part is used to provide power for the PoE interfaces with 48 VDC Machine Body Cover Power Supply Installation Hole Keyhole HDD Slot Figure 2 3 Open the Cover 2 Install HDD...

Страница 12: ...the four expansion screws on the wall to hook the terminal on the screws 5 Connect network cable and power cord in the machine body and route the cables from the corresponding outlet holes according...

Страница 13: ...Top Weak Current Outlet Hole Side Weak Current Outlet Hole Top Strong Current Outlet Hole Side Strong Current Outlet Hole Figure 2 5 Wiring 6 Close the cover and lock the key to finish the installatio...

Страница 14: ...d to the guidance terminal The following figure takes an example of the device connection for DS TPM400 1 2 3 4 5 6 1 2 3 4 5 6 Optical Fiber Network Cable Network Cable RS 485 Cable LED Display Units...

Страница 15: ...umber and information of the searched devices in the device list Device information including the device type IP address port number gateway etc will be displayed as the figure below Figure 3 2 SADP A...

Страница 16: ...he high security system resetting the password monthly or weekly can better protect your product 3 Click Activate to activate the device A The device is activated hint window pops up when the password...

Страница 17: ...user We recommend you to create a new user to operate for protecting your data security 3 2 2 Activating via Web Browser Steps 1 Modify the IP address of your computer to ensure the computer IP addre...

Страница 18: ...nter the login interface A login window displays By default the IP address of the guidance terminal is 192 0 0 64 You are recommended to use web browser of IE 8 or above 2 Input the user name and pass...

Страница 19: ...r security purpose Click OK to change the password in User Management interface Figure 3 7 Change the Default Password 5 For the first time to login you should install the plug in before you can acces...

Страница 20: ...Guidance Terminal User Manual 19 Figure 3 8 Install the Plug in 6 After login the interface is shown as below Figure 3 9 Live View Window...

Страница 21: ...page 4 1 Local Configuration Steps 1 Go to Configuration Local Configuration Figure 4 1 Local Configuration 2 Set the corresponding parameters such as protocol stream type image size etc as desired 3...

Страница 22: ...iles Default Path Save snapshots in live view to C Users TSP Web CaptureFiles Default Path Save snapshots when playback to C Users TSP Web PlaybackPics Default Path Save clips to C Users TSP Web Playb...

Страница 23: ...Zone synchronization NTP Time Synchronization or Manual Time Synchronization Figure 4 3 Time Setting NTP After enabling NTP the NTP server will synchronize the device time at regular intervals Click...

Страница 24: ...ync with computer time 4 2 2 Managing Camera In the IP Camera interface the guidance terminal is capable of connecting up to 32 parking cameras Figure 4 4 IP Camera Management Activating Parking Camer...

Страница 25: ...assword monthly or weekly can better protect your product 4 Click OK to activate the camera s Adding Parking Camera Click Auto Distribute IP and the IP address of the camera is auto allocated The four...

Страница 26: ...e 2 Click Modify and you can modify the information including user name and password Figure 4 7 Modify Parking Camera 3 Optional Click Copy to to copy the settings to other camera s 4 Click OK to save...

Страница 27: ...is online you can click Access and a login interface for a camera is linked Log in to the camera to configure the parking camera parameters as follows Figure 4 9 Access You must configure the IP addre...

Страница 28: ...eck the checkbox to display camera name date and week information on the live view screen You can also set the time and data format and display mode Figure 4 10 OSD Settings You can drag the name date...

Страница 29: ...number of spaces you set the quadrilaterals appear in the image 1 Click a quadrilateral and drag corner of the quadrilateral to adjust the shape of it or drag the quadrilateral to adjust the location...

Страница 30: ...tor or External Indicator and when all the detected parking spaces are occupied the indicator turns to the occupied color when the detected parking spaces are not all occupied the indicator remains th...

Страница 31: ...the parking space No e g Parking Space 1 and select the indicator in the Indicator Source drop down list 2 Configure the following parameters on your demand Enable Select Yes or No to enable or disabl...

Страница 32: ...ixels in the image which will make it looks large then you should enable the Large License Plate function to improve the accuracy of the license plate recognition Vehicle Color Enable or disable vehic...

Страница 33: ...h is 1 meter away from the parking camera Transmit Power Three levels are selectable The stronger the transmit power the further the receivable distance Parking Lot ID Hex number can be entered 0 F Pa...

Страница 34: ...solution the clearer the image and the larger bandwidth it needs Bitrate Type Variable Constant is selectable Video Quality Highest Higher Medium Low Lower Lowest By default it is Medium Frame Rate Th...

Страница 35: ...the channel No from the drop down list 2 Check the checkbox of Enable Record Schedule 3 Click Edit to set the schedule as follows Figure 4 19 Edit Schedule 1 Select All Day or Customize to edit the s...

Страница 36: ...o save the settings 4 Click Advanced in Schedule Settings interface to configure advanced settings as follows Figure 4 20 Advanced Settings 5 Optional If you want to copy all the settings to other cha...

Страница 37: ...t and intranet parameters respectively Configuring TCP IP You can configure the IP address of the four 1000M network interface cards NIC Type Auto 10M Half dup 10M Full dup 100M Half dup and 100M Full...

Страница 38: ...l Net You can view IP Address and modify subnet mask and gateway of the 16 100M network interface cards in the following interface The default IP address is 192 168 254 1 The 16 network interface card...

Страница 39: ...You can check the checkbox to enable HTTPS in the HTTPS interface and create self signed certificate certificate request and upload download and delete certificate Figure 4 24 HTTP Settings Configuri...

Страница 40: ...rt RS 232 serial port parameters are for the RS 232 interface Please keep the settings as default Figure 4 26 RS 232 Settings Configuring RS 485 Serial Port RS 485 serial port is used for connecting t...

Страница 41: ...Select the Alarm Input No from the drop down list 2 Select Alarm Type as NO Remain Open or NC Remain Closed 3 Enter the Alarm Name 4 Check Enable to enable the alarm input 5 Click Arming Schedule tab...

Страница 42: ...29 Edit Schedule Time 7 Click Linkage Method tab to set the parameters of Normal Linkage Trigger Alarm Output and Trigger Channel Figure 4 30 Linkage Method Configuring Alarm Output Refer to the abov...

Страница 43: ...l User Manual 42 Figure 4 31 Alarm Output Configuring Voice Alarm Steps 1 Enter the Voice Alarm Configuration interface Figure 4 32 Voice Alarm Configuration 2 Click Add to add voice alarm Figure 4 33...

Страница 44: ...e to the parking lot that the aisle between the opposite parking spaces is very narrow After you configure the function the indicator of the current parking camera displays the status of opposite spac...

Страница 45: ...dance terminal which needs to be controlled Opposite camera is another parking camera which needs to be controlled 4 Click Add to save the settings 4 2 8 Configuring Exception You can set the alarm ou...

Страница 46: ...xception Exception of record or capture 4 2 9 Managing User You can add modify and delete users and set user permission in User Management interface By default there is only one user account admin and...

Страница 47: ...ng Basic Permission and Camera Configuration Permission by checking the checkbox Figure 4 38 Add a User 6 Click OK to save the settings Modifying a User Steps 1 Select the user account for modifying a...

Страница 48: ...ge Configuring Basic Settings Steps 1 You can select the HDD No and set the property as R W Read only or Redundancy 2 Click Set to save the settings 3 Optional Select the HDD in the list and click For...

Страница 49: ...e in the guidance terminal 2 Check Overwrite File 3 Optional Check Enable by Period and set the time period for saving the log 4 Click Save to save the settings 5 Optional Click Export to export the l...

Страница 50: ...ce will reboot automatically after upgrading 4 2 13Connecting to Platform The guidance terminal can connect to Ehome and Hik Connect Accessing to Ehome The guidance terminal can connect to Ehome to re...

Страница 51: ...atus to see if the terminal is accessed to Ehome successfully Accessing to Hik Connect Hik Connect is a micro video service platform The guidance terminal can connect to Hik Connect to realize video a...

Страница 52: ...rameters for the data uploading in the Remote Host interface Steps 1 Select the remote host from the drop down list 2 Enter the IPAddress Port and Uploading Timeout Interval 3 Click Save to save the s...

Страница 53: ...Guidance Terminal User Manual 52 Figure 4 46 Uploading Status Viewing Working Status You can view the system time and working time in Working Status interface Figure 4 47 Working Status...

Страница 54: ...ame to start the live view 4 Optional Click before the camera name to select the main stream or sub stream Figure 5 1 Live View Interface Live View Toolbar Figure 5 2 Toolbar On the Live View page the...

Страница 55: ...all cameras Prev Page Go for live view of the previous page Next Page Go for live view of the next page Start Two way Audio Enable the two way audio Audio On Audio Off Turn on off the audio in live v...

Страница 56: ...ayback interface is shown as follows Figure 6 1 Playback Interface Playback Toolbar Figure 6 2 Playback Toolbar On the Playback page the following toolbar buttons are available Table 6 1 Toolbar Descr...

Страница 57: ...Clipping Start Stop clipping the record files Audio On Audio Off Turn on off the audio in live view Full Screen Display the playback in full screen mode Press ESC to exit Click on the to select the ti...

Страница 58: ...twork disk Click Log tab to entre the Log interface Figure 7 1 Log Interface 7 1 Searching Log Files Steps 1 Open the Log Search page 2 Select the Major Type There are four major types including Alarm...

Страница 59: ...Guidance Terminal User Manual 58 6 Optional You can click to save the searched logs Please narrow the time range or filter the log type for search if there are too many log files...

Страница 60: ...ter the Search interface Figure 8 1 Search Interface Steps 1 Click to specify the Start Time and End Time When inputting the time you can click for quick selection Time range cannot exceed 7 days 2 Se...

Страница 61: ...parking space box Green means the parking space is free Red means the parking space is occupied If the colour of parking space box on the interface and the colour of the parking space light is the sam...

Страница 62: ...Guidance Terminal User Manual 61 Figure 9 2 Vehicle Information...

Страница 63: ...arch the specified parking space Parking spaces may include local parking spaces or other parking spaces on the guidance terminal This interface shows offline statistics LED ID LED ID is the index of...

Страница 64: ...Parking Space Information Statisctics 10 2Viewing LED Guidance Screen Information You can view all the LED guidance screen information in LED Guidance Screen Information tab Figure 10 2 LED Guidance...

Страница 65: ...Guidance Terminal User Manual 64...

Отзывы: