background image

Network Bullet Camera

·

Quick Start Guide


22 

2.


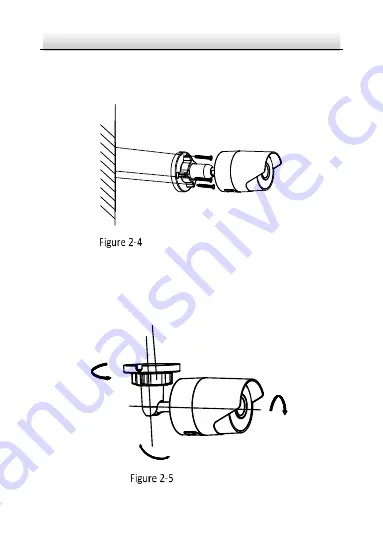
Route the corresponding cables. 

3.


Secure the camera to the wall with the supplied Screws. 


Secure the Camera to the Ceiling 

4.


Connect the cables and power on the camera to view live view 
image. 

5.


Adjust the viewing angle.   

Tilt: 0° to 90°

Adjusting Nut

Pan: 

0° to 360°

Rotate:

0° to 360°


3-axis Adjustment 

Содержание DS-2CD2023G0-I

Страница 1: ...0 Network Bullet Camera Quick Start Guide ...

Страница 2: ...y information contained herein About this Manual The Manual includes instructions for using and managing the Product Pictures charts images and all other information hereinafter are for description and explanation only The information contained in the Manual is subject to change without notice due to firmware updates or other reasons Please find the latest version of this Manual at the Hikvision w...

Страница 3: ... BASED ON BREACH OF CONTRACT TORT INCLUDING NEGLIGENCE PRODUCT LIABILITY OR OTHERWISE IN CONNECTION WITH THE USE OF THE PRODUCT EVEN IF HIKVISION HAS BEEN ADVISED OF THE POSSIBILITY OF SUCH DAMAGES OR LOSS YOU ACKNOWLEDGE THAT THE NATURE OF INTERNET PROVIDES FOR INHERENT SECURITY RISKS AND HIKVISION SHALL NOT TAKE ANY RESPONSIBILITIES FOR ABNORMAL OPERATION PRIVACY LEAKAGE OR OTHER DAMAGES RESULTI...

Страница 4: ...not expressly approved by the party responsible for compliance could void the user s authority to operate the equipment FCC compliance This equipment has been tested and found to comply with the limits for a Class B digital device pursuant to part 15 of the FCC Rules These limits are designed to provide reasonable protection against harmful interference in a residential installation This equipment...

Страница 5: ...vice may not cause harmful interference 2 This device must accept any interference received including interference that may cause undesired operation EU Conformity Statement This product and if applicable the supplied accessories too are marked with CE and comply therefore with the applicable harmonized European standards listed under the EMC Directive 2014 30 EU the RoHS Directive 2011 65 EU 2012...

Страница 6: ...return the battery to your supplier or to a designated collection point For more information see www recyclethis info Industry Canada ICES 003 Compliance This device meets the CAN ICES 3 B NMB 3 B standards requirements Safety Instruction These instructions are intended to ensure that user can use the product correctly to avoid danger or property loss The precaution measure is divided into Warning...

Страница 7: ...ements according to IEC 60950 1 or IEC 62368 1 standard Do not connect several devices to one power adapter as adapter overload may cause over heating or a fire hazard Please make sure that the plug is firmly connected to the power socket When the product is mounted on wall or ceiling the device shall be firmly fixed If smoke odor or noise rise from the device turn off the power at once and unplug...

Страница 8: ...any precautions that shall be taken Make sure the power supply voltage is correct before using the camera Do not drop the camera or subject it to physical shock Do not touch sensor modules with fingers If cleaning is necessary use clean cloth with a bit of ethanol and wipe it gently If the camera will not be used for an extended period please replace the lens cap to protect the sensor from dirt Do...

Страница 9: ...ll be replaced regularly according to their average enduring time The average time varies because of differences between operating environment and using history so regular checking is recommended for all the users Please contact with your dealer for more details This equipment is not suitable for use in locations where children are likely to be present CAUTION Risk of explosion if the battery is r...

Страница 10: ...nt which may result in an explosion or the leakage of flammable liquid or gas Do not subject the battery to extremely low air pressure which may result in an explosion or the leakage of flammable liquid or gas If the product does not work properly please contact your dealer or the nearest service center Never attempt to disassemble the camera yourself We shall not assume any responsibility for pro...

Страница 11: ...1 Type II 13 Resetting the Camera 14 Setting the WPS Protocol 15 Type III 17 2 Installation 19 Installation of Memory Card 20 Installation of Camera 21 Waterproof Measures 23 2 3 1 Install Network Cable Waterproof Jacket 23 2 3 2 Waterproof Other Cables 24 3 Activate and Access Network Camera 25 ...

Страница 12: ...Network Bullet Camera Quick Start Guide 11 Appearance Description Type I 1 2 3 4 5 6 9 7 8 Type I Bullet Camera ...

Страница 13: ...eld 3 Front Case 6 Power Cable 7 Reset Button 8 GND Screw 9 10 100M Self adaptive Ethernet Interface Note Type I camera does not support the function of Wi Fi or memory card Press Reset button about 10s when the camera is power on or rebooting to restore the default settings including the user name password IP address port No etc ...

Страница 14: ...Network Bullet Camera Quick Start Guide 13 Type II 1 2 4 3 5 6 7 9 8 10 11 Type II Bullet Camera ...

Страница 15: ...amera supports PoE power supply You can power the camera by connecting both DC 12V interface and the Ethernet interface Or you can connect the Ethernet interface only WPS RESET Button WPS function and Reset function share the same button The button works as a reset button only when you press it when the camera is powered on Resetting the Camera Press WPS RESET button about 10s when the camera is p...

Страница 16: ...ol A wireless router with the WPS function is required to enable the WPS function of the camera Steps 1 Enable the WPS function of your router Refer to the operation guide of your router for detailed procedures 2 Press the WPS RESET button about 2s on the camera to join in the wireless network ...

Страница 17: ...T Button Note You can also press the WPS button on the camera first and then enable the WPS function on the router to establish the connection But the WPS function of the router must be turned on within 120s right after pressing the WPS RESET button on the camera ...

Страница 18: ...Network Bullet Camera Quick Start Guide 17 Type III 1 3 2 4 5 7 6 8 9 10 Type III Bullet Camera ...

Страница 19: ...ens 9 Memory Card Slot 5 Sun Shield 10 Reset Button Note This type of bullet camera supports PoE power supply You can power the camera by connecting both DC 12V interface and the Ethernet interface Or you can connect the Ethernet interface only Press and hold the reset button about 10s when the camera is powering on or rebooting to restore the default settings including the user name password IP a...

Страница 20: ...amera that supports IR you are required to pay attention to the following precautions to prevent IR reflection Dust or grease on the dome cover will cause IR reflection Please do not remove the dome cover film until the installation is finished If there is dust or grease on the dome cover clean the dome cover with clean soft cloth and isopropyl alcohol Make sure that there is no reflective surface...

Страница 21: ...mera support memory card function Follow the steps to mount and unmount a memory card Steps 1 Unscrew the cover on back case to expose memory card slot Cover Unscrew the Cover 2 Insert the memory card into the memory card slot Memory Card Slot Type II Memory Card Slot Type III Insert Memory Card ...

Страница 22: ...on of Camera Note Both wall mounting and ceiling mounting are suitable for the bullet camera Wall mounting will be taken as an example in this section You can take steps of wall mounting for reference if ceiling mounting is adopted Steps 1 Drill the screw holes in the wall according to the drill template Ceiling Mounting Hole Hole Hole Drill Template ...

Страница 23: ...g cables 3 Secure the camera to the wall with the supplied Screws Secure the Camera to the Ceiling 4 Connect the cables and power on the camera to view live view image 5 Adjust the viewing angle Tilt 0 to 90 Adjusting Nut Pan 0 to 360 Rotate 0 to 360 3 axis Adjustment ...

Страница 24: ...ed viewing angle 5 Tighten the adjusting nut to complete the installation Waterproof Measures If the camera is installed outdoor you should use the waterproof accessory or tapes to waterproof the cables Otherwise the cables might get wet or a short circuit occurs 2 3 1 Install Network Cable Waterproof Jacket Align Figure 2 6 Install Waterproof Jacket Steps 1 Feed the network cable through and in o...

Страница 25: ...e connector into RJ45 female connector 4 Screw to clockwise 5 Push into 6 Secure with the in clockwise direction 2 3 2 Waterproof Other Cables After routing and connecting the cables use the waterproof tapes to wrap up the cables Connected cables and spare cables both should be wrapped up as the figures below Waterproof Cables ...

Страница 26: ...Network Bullet Camera Quick Start Guide 25 3 Activate and Access Network Camera Scan the QR code to get Activate and Access Network Camera Note that mobile data charges may apply if Wi Fi is unavailable ...

Страница 27: ...0 UD04363B D ...

Отзывы: