HIKVISION DeepinMind iDS-6700NXI Series Скачать руководство пользователя страница 31

DeepinMind Series NVS User Manual 


iDS-67 00 Deep inMind Series NVS User Manua l 

30 


If the device is connected to a public network, you should use a NTP server that has a time 
synchronization function, such as the server at the National Time Center (IP Address: 
210.72.145.44). If the device is set up in a more customized network, NTP software can be used to 
establish a NTP server used for time synchronization. 


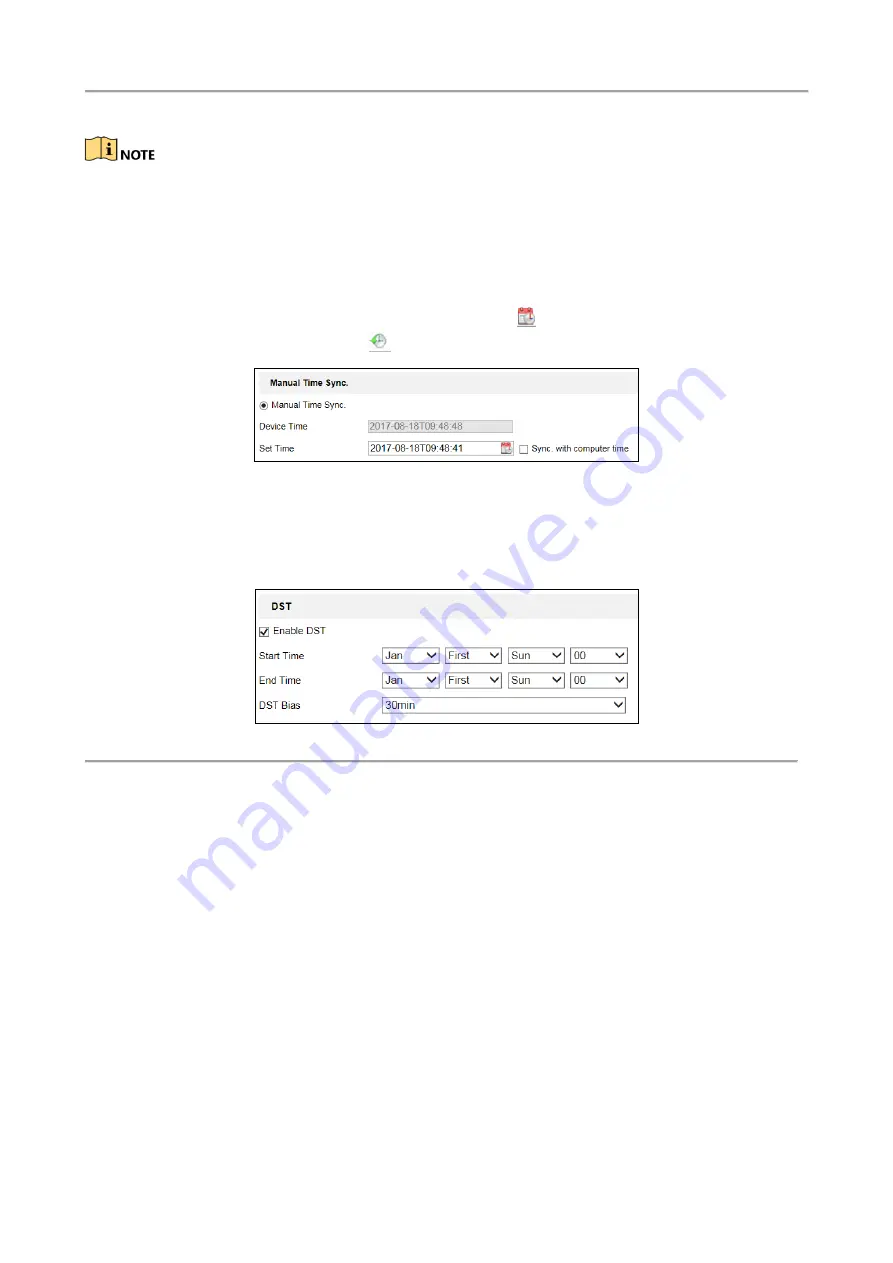
Configuring Time Synchronization Manually   

Enable the 

Manual Time Sync.

 function and then click the 

  icon to set the system time from 

the pop-up calendar. You can click the 

  icon to quickly select the time. 


Figure 4-4


Manual Time Sync. 

You can also check the checkbox of 

Sync. with computer


time

 to synchronize the time with the 

local PC.   


Check 

Enable DST

 to enable the DST function and set the date of the DST period. 


Figure 1. 2


DST Settings 


Step 4


Click 

Save

.   

4.2.2 Configuring RS-232 Serial Port 

The RS-232 serial port can be used in two ways:   


Parameters Configuration: Connect a computer to the camera through the serial port. Device 
parameters can be configured by using software such as HyperTerminal. The serial port 
parameters must be the same as the serial port parameters of the camera. 


Transparent Channel: Connect a serial device directly to the camera. The serial device will be 
controlled remotely by the computer through the network. 

Step 1


Go to Configuration> System > System Settings > RS-232.   

Step 2


Configure the Baud Rate, Data Bit, Stop Bit, Parity, Flow Control, and Usage. 

Содержание DeepinMind iDS-6700NXI Series

Страница 1: ...iDS 6700NXI DeepinMind Series NVS User Manual...

Страница 2: ...demarks and logos mentioned below are the properties of their respective owners Legal Disclaimer TO THE MAXIMUM EXTENT PERMITTED BY APPLICABLE LAW THE PRODUCT DESCRIBED WITH ITS HARDWARE SOFTWARE AND...

Страница 3: ...use harmful interference 2 This device must accept any interference received including interference that may cause undesired operation EU Conformity Statement This product and if applicable the suppli...

Страница 4: ...mbols that may be found in this document are defined as follows Symbol Description Provides additional information to emphasize or supplement important points of the main text Indicates a potentially...

Страница 5: ...e power socket If smoke odor or noise rise from the device turn off the power at once and unplug the power cable and then please contact the service center Preventive and Cautionary Tips Before connec...

Страница 6: ...21 3 4 1 Operating PTZ Movement 22 3 4 2 Setting Calling a Preset 23 3 4 3 Setting Calling a Patrol 24 3 5 Configuring Channel Zero Encoding 26 Chapter 4 Device Configuration 27 4 1 Local Configuratio...

Страница 7: ...onfiguring Smart Event 57 6 2 1 Configuring Audio Exception Detection 57 6 2 2 Configuring Face Detection 58 6 2 3 Configuring Intrusion Detection 59 6 2 4 Configuring Line Crossing Detection 61 6 2 5...

Страница 8: ...DeepinMind Series NVS User Manual iDS 6700 DeepinMind Series NVS User Manual 7 8 2 4 Upgrading the System 78 8 3 Configuring Security Settings 79 Chapter 9 Specifications 80...

Страница 9: ...ideo loss motion detection video tampering abnormal signal video input recording resolution mismatch illegal login network disconnected IP confliction record exception etc Alarm triggers audio alarm n...

Страница 10: ...Remote keyboard operation Remote system restart and shutdown Alarm and exception information can be sent to the remote host Remotely start stop alarm output Remote PTZ control Remote JPEG capture Two...

Страница 11: ...on 1 1 Front Panel Figure 1 1 Front Panel Table 1 1 Indicator Description Item Description Turns red when device is powered up Turns red when data is being read from or written to HDD Flickers blue wh...

Страница 12: ...in connect to audio input device or active pick up microphone etc 3 AUDIO OUT 3 5mm interface connect to audio output device e g loudspeaker etc 4 RS 232 Serial interface for configuration of device...

Страница 13: ...h Internet access might be under network security risks For avoidance of any network attacks and information leakage please strengthen your own protection If the product does not work properly please...

Страница 14: ...r product Step 3 Click OK Step 4 Set the security questions Figure 2 2 Security Question Configuration and Export GUID File Step 5 Optional Configure the security questions or export the GUID file Ref...

Страница 15: ...on to enter the Device Management interface as shown in the figure below Figure 2 4 Control Panel Step 3 Check the device status from the device list and select an inactive device Step 4 Click the Act...

Страница 16: ...etters numbers and special characters in order to increase the security of your product And we recommend you reset your password regularly especially in the high security system resetting the password...

Страница 17: ...name and the password to log into the system Step 3 Click Login In the Login dialog box if you have entered the wrong password for 7 times for the admin user or 5 times for the normal user the curren...

Страница 18: ...2 7 Security Question Verification GUID File Verification Click Browse to select the exported GUID file Figure 2 8 GUID File Verification Step 3 Click Next to set new password Figure 2 9 Set New Passw...

Страница 19: ...DeepinMind Series NVS User Manual iDS 6700 DeepinMind Series NVS User Manual 18 Figure 2 10 Password Modified...

Страница 20: ...ct and the IP camera to add has already been activated Step 1 Go to Configuration System Camera Management Step 2 Click Add Step 3 Enter IP address protocol management port and other information of th...

Страница 21: ...a camera from the device list to start the live view Figure 3 2 Start Live View Step 3 Use the toolbar at the playing window bottom to start live view of all cameras capture picture start audio on off...

Страница 22: ...lect the Video Type to Video Audio on Chapter 6 2 Configuring Video Audio Settings 3 3 Capturing the Picture In live view mode click on the toolbar to capture the live pictures When the picture is cap...

Страница 23: ...1 Operating PTZ Movement In live view mode you can use the PTZ control buttons to realize pan tilt zoom control of the camera lens There are 8 directional buttons up down left right upper left upper...

Страница 24: ...xiliary focus Initialize lens Adjust speed of pan tilt movements Start Manual Tracking Start 3D Zoom 3 4 2 Setting Calling a Preset Setting a Preset Step 1 In live view mode click from the PTZ control...

Страница 25: ...you can call it at any time to the desired preset scene In live view mode select a predefined preset from the list and click the icon to call a preset Linking to Alarm The preset can also be used to...

Страница 26: ...ich the PTZ will follow while cycling through the patrol Time refers to the time span to stay at the corresponding key point The time can be set from 1 to 30 sec Speed defines the speed at which the P...

Страница 27: ...g Channel Zero Encoding Sometimes you need to get a remote view of many channels in real time from web browser or CMS Client Management System software in order to decrease the bandwidth requirement w...

Страница 28: ...provides more real time audio and video streams TCP It ensures complete deliver of streaming data and better video quality yet its real time effect is not so good MULTICAST It s recommended to select...

Страница 29: ...6 9 or Auto fill Auto Start Live View Enable or disable the auto start of live view once you open the Web browser Image Format Select the image format for picture capture Encryption Key Enter the encr...

Страница 30: ...on your device to ensure the accuracy of system date time If the device is connected to a Dynamic Host Configuration Protocol DHCP network that has time server properties configured the camera will s...

Страница 31: ...can also check the checkbox of Sync with computer time to synchronize the time with the local PC Check Enable DST to enable the DST function and set the date of the DST period Figure 1 2 DST Settings...

Страница 32: ...ed here Step 3 Click Save 4 2 3 Configuring RS 485 Serial Port The RS 485 serial port is used to control the PTZ of the camera The configuring of the PTZ parameters should be done before you control t...

Страница 33: ...tings Network settings must be properly configured before operating device over network Step 1 Go to Configuration Network Basic Settings TCP IP to enter the TCP IP Settings page Figure 4 7 TCP IP Set...

Страница 34: ...P port and HTTPS port Step 1 Go to Configuration Network Basic Settings Port to enter the Port Settings page Figure 4 9 Port Settings Step 2 Set the HTTP port RTSP port HTTPS port and Server Port 8000...

Страница 35: ...ct DDNS Type Three different DDNS types are selectable DynDNS PeanutHull and NO IP DynDNS 1 Enter Server Address for DynDNS e g members dyndns org 2 Enter the Domain obtained from the DynDNS website 3...

Страница 36: ...the domain name Figure 4 12 NO IP Settings Reboot the device to make the settings take effect 4 3 4 Configuring PPPoE Settings Your device also allows access by Point to Point Protocol over Ethernet...

Страница 37: ...ettings the device must be connected to a local area network LAN that maintains an SMTP mail server The network must also be connected to either an intranet or the Internet depending on the location o...

Страница 38: ...fied Receiver s Address The Email address of user to be notified Step 4 Click Save Please refer to the following sections for more information Configure alarm linking methods with Send Email on Chapte...

Страница 39: ...t Transfer Protocol Secure ensures the data transferred is encrypted using Secure Socket Layer SSL or Transport Layer Security TLS HTTPS provides authentication of the web site and associated web serv...

Страница 40: ...he authorized certificate 1 Select Create the certificate request first and continue the installation as the Installation Method 2 Click Create to create the certificate request Fill in the required i...

Страница 41: ...tware GUI and Web browser We introduce the operation steps on GUI in this section Step 1 Go to Configuration Network Advanced Settings Platform Access to enter the Hik Connect Settings page Figure 4 1...

Страница 42: ...ation you can access and manage the encoder by your mobile phone on which the Hik Connect application is installed or by the website www hik connect com Please refer to the help file on the official w...

Страница 43: ...ge to the host when an alarm is triggered The remote alarm host must have the CMS Client Management System software installed Step 1 Go to Configuration Network Advanced Settings Other to enter the al...

Страница 44: ...ons default Indoor the image is relatively smoother Outdoor the image is relatively clearer and sharper The degree of contrast and saturation is high Dim Light the image is smoother than the other thr...

Страница 45: ...ings Step 2 Check the corresponding checkbox to select the display of camera name date or week if required Step 3 Edit the camera name in the text field of Camera Name Step 4 Select from the drop down...

Страница 46: ...acy mask settings page Step 2 Select the camera to configure privacy mask Step 3 Check the checkbox of Enable Privacy Mask to enable this function Figure 5 3 Privacy Mask Settings Step 4 Click Draw Ar...

Страница 47: ...od bandwidth and the sub stream can be used for live view when the bandwidth is low Refer to the Chapter 5 1 Local Configuration for changing the main stream to sub stream for live view Step 5 You can...

Страница 48: ...main stream continuous of cameras H 264 H 265 Select ON or OFF to enable or disable H 264 H 265 Enabling it helps to ensure the high video quality with a lowered bitrate The cameras support enabling H...

Страница 49: ...iguring Motion Detection Motion detection is a feature which can alert the personnel and record the video for the motion occurred in the surveillance scene Step 1 Go to Configuration Event Basic Event...

Страница 50: ...ion area by dragging the mouse in the live video image By default the full screen motion detection is configured 5 Click Stop Drawing to finish drawing You can click Clear All to clear all areas 6 Mov...

Страница 51: ...Detection Arming Schedule Settings 2 Click on the time bar and drag the mouse to select the time period Figure 6 3 Motion Detection Edit Arming Schedule Click on the selected time period you can adjus...

Страница 52: ...detection 1 Click Linkage Method tab Figure 6 4 Motion Detection Linking Method 2 Select the alarming linkage method s including Audible Warning Notify Surveillance Center Send Email and Upload Pictu...

Страница 53: ...rm Input Settings page Step 2 Select the Alarm Input No Step 3 Select the Alarm Type The alarm type can be NO Normally Open and NC Normally Closed Step 4 Enter the Alarm Name Step 5 Check Enable Alarm...

Страница 54: ...f your camera is installed with a pan tilt unit 1 Select the PTZ Linking channel 2 Check the relative checkbox to enable preset calling patrol calling or pattern calling Step 9 Optional Click Copy to...

Страница 55: ...arm output remains in effect after alarm occurs If you choose Manual you need to manually disable the alarm output Step 4 Click Arming Schedule tab to set the arming schedule for the alarm input Pleas...

Страница 56: ...se refer to Step 6 in Chapter 7 1 1 Configuring Motion Detection Step 5 Set the actions taken for video loss detection Please refer to Step 7 in Chapter 7 1 1 Configuring Motion Detection Step 6 Click...

Страница 57: ...Chapter 7 1 1 Configuring Motion Detection Step 6 Set the actions taken for the tamper proof alarm Please refer to Step 7 in Chapter 7 1 1 Configuring Motion Detection Step 7 Click Save 6 1 6 Handlin...

Страница 58: ...detection These events can trigger the linkage methods such as Notify Surveillance Center Send Email Trigger Alarm Output etc 6 2 1 Configuring Audio Exception Detection Audio exception detection fun...

Страница 59: ...nge 1 100 the smaller the value is the more severe the change should be to trigger the detection Sound Intensity Threshold Range 1 100 it can filter the sound in the environment the louder the environ...

Страница 60: ...the face can be detected Step 5 Click Arming Schedule to set the arming schedule Step 6 Click Linkage Method to select the linkage methods for face detection Figure 6 12 Face Detection Step 7 Click Sa...

Страница 61: ...ures and videos which are not triggered by line crossing detection Step 5 Set the detection area 1 Select a region number from the drop down list of Region Region A pre defined vertexes area on the li...

Страница 62: ...percentage Percentage Range 1 100 Percentage defines the ratio of the in region part of the object which can trigger the alarm For example if the percentage is set as 50 when the object enters the re...

Страница 63: ...s which are not triggered by line crossing detection Step 6 Set the detection area 1 Click Area Settings tab and select the line from the drop down list 2 Select a line to configure 3 Click Draw Area...

Страница 64: ...ly when 60 percent or more body part goes across the line The Sensitivity of the detection is supported by certain models Refer to actual display for details 7 Repeat the above steps to configure othe...

Страница 65: ...gered by line crossing detection Step 4 Set the detection area 1 Select the region from the drop down list for detection settings 2 Click Draw Area to start the area drawing 3 Click on the live video...

Страница 66: ...he above steps to configure other regions Up to 4 regions can be set You can click Clear to clear all pre defined regions Step 5 Click Arming Schedule to set the arming schedule Step 6 Click Linkage M...

Страница 67: ...aller or larger than the valid target size are not able to trigger detection Max Size The maximum size of a valid target Targets with larger sizes would not trigger detection Min Size The minimum size...

Страница 68: ...ar to clear all pre defined regions Step 5 Click Arming Schedule to set the arming schedule Step 6 Click Linkage Method to select the linkage methods Step 7 Click Save 6 2 7 Configuring Scene Change D...

Страница 69: ...e higher the value is the more easily the change of scene can trigger the alarm Step 6 Click the Arming Schedule to set the arming schedule Refer to Step 6 in Chapter 7 1 1 Configuring Motion Detectio...

Страница 70: ...the User Management page Figure 7 1 User Management The admin user is allowed to create normal users And up to 31 users can be created 7 1 2 Adding a User Step 1 Click Add to enter the Add User page S...

Страница 71: ...rity system resetting the password monthly or weekly can better protect your product Figure 7 2 Add a User Different user level is given different permissions Operator The Operator user level has perm...

Страница 72: ...inMind Series NVS User Manual 71 Figure 7 3 Added User 7 1 3 Modifying a User Step 1 Select a user account from the list on the User Management page to be modified Step 2 Click Modify to enter the mod...

Страница 73: ...You are highly recommended to use the strong password Step 4 Configure the user permission for the user Step 5 Click OK You need the admin password to modify the admin user or operator 7 1 4 Deleting...

Страница 74: ...rgetting the password you can retrieve the password by answering the security questions Step 1 Go to Configuration System User Management User Management Step 2 Select a user from the user list Step 3...

Страница 75: ...ent User Management 2 Click Export GUID File and the window pops up as below Figure 7 9 Confirm the Admin Password 3 Enter the Admin Password and click OK 4 Select the directory to save the GUID file...

Страница 76: ...g function can be realized only when the encoder is connected with HDD or network disk And make sure the HDD or network disk has been initialized for the first time to use Step 1 Go to Configuration S...

Страница 77: ...NVS User Manual 76 Figure 8 1 Search Log Step 5 You can click Export to save the searched log files to local directory 8 2 Maintenance Go to Configuration System Maintenance Upgrade Maintenance to ent...

Страница 78: ...e operation 8 2 2 Restoring Default Settings Step 1 Go to Configuration System Maintenance Upgrade Maintenance Default Figure 8 5 Restore Default Settings Step 2 Click Restore or Default to restore de...

Страница 79: ...rowse to select the file from the selected backup device Step 3 Click Import to import a configuration file After having finished the import of configuration files the device will reboot automatically...

Страница 80: ...To enable the remote login and improve the data communication security the encoder provides the security service for better user experience Step 1 Go to Configuration System Security Security Service...

Страница 81: ...re comparison by similarity Video Audio input IP video input 16 ch Incoming Outgoing bandwidth 256 Mbps 200 Mbps Video encoding format H 265 H 264 Video encoding resolution 8MP 6MP 5MP 4MP 3MP 1080p U...

Страница 82: ...DeepinMind Series NVS User Manual iDS 6700 DeepinMind Series NVS User Manual 81 W D H Weight without hard disk 3 kg 6 6 lb...

Страница 83: ...DeepinMind Series NVS User Manual iDS 6700 DeepinMind Series NVS User Manual 82 UD07970B...

Отзывы: