English
35
PRIOR TO OPERATION
WARNING
To avoid serious accident, ensure the switch is in the OFF position, and pull out the
battery.
1. Check the work area environment
Check the work area to make sure that it is clear of debris and clutter.
Clear the area of unnecessary personnel. Ensure that lighting and ventilation is adequate.
2. Power
switch
Ensure that the power switch is in the OFF position.
3. Installing the sanding paper
CAUTION
●
Use only sanding paper size speci
fi
ed on the product nameplate.
●
Do not use accessories with poor adhesion.
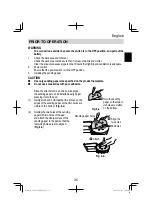
Since the attachment is a hook-and-loop type,
the sanding paper can be installed easily by just
pressing it onto the pad.
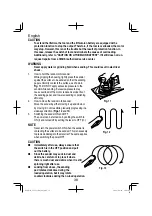
(1) Gently pinch and hold together two places on the
edges of the sanding paper so that two holes are
visible on the bottom. (
Fig. 8-a
)
(2) Overlap the two holes of the sanding
paper with two holes of the pad,
and attach the whole surface of the
sanding paper to the pad so that the
remaining holes are also aligned.
(
Fig. 8-b
)
Fig. 8-a
Hold the sanding
paper so that two of
its holes are visible
on the bottom
Fig. 8-b
Pad holes
Sanding paper holes
Align the
two holes
Attach
000Book̲SV1813DA̲ChS.indb 35
000Book̲SV1813DA̲ChS.indb 35
2022/02/16 10:21:47
2022/02/16 10:21:47

