background image


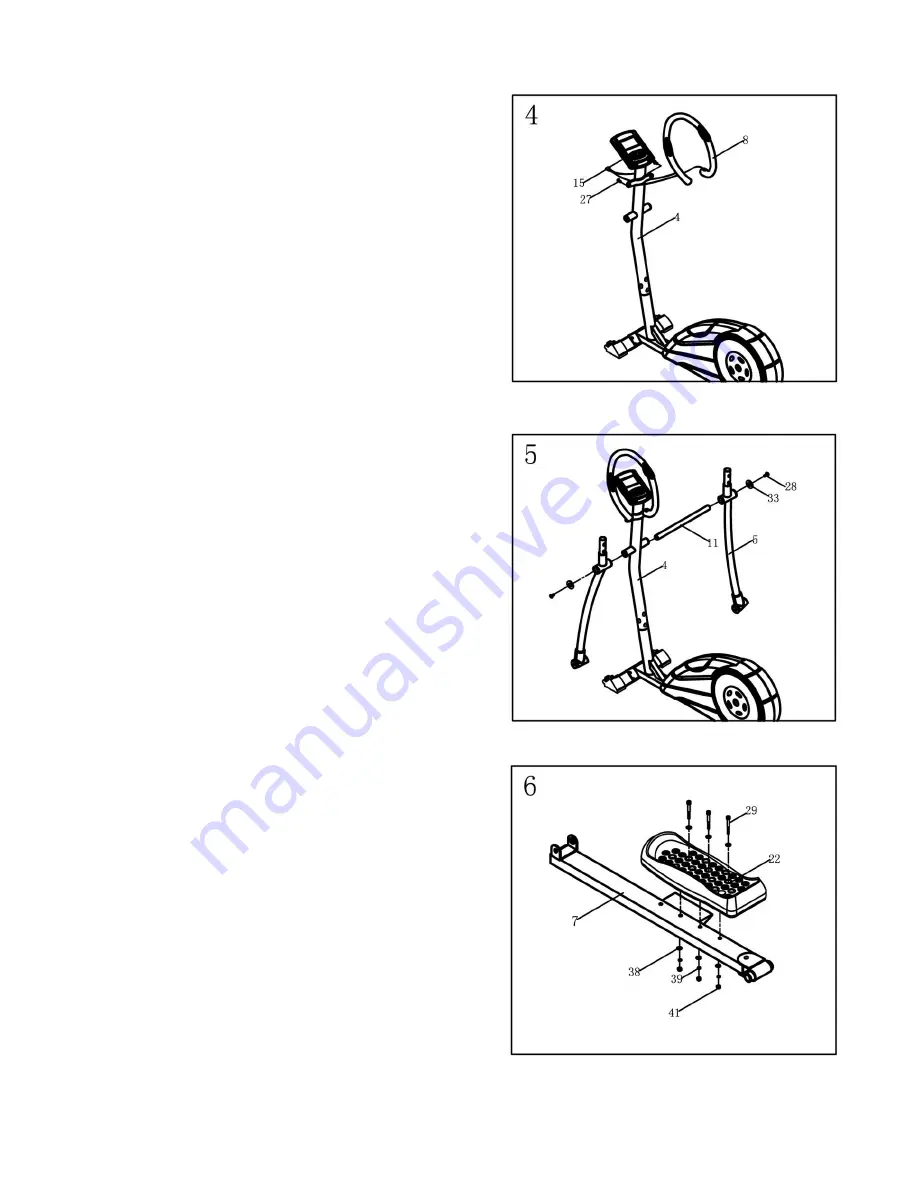
STEP 4 

Fasten the handle bar (8) to the upper support 

(4) and secure it with screws (27).then connect 

hand pulse cable (15) with computer (12). 


STEP 5 

Fasten lower swing bars (L+R) (5) with axle 
(11) from upper support (4) and secure it with 
bolt (28), washer (33) tightly.   


STEP 6 

Attach pedal (22) onto the pedal bar (7) and 

fit it with Screw(29), Flat washer(38), Spring 

washer(39) and Nylon lock nuts(41). 


Содержание EP 949

Страница 1: ...1 ELLIPTICAL TRAINER EP 949 INSTRUCTION MANUAL...

Страница 2: ...success during training Please note and follow the enclosed safety and assembly instructions carefully If you have questions please do not hesitate to contact us Table of Content as blew 1 Safety Inst...

Страница 3: ...he first training and every 1 2 months that all connecting elements are tight fitting and are in the correct condition Replace defective components immediately and or keep the equipment out of use unt...

Страница 4: ...advice for correct training as detailed in training instructions The load work level can be adjusted by turning the adjustment knob on the handle bar stem The safety level of this equipment can be mai...

Страница 5: ...5 EXPLODED DRAWING...

Страница 6: ...Upper Swing Bar L R 1 SET 7 Pedal Bar L R 1 SET 8 Handle bar 1 PC 9 Bushing 16 8 30mml 1 SET 10 Crank left right 1 SET 11 Axle 1 PC 12 Computer 1 PC 13 Computer Cable 1 PC 14 Sensor cable 1 PC 15 Hand...

Страница 7: ...1 25 5mm Bolt Nylok 2 PCS 29 M6 45mml Screw 6 PCS 30 M4 10mml Screw 8 PCS 31 M4 15mml Screw 10 PCS 32 M5 15mml Screw 10 PCS 33 M8 32 2mm Flat washer 2 PCS 34 M8 21 1 5mm Curved washer 6 PCS 35 M8 25...

Страница 8: ...ilizer 3 with 4 bolts 23 and secure it with 4 washers 36 STEP 2 I Connect computer cable 13 and sensor cable 14 II Put upper support 4 into main frame 1 and secure it with washers 34 and bolts 23 tigh...

Страница 9: ...en connect hand pulse cable 15 with computer 12 STEP 5 Fasten lower swing bars L R 5 with axle 11 from upper support 4 and secure it with bolt 28 washer 33 tightly STEP 6 Attach pedal 22 onto the peda...

Страница 10: ...Fasten front of pedal bars 7 to the lower swing bars 5 secure it with bolt 26 washer 37 and Nylon lock nuts 40 STEP 8 Connect upper swing bar 6 and lower swing bar 5 then secure it with Bolt 25 STEP...

Страница 11: ...rt 4 fasten it with M4 15mml Screw 31 Fasten Front End Cap L R 20 With M5 15mml Screw 32 Fasten Back End Cap L R 21 With M4 15mml Screw 31 STEP 10 Put Adapter 17 into Socket 16 Then connect power supp...

Страница 12: ...the monitor Key Functions There are total 6 keys including START STOP ENTER MODE UP DOWN and RECOVERY A START STOP Starts or stops the program chosen And resets the monitor by pressing and holding fo...

Страница 13: ...of functions applied C PROGRAM Indicates the programs selected from PROGRAM 1 to PROGRAM 15 or 17 D LEVEL Indicates the level of loading selected from LEVEL 1 to LEVEL 16 E GENDER Indicates the gende...

Страница 14: ...ere are 10 columns of loading bars and 8 bars in each column Each column represents 3 minutes workout without the change of TIME value and each bar represents 2 levels of loading Operating Ranges Valu...

Страница 15: ...e 17 programs with 1 Recovery including 1 Manual Program 6 Preset Programs 1 Body Fat Program 4 Heart Rate Control Programs 4 User Setting Programs 1 Speed Independent Program and 1 Pulse Recovery Mea...

Страница 16: ...ting and ideal is from 10 to 14 Type 3 super sporting is from 15 to 19 Type 4 sporting is from 20 to 24 Type 5 healthy and ideal is from 25 to 29 Type 6 thin is from 30 to 34 Type 7 fat is from 35 to...

Страница 17: ...o apply the heart rate detector appropriately Users may also exercise in any desire level by pressing or during the workout with a period of time or a certain distance With the input of age the comput...

Страница 18: ...Independent Program Press ENTER key to select the values of TIME DISTANCE WATT and AGE Then press or key to adjust the values After pressing START STOP key to exercise please also apply the heart rat...

Страница 19: ...te is used as guideline As a rule of thumb the following formula is commonly used Maximum pulse rate 220 Age While exercising the pulse rate should always be between 60 85 of the maximum pulse rate Wh...

Страница 20: ...d be increased to 70 85 of your maximum pulse rate This can be done by increasing the resistance a higher frequency or longer training period TRAINING QRGANIZATION Warm up Before every training you sh...

Страница 21: ...u constantly have to increase the resistance to reach your optimum pulse rate The units will be continuously easier and you will feel a lot fitter during your normal day For this achievement you shoul...

Отзывы: