background image


Flight Control


---------------------------------------------------------------------------------------------------------------------------------------------------- 

During your first flight, please begin with operating on a 

smallscale.Pay attention to the flight direction and adjust the flight 

speed, slowly working towards moderate-scale operation. 

Please don't operate on too large scale, so as to avoid accidental 

collision. 

---------------------------------------------------------------------------------------------------------------------------------------------------- 


Motion Sensing Method 


Using your mobile device’s gravity sensor system, you can control flight by 

tilting your mobile device. 

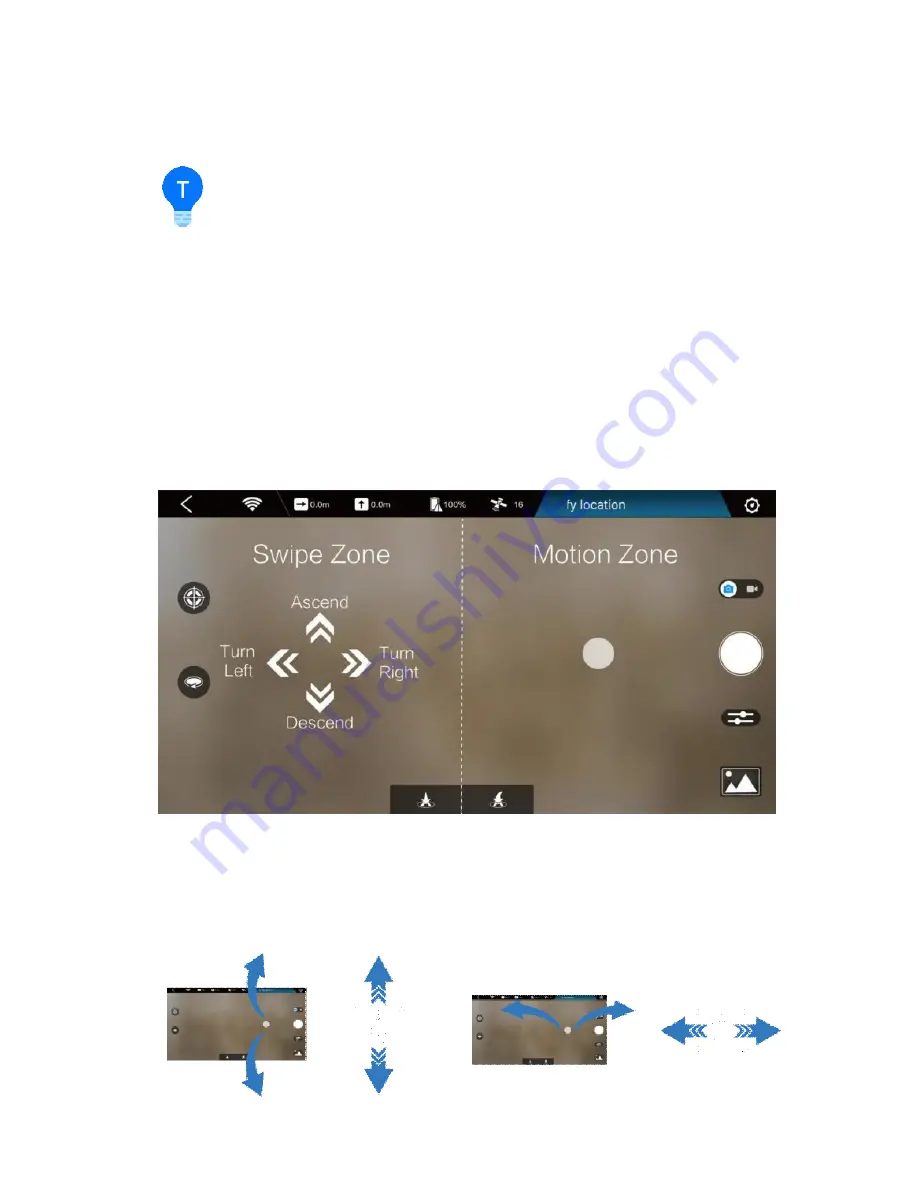
The left hand half of the screen is the swipe zone which controls 

ascent/descent and direction; the right hand half is the motion zone which 

controls flying forward/backward/left/right, as in the picture below: 


Fly forward/backward/left/right:Your mobile device tilted within 45° from 

horizontal, hold down on any part of the right hand half (motion zone) of your 

screen, and tilt your mobile device forward/backward/left/right. For fear of 

misoperation, the motion sensing can be activated by holding down on the 

screen only when the mobile device’s angle from horizontal is within 45°. 


Содержание HG TAKE

Страница 1: ...HG TAKE User Manual V1 0 2017 2...

Страница 2: ......

Страница 3: ...read the provided manuals in this order In the Box Battery Safety Instructions Disclaimer and then HG TAKE Quick Start Guide If you want to learn more please read HG TAKE User Manual Downloading the A...

Страница 4: ...p is specifically developed for HG TAKE and is really simple to use It can be used as a remote controller for flight control and photo video shooting Indoor Flight HG TAKE uses the optic flow and ultr...

Страница 5: ...t with a certain radius and at a certain altitude Return to Home After outdoor flight HG TAKE can return to you by just one tap on screen Sharing Directly share your photos Videos with your friends on...

Страница 6: ...Reset Key Power key light indicator Micro USB port Optic Flow and Ultrasonic Positioning Module...

Страница 7: ...t the ESC has turned on After connecting to the app the Power Indicator will turn solid blue Hold the On Off Switch for 3 seconds Wait until the blue light of the Power Indicator goes out then remove...

Страница 8: ...d to 0 5m it will determine if the requirements for using this system have been met If they have not it will initiate landing If the requirements are not met for this system during flight the aircraft...

Страница 9: ...asonic waves that are inaudible to humans but may make some animals nervous Please do not use HG TAKE close to animals Propeller HG TAKE has 4 sets of 3 inch foldable Propellers The propeller blades a...

Страница 10: ...ry 10 hours of flight Battery The battery is designed specifically for use with HG TAKE It has a rated capacity of 1450mAh and a nominalvoltage of 11 4V The battery s major characteristics are as foll...

Страница 11: ...The battery may be very hot after use Please do not touch it with bare hands immediately after use for fear of burns If the battery leaks emits an odor generates heat by itself changes shape swells et...

Страница 12: ...dapter and a USB cable Put the battery into the battery adapter The indicator will show the current battery level The indicator will go out automatically after 5 seconds The indicator s status and the...

Страница 13: ...olid orange during quick charge If you don t use the provided adapter it may only achieve slow charge instead of quick charge The Charging Status Indicator will be solid red during slow charge If the...

Страница 14: ...mera that can take 4208x3120 photos and shoot 1920x1080 videos Micro USB Port While HG TAKE is turned on use the provided USB cable and adapter to connect HG TAKE to your computer You can then copy yo...

Страница 15: ...rface All the necessary status indicators and main function buttons are on the main interface The layout is as follows 1 Back to main interface 2 Wi Fi Connection Status 3 Current Flight Distance 4 Cu...

Страница 16: ...after the icon 4 Current Flight Height The current flight height will be displayed after the icon 5 Aircraft Battery Full battery The battery level will be displayed in percentage after the icon Low b...

Страница 17: ...ettings Tap to enter the app setting and see About Some of the settings will need to access the Internet by using mobile data or switching to router Wi Fi 9 Target Tracking Aircraft automatically foll...

Страница 18: ...l Method It s set to Motion Sensing by default HG TAKE comes with 4 control methods that users can choose between Motion Sensing Swipe Screen Free Sticks and Safe Sticks The motion sensing method uses...

Страница 19: ...ages for you to choose from Compass Calibration HG TAKE can assist with compass calibration Please refer to Calibrating the Compass on page 24 Aircraft FC Update Upgrade the aircraft flight control Ai...

Страница 20: ...mobile device a mobile phone icon will be added to the top right hand corner of the thumbnail Selecting Photos To select a photo tap the tick in the bottom right hand corner of the photo To select al...

Страница 21: ...hotos to your gallery Other downloading methods will download photos into a new folder and won t be able to download photos into your gallery Photo Sharing There is a Share button on the browsing page...

Страница 22: ...by turning the equipment off and on the user is encouraged to try to correct the interference by one or more of the following measures Reorient or relocate the receiving antenna Increase the separati...

Страница 23: ...l buildings for fear that the GPS signal would be blocked 4 Do not fly near complex electromagnetic environments such as near signal tower base station for fear that the Wi Fi signal would be interfer...

Страница 24: ...E will not be able to fly while using the GPS positioning The Aircraft Status Indicator will be slow yellow flashing The app will prompt the no fly zone warning Preflight Checklist Please check the fo...

Страница 25: ...quipment The process of compass calibration is as follows 1 Expand the Arms Turn on the aircraft Connect to the aircraft s Wi Fi Enter HG TAKE s Settings Compass Calibration and tap on Start 2 Keep th...

Страница 26: ...e landing If the Wi Fi connection is lost or the app drops out HG TAKE will return and land if the GPS positioning is being used or initiate landing if the optic flow and ultrasonic positioning is bei...

Страница 27: ...from people When you touch HG TAKE with your hand or other objects like when using the palm takeoff landing function take care not to touch the propeller Take extra care not to run into people or obje...

Страница 28: ...ile device The left hand half of the screen is the swipe zone which controls ascent descent and direction the right hand half is the motion zone which controls flying forward backward left right as in...

Страница 29: ...for its meaning and applicable usage The default control method is set to Motion Sensing If it s already switched to other methods you can switch it back to Motion Sensing in App Settings Control Meth...

Страница 30: ...e movement Turn left right Hold down on the left stick the dot at the center of the left circle and toggle left and right Toggle and hold to continue the movement Fly forward backward left right Hold...

Страница 31: ...control HG TAKE s flight by tapping on the arrows on the four directions in the virtual sticks The operations of the safe sticks method are similar to the free sticks method However it uses tapping on...

Страница 32: ...jitter jelly etc It applies to both the conventional video recording and the 10s auto track short video recording We suggest you enable it How to enable EIS Tap the Camera Settings button and select...

Страница 33: ...ables the aircraft to automatically fly and record video around a certain point the origin with a certain radius and at a certain altitude When using it first you set the radius and the altitude to de...

Страница 34: ...ius of the orbit Thehorizontal axis shows the radius and the vertical axis shows the altitude Please make sure that there is no obstacle near the orbit The aircraft will fly to the position where you...

Страница 35: ...PS positioning The Camera s pitch angle must be adjusted to 22 5 first It can be manually adjusted before flight refer to Camera on page 12 Please be careful not to collide with other objects during o...

Страница 36: ...the target tracking tapping the Stop Tracking button will quit it The target tracking feature can be used only under outdoor GPS positioning The Camera s pitch angle must be adjusted to 45 first It c...

Страница 37: ...list If there re trees utility poles highline or other obstacles on the way of the return HG TAKE may collide with it Please confirm that there re no obstacles between the current position of HG TAKE...

Страница 38: ...Warranty Card Purchase Information Serial No Purchase Date Dealer Telephone Address User Name Telephone Address Maintenance Records Repair Date Fault and Repair Conditions...

Страница 39: ...In need of maintenance service please contact your dealer or contact HIGHGREAT customer service in the following ways E mail ass hg fly com TEL 400 888 9686 Wechat HighGreat service...

Отзывы: