background image

© 2020 HI-POD INC.

  (PAGE 49)  


Camera Settings Continued: 

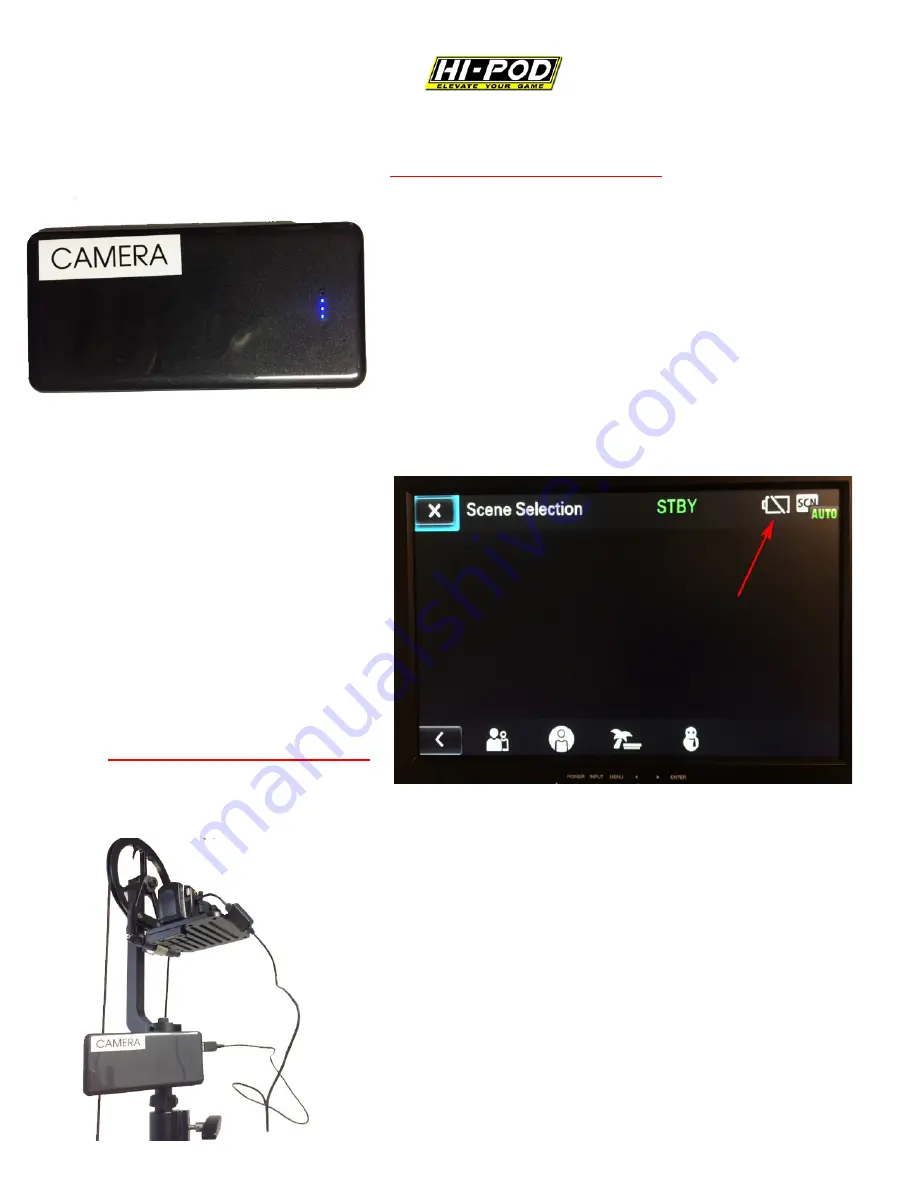
Confirming Camera Battery


For those


clients using either the grey or 

white USB batteries, you need to confirm 
that the battery is turned on and is set as 
the main power source before elevating. 
Without doing this, it's possible to leave 
the small internal camera battery


active 

which will die quickly

.  

If you have your camera 
connected to the LCD (with 
text on screen applied as 
explained earlier in this 
manual) you will see the 
battery icon in the top left. 
This means the small 
internal battery is active.


This is not what you want. 


First, mount the


battery to the tower (either 

to the top of the poles as


shown or to the 

camera plate).  Connect the battery to the 
camera with the female

-

to

-

male USB cable 

extension.  The female end will connect to the 
USB cable found in the camera hand strap.


Содержание Super-Lite

Страница 1: ... 2020 HI POD INC PAGE 1 HI POD Super Lite Setup Manual ...

Страница 2: ...ge 14 Attach LCD Page 15 Sony Remote Page 16 Hi Pod Handle Page 19 Cable Setup Page 31 Camera Battery Page 38 Finish LCD Setup Page 41 Finish Remote Setup Page 45 Text REC On Screen Optional Page 51 Raingear Page 56 Elevating Tubes Page 58 Complete Handle Setup Page 59 Lowering Tubes Page 59 Velcro Cables to Tubes Page 60 Putting The Tower Away ...

Страница 3: ...unk of an economy car Once you are familiar with the setup procedures it should take 10 15 mins to fully configure a unit Note Within 2 weeks of delivery product must be checked and confirmed by the client to have arrived in good order and in its entirety After that time clients will be responsible for any and all lost parts which are not covered under the warranty Confirm your inventory with the ...

Страница 4: ...itor Bracket 3 Piece Raingear 3 Sandbags LCD LCD Visor LCD Battery 5 9 Volt Adapter Cable HDMI Cable Lanc Cable Gold Screw for Power Bank Camera Remote Camera Camera Power Bank 16GB SD Card Cable Stress Relief Plate Quick Release Plate Hi Pod Quick Notes Insert ...

Страница 5: ...OD INC PAGE 5 3 IMPORTANT THINGS ALWAYS use the Strain Relief Plate for your cables ALWAYS use your sandbags Take note of the Text on Screen instructions to display record status and other camera settings page 47 ...

Страница 6: ... PAGE 6 Take Tower Out Of Bag Take the tower out of your case and place it on the ground There are two black twist knobs on the base of the tower and you will need to unlock these to allow for the tower legs to expand ...

Страница 7: ...base of the tower with the black slats between the yellow legs as even level with the ground as possible This will give you maximum stability during operation Once the black slats are level turn the two knobs shown in the above picture with red arrows to lock the legs in place ...

Страница 8: ...majority of situations Also it s better not to actually fill the bags with sand it can be a mess Rocks gravel bricks weights from the gym or something else is preferred You are welcome to go beyond the three bags should you want Add cables through the legs which then connect to stakes if not on a turf field add more weight bags whatever you like The three bags we include are sufficient but there i...

Страница 9: ... 2020 HI POD INC PAGE 9 USE YOUR WEIGHT BAGS ...

Страница 10: ...manage it at all times Anything can happen at any time unexpected winds can pop up rain can surprise you someone could mess with your setup or there could be lightning who knows If you ever need to walk away from the unit bring it completely down so the tubes are fully compressed Then you can take a break ...

Страница 11: ... 2020 HI POD INC PAGE 11 Hi Pod Head Find the Hi Pod Head in the case and attach it to the opening at the top of the tubes You ll see a threaded hole on the top tube which the head will connect to ...

Страница 12: ...ock the tubes so they can t rotate or to release the tubes so they can spin 360 degrees You can turn the ratchet in a complete circle to tighten but the ratchet itself is adjustable pull out reposition release continue the motion It s best to tighten the ratchet when putting the tower away so it won t rotate awkwardly During filming you ll want to open this ratchet so you can spin the tower as nee...

Страница 13: ...ounting Rod The LCD Mount allows for the screen to attach to the unit You will find a metal item shown in the image to the left Simply screw this part into the threaded hole on the silver clamp on the middle of the tower to tighten ...

Страница 14: ...PAGE 14 Attach LCD You ll find the LCD in the electronics bag Note the metal part mounted beneath with an open hole red arrow Slide onto the silver rod and tighten with the black knob below to hold the desired position ...

Страница 15: ... a picture of the Sony remote with mounting arm below To install line up the groove in the back of the remote to the arm and snap into place When ready to remove the remote press the button on the left top of the remote and it will slide off ...

Страница 16: ...E 16 Hi Pod Handle The basic handle is included in the list price and it pivots up and down It has a black knob on the side which will either lock the arm in place if closed or if open will allow the handle to move freely ...

Страница 17: ...ou use to connect the handle to the head On the head you ll see a small hole cut out where you ll thread the cable On the end of one side of the line you ll find a metal stopper Take the opposite end without the stopper and insert it through the hold noted on the head Pull it through all the way until the stopper falls in place ...

Страница 18: ... the basic handle is done at the very end up setup after the tubes have been elevated unlike the advanced handle which you can connect immediately When it is time to complete the head handle connection see the area you ll install and connect the cable to with a brass screw in the image below but this will occur later ...

Страница 19: ...he cable bundle for your system below There are two cables HDMI for video and Lanc for remote control that are installed in two metal plates Strain Relief and Quick Release plates There is also a carabineer hook attached to help better position teh cabling ...

Страница 20: ... 2020 HI POD INC PAGE 20 First take the carabineer and attach it to the metal eye hook connected to the very top of the Hi Pod tubes 1 2 ...

Страница 21: ...Plate w Quick Release Carabineer To mount the strain relief plate with quick release attached use the smaller of the two middle holes on the bottom of the strain relief portion of the plate See the hole noted with the red arrow to the right ...

Страница 22: ... 2020 HI POD INC PAGE 22 Note the hole which has the circular rubber grip installed around it This is the hole you will use to connect the strain relief plate to the Hi Pod head ...

Страница 23: ...open to accept the camera which will then snap into position The Strain Relief plate has winding grooves cut out of it which allow the HDMI and remote cables to slide into place Then the Quick Release plate installs on top of the Strain Relief to lock the cables down This set of plates prevents any tension from pulling at the small connection points on the camera Any yanking or pulling on the cabl...

Страница 24: ...screw in one of the pockets of your tower camera bag as shown in the image to the right This is what is used to secure the plates to the Hi Pod head Here is a view from below of what the brass screw lever and strain relief plate will look like ...

Страница 25: ... 2020 HI POD INC PAGE 25 Now from below the Hi Pod head take the brass screw and thread it into the strain relief plate as shown Note the red arrow pointing out the position of the lever pointing back ...

Страница 26: ...ike this view from above Note the red arrow again pointing to the lever which is facing back There is a long strap of velcro image right on the cables which you can use when putting them away but also to reinforce the cables connected to the hook Position as needed ...

Страница 27: ...in all default purchases we will ship the camera with a mounting adapter already attached It is pointed to by the red arrow below This will snap into the top Quick Release plate we just connected in the previous step again make sure the lever is pulled back to accept the camera For cabling there are two ports to be aware of on the camera HDMI and Multi They will each be described below ...

Страница 28: ...est to leave it in the permanently as the cards are very small Inserting removing the card over and over again is not advisable as you could cause damage Instead transfer footage out of the camera via the USB cable to be discussed on the following page located on the opposite side of the camera MULTI Remote Cable Port On the opposite side of the camera under the hand strap you ll find a small door...

Страница 29: ...small internal battery will need some amount of charge in it so that the camera will turn on but you do not want the small battery to be used as the default power source because it will die in 20 30mins more on that in a later section Mount the camera by pulling back the lever on the Quick Release Plate and inserting the adapter on the bottom of the camera into the plate assembly Tilt the camera i...

Страница 30: ... Now connect the HDMI and remote Multi cables to the camera Note that the cable for the remote which connects to the Multi port has a yellow tag attached The HDMI does not have a tag on it so this is how you can tell them apart HDMI left side MULTI right side ...

Страница 31: ...ight actual battery can change over time but function remains the same As mentioned earlier there is a small battery inside of the camera that lasts 20 30 mins This is far too short to film a game so by connecting this external battery you can film up to 5 hrs Find another of the brass screws in your cases and drop it into the hole shown in image below facing down to the right of the camera ...

Страница 32: ... 2020 HI POD INC PAGE 32 See a reverse angle of the camera screw setup ...

Страница 33: ... 2020 HI POD INC PAGE 33 Take the USB battery and connect it to the brass screw Tighten the secondary thumbnail on the screw to lock in place ...

Страница 34: ...ble inside of the camera s hand strap and the USB port on the external battery we just installed These will be connected by an adapter cable See the female to male USB adapter in the image to the left The female side connects to the USB cord from the camera and the male end plugs into the USB battery ...

Страница 35: ... 2020 HI POD INC PAGE 35 Connect the male side of the USB cable to the battery Connect the female side of the USB cable to the camera s male USB ...

Страница 36: ...nd unplugs the battery during use very important The best option is to bind up the extra cable and secure it inside of the velcro on the hand strap Gather the cabling open the velcro place cable inside and close the velcro This allows everything to move together when the camera pans tilts when filming Nothing will catch and unplug ...

Страница 37: ... half charged or about to die like in the image below you are drawing power from the small battery inside of the camera This is NOT what you want If your external battery is already connected per instructions above you need to click the battery on to activate the power transfer Sometimes the batteries don t automatically turn on often they do but not always When the big USB battery takes over the ...

Страница 38: ... 2020 HI POD INC PAGE 38 Finish LCD Setup See the open HDMI port on the LCD in the image to the right Connect the standard sized HDMI cable at the bottom of the cable bundle to the port ...

Страница 39: ... 2020 HI POD INC PAGE 39 On the back for your LCD you ll see a long strip of velcro Find the larger LCD battery with velcro pre attached and stick it onto the back of the screen ...

Страница 40: ... provide power from the battery directly into the LCD In the first image below you ll see a red arrow pointing to the USB port on the LCD With the LCD reversed you ll find it on the right side near the DC port Simply plug the USB cable into the available port and connect it to the battery ...

Страница 41: ...dle top end of this cable has the yellow tag which plugged into camera The cable head looks like this right Pay special attention to the white piece added to the cable head This is a strain relief that we have made with a 3D printer It fits into the gap around the cable port that s inside the remote and prevents the tip of the cable from wiggling or breaking inside when filming ...

Страница 42: ...n to the remote and therefore will not function properly Below in the first image you ll see the silver tip of the remote cable extending past the white strain relief This is what you want as the strain relief is present but the metal tip passes it to connect to the remote In the second image you ll see a scenario where the white stain relief has shifted forward This will offer no connection to th...

Страница 43: ...es to protect the cable Common Issue Something that tends to happen is that a client will have the white piece shifted forward slightly but they won t notice it This happens when the white strain relief is shifted back on the cable head enough for the metal tip to connect to the remote but not completely so the cable is only half inserted into the remote When this happens you see the green power ...

Страница 44: ...to remote enough to receive power but not enough to communicate signals back and forth Correct this by adjusting the placement of the white strain relief back onto the cable head and make sure it is fully connected Then everything will start working Complete this portion of the setup by sliding the gray plastic grip on the arm of the remote mount directly behind the end of the cable head This acts...

Страница 45: ...t text record battery status from the camera down to the LCD There is a way to achieve this on less expensive cameras but it s applied every time the camera is turned on Once memorized it takes about 5 secs With the new remote with light on it this becomes an option First click on the Menu button in the top left corner Select Camera Mic ...

Страница 46: ... 2020 HI POD INC PAGE 46 Scroll down until you find Scene Selection and click on it Your screen will change to look like this Click on the bottom right arrow to continue ...

Страница 47: ...cording This way you ll always know when you are or aren t recording This text overlay will not be on your final video files It is only seen by the Hi Pod operator when they are filming Note If you have a remote which has a Photo button option DO NOT HIT IT If you do it will bounce you out of this view back into the menu where you chose Scene Selection If you do this while the camera is in the air...

Страница 48: ...active the camera saves two copies of the same clip in different quality settings one is higher def one is for online sharing What this means is that the camera is taking double the storage space that it needs to Whether you want to leave this setting on is up to the preference of the user but if you want to turn it off First go to Menu Then Image Quality Size Then look for Dual Video REC Turn thi...

Страница 49: ...ery active which will die quickly If you have your camera connected to the LCD with text on screen applied as explained earlier in this manual you will see the battery icon in the top left This means the small internal battery is active This is not what you want First mount the battery to the tower either to the top of the poles as shown or to the camera plate Connect the battery to the camera wit...

Страница 50: ...ttery to turn it on You will see the buttons on the battery light up blue When connected correctly and turned on the battery button in the top right of the LCD will disappear This is what you want and when charged will allow the camera to record for at least 5 hrs ...

Страница 51: ...here are three parts to the raingear for the Hi Pod Camera LCD Remote See the camera raingear below This image is shown without the wheeled head The brass screw will be the only part under the wheeled head everything else will go on top ...

Страница 52: ... 52 Use the same hole on the strain relief plate to attach the brass screw as you do with the raingear Just make sure that now the raingear plate is below the strain relief plate but on top of the wheeled plate See attached ...

Страница 53: ...s a cinch cord which will allow you to organize your cables arrange the bag and then completely close so no water can get inside There are different ways to accomplish this but the key is to pull the cord completely shut when finished ...

Страница 54: ... 2020 HI POD INC PAGE 54 Note the length of cord and general position Pull shut The LCD raingear attaches by simply sliding it over the mounted screen with battery attached in the back Velcro to seal ...

Страница 55: ...l With the camera lcd and remote covered this completes the raingear setup If conditions vary you can always go beyond what is included to enhance your protection You will need to judge the weather conditions and adjust BEFORE you start shooting If you even think there is a chance of bad weather mount the raingear in advance There is nothing worse than scrambling in rain during the middle of a gam...

Страница 56: ...es At this point in the setup your unit is set to elevate Grab a pole above a collar unlock raise to your desired height and lock again Note the lever camlock which you ll use to release and lock the tube collars Repeat this for all stages ...

Страница 57: ...2020 HI POD INC PAGE 57 See the collar and camlock on the tubes after the pole has been elevated Close the lever camlock to hold the pole in place at your desired height Again repeat for all tube stages ...

Страница 58: ...ct the head to the brass screw gap on the handle mechanism See this image mentioned earlier in the manual The gap between the brass screw and metal frame of the handle is where you ll secure the long cable attached to the Hi Pod head Once the cable is in place close the brass screw behind it to secure ...

Страница 59: ...a collar before opening that collar If you do not grab the pole first it will shoot down Velcro Cables to Tubes We include a strap of velcro above every collar Use this to attach your video lanc cables to the tower This keeps your cables out of the way and acts and an additional strain relief ...

Страница 60: ...r you to put away the unit most of the setup can just be done in reverse Two key things to point out 1 When attempting to fold the tower unlock all knobs and push your foot lightly down on the black slats between the legs and pull up on the top The legs will fold in ...

Страница 61: ... 2020 HI POD INC PAGE 61 Setup Complete For more information see http hipod com see Manuals tab For help call us at 818 982 2601 9am 5pm Pacific M F ...

Отзывы: