18
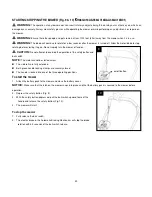
ATTACHING/REMOVING THE SIDE DISCHARGE CHUTE(available separately) (Fig. 5a & 5b)
WARNING:
Do not at any time make any adjustment to the lawn
mower without first stopping the motor, removing the battery pack and
waiting for the blade to stop rotating.
1. Remove the battery.
2. Lift the rear-discharge door up.
3. Align the lower edge of the discharge with the groove of the door sill
and insert it into the slot.
4. Push the top of the discharge and insert it into the mower. Check to
see that it is securely seated in the deck.
5. To remove the side discharge chute, lift the rear-discharge door, grasp
the side discharge chute and pull it out.
6. Release the discharge door and make sure that it rests firmly against
the discharge chute.
SPRING-LOADED CUTTING-HEIGHT ADJUSTMENT (Fig. 6)
WARNING:
Do not at any time make any adjustment to the lawn
mower without first stopping the motor, removing the battery pack and
waiting for the blade to stop rotating.
WARNING:
Keep your feet away from the deck when adjusting its
height.
The mower can be set to 7 cutting heights between 1-
1/2” (
25mm) and 3
”
(75mm). Choose the proper cutting height according to the type and
condition of the grass.
To raise the blade height
1. Grasp the height-adjustment lever, and move it outwards.
2. Move the lever toward the back of the mower and engage the lever in
the desired cutting-height position on the mower deck.
To lower the blade height
1. Grasp the height adjustment lever, and move it outwards.
2. Move the lever toward the front of the mower and engage the lever in
the desired cutting-height position on the mower back.
5a
5b
6
cutting height
adjustment lever
grooves


