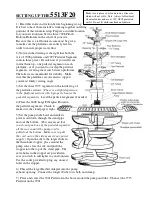
8) Set the 6615 Bowl on the 7715 pedestal, feeding the tube up through the center hole of this bowl
as it is lowered. Check how level the 6615 bowl is. Add shims if necessary. Then, slip the 8” long
Standpipe down around the tube and screw it into the hole in the bowl.
9) Push the larger Tee into the end of the tube as shown. Then push the remaining ¾” tubes over
the other two legs of the tee. Clamp each tube connection to this tee. Secure all with screw clamps.
Then mount a Flow Restrictor to the side-spilling tube (as shown in drawing) by tightening it
just enough to hold in place.
10) As you then set the 6614 Bowl on the 6615, feed the upper tube up through the center hole
of this new bowl. Check for level. Slide the shorter standpipe over and down around the water tube
until you screw it into place in the bowl’s hole, then add the reducing tee to the top of the tube.
11) Connect two ½” tubes to the other legs of the tee. Attach another flow restrictor to the side-
spilling tube as before.
12) As you place the 6613 Bowl on the 6614, feed the loose tube up through it and check for level
as before. In this bowl, seal the hole with the Large-Holed Rubber Stopper. Simply open the
stopper at the slit, place around the tube near the hole, and push tightly into the hole. Attach the
third flow restrictor to the tube near the stopper.
13) Thread the smaller Barbed Adapter into the underside of the 5513 Finial Bowl. Lower the
5513 toward the 6613 bowl and connect the open tube to the barbed adapter, then set on the 6613.
14) Finally, place two of the 6097 Rim Edge pieces on the rim of the 6098 fiberglass bowl. You
may want to make sure you do not place a seam between these pieces right in your desired viewing
angle. Connect these two pieces using the stainless strap and screws provided. They attach on the
inner bowl side of the pieces as shown. After connecting the first pair, place and attach the third
and then place and attach the fourth.
15) Fill all basins and pools with water. Read pump instructions. Plug the pump in to start the
fountain. If it does not immediately begin working, there may be an “airlock” within the impeller
chamber. Simply unplug and plug in a few times and it should start. Adjust shims to correct any
level concerns. Tighten any of the flow
restrictors if you want to reduce the
water flow in that area.
Csd
4/2021
Online Resources
Products
:
www.henristudio.com/products
FAQs:
www.henristudio.com/faq
Warranty:
www.henristudio.com/warranty
Contact :
www.henristudio.com/contact-us
Caution: The use of Chlorine or Chlorine Bleach or water
coloring additives may damage the finish of your fountain.
IMPORTANT – WINTER CARE
Winter ice build-up can cause damage to concrete statuary. Follow
these tips to reduce winter weathering to your fountain:
* Disconnect power to pump.
* Remove plugs/stoppers in all fountain bowls to open drains and let
all moisture out. Keep drains open throughout winter.
* Cover with a Henri fountain cover. Keep tight and do not let snow
or water collect in sagging areas.
* Do not allow snow or ice to build up on or against the concrete.
Remove snow before it turns to ice. Do not use antifreeze, salt or
chemical ice removers as these may damage concrete.


