background image

42

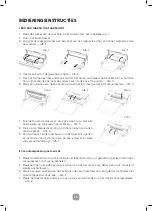
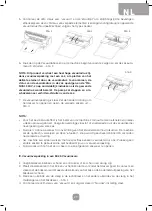
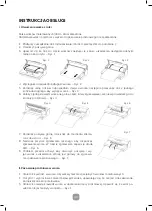
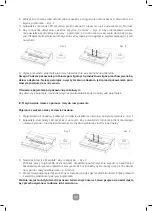
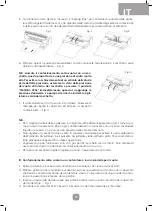
3.   Włożyć końcówkę przewodu do wlotu powietrza, drugi koniec zamocować w otworze w po-

krywie pojemnika. – Rys. 1

4.   Sprawdzić stan diody LED przycisku próżni „vacuum” i upewnić się, że ustawienie to „Normal”.
5.  Aby rozpocząć odsysanie, nacisnąć przycisk „Canister” – Rys. 2. Aby uniemożliwić ucieka-

nie powietrza  spomiędzy pokrywy i  pojemnika, po rozpoczęciu zasysania  docisnąć pokry-
wę. Urządzenie zostanie automatycznie zatrzymane po osiągnięciu wystarczającego ciśnie-
nia próżni.

Rys. 1

Rys. 2

6.   Wyjąć przewód z pojemnika lub misy niezwłocznie po zakończeniu działania. 

Uwaga: Podczas pakowania próżniowego wilgotnych produktów wilgoć przechowywana bę-
dzie w adaptorze. Należy pamiętać o wyczyszczeniu adaptora, jeśli przed pakowaniem próż-
niowym znajduje się w nim woda.

Otwieranie pojemnika po pakowaniu próżniowym

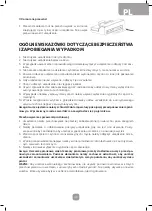
Aby otworzyć pojemnik, nacisnąć przycisk zwolnienia blokady na pokrywie pojemnika.

IV. Marynowanie mięsa za pomocą misy do marynowania

Pojemnik z wężem należy zamawiać osobno.

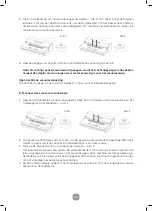
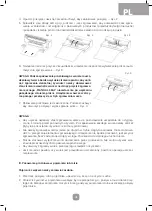
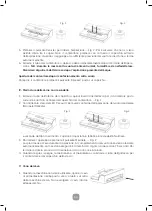
1.   Wyjąć przewód z obudowy, podłączyć do wejścia urządzenia i otworu w pokrywie pojemnika. – Rys. 1
2.   Sprawdzić stan diody LED przycisku „vacuum”, aby potwierdzić ciśnienie próżni dla danego 

rodzaju żywności (normalne/delikatne). Domyślnie wybierany jest tryb normalny. 

Rys. 1

Rys. 2

3.  Nacisnąć przycisk „Marinate”, aby rozpocząć. – Rys. 2
 

Podczas pracy miga dioda LED kontrolki. Urządzenie automatycznie wypuści powietrze po 
zakończeniu zasysania, urządzenie pracuje przez 5 cykli. Każdy cykl roboczy trwa ok. 75 sekund. 
Cały proces marynowania trwa ok. 6 minut.

4.   Proces marynowania jest zakończony w momencie, gdy zgaśnie dioda kontrolki. Zdjąć przewód 

z wejścia urządzenia i pokrywy pojemnika. 

Próżnia nie jest substytutem dla procesu termicznej konserw. Łatwo psujące się nadal muszą 
być przechowywane w lodówce lub zamrożone.

Содержание CookMania Professional 970546

Страница 1: ...P R O F E S S I O N A L VACUUM SEALER ITEM NUMBER 970546 INSTRUKCJA OBS UGI USER MANUAL VERKLARING BEDIENUNGSANLEITUNG INSTRUCTIUNE MANUALE PL EN NL DE RO IT...

Страница 2: ...to open the casing of the appliance yourself Do not insert any objects in the casing of the appliance Do not touch the plug with wet or damp hands Danger of electric shock Do not attempt to repair yo...

Страница 3: ...ppliance and its cord out of reach of children Children shall not play with the appliance Always disconnect the appliance from the supply if it is left unattended and before assem bly disassembly or c...

Страница 4: ...ome soft crushable items storage where less vacuum pressure is de sired Default setting is normal and high vacuum pressure 3 Sealing time Three buttons for choosing the best bag seal time Dry button f...

Страница 5: ...rt To insert the hose for canister and wine stopper before marinates or canister operations 11 Front handle Press down to lock the cover And lift to open the cover 12 Air intake Air intake connects wi...

Страница 6: ...e end to the other end to cut the bag Close the top cover Fig 3 6 Put one end of the bag on top of the sealing strip but not enter the vacuum chamber Fig 4 Fig 4 Fig 5 Fig 6 7 Close the upper lid and...

Страница 7: ...to let the appliance cool down for 1 minute before using it again Wipe out any excess liquid or food residue in the vacuum chamber after each bag packaged Do not seal one after another continuously t...

Страница 8: ...containers Vacuum is NOT a substitute for the heat process of canning Perishables still need to be re frigerated or frozen Open Canister after vacuum packaging In order to open the canister you need t...

Страница 9: ...ember to make sure the lid of appliance is unlocked when not in use and in storage Keep the cover locked will distort the foam gaskets causing leaking 3 Unplug the machine before cleaning it or carryi...

Страница 10: ...seal or use another bag 4 Leaks along the seal which can be caused by wrinkles debris crumbs grease or liquids from the bag Reopen bag wipe the top inside of the bag and smooth it out along the sealin...

Страница 11: ...r the plug then the plug must be removed cut off if it is a molded on plug and an appropriate one fitted Warning dispose of a plug that has been cut from the power supply cord as such a plug is hazard...

Страница 12: ...n Sie kein Zubeh r das weder empfohlen noch daf r bestimmt wurde benutzen Sie keine Ger te die nicht mit dem Bestimmungszweck bereinstimmen Man muss sofort die Anwendung des Ger tes unterbrechen wenn...

Страница 13: ...Fl che stehen z B auf dem Tisch oder einer Platte Es ist nicht notwendig Schmiermittel zu verwenden z B weder l noch Wasser Tauchen Sie weder ein Teil des Ger tes noch die Stromversorgungsleitung in W...

Страница 14: ...smittel ohne Feuchtigkeit k rzere Schwei zeit Einstellung Moist nass f r nasse Beutel oder feuchte Lebensmittel l ngere Schwei zeit Einstellung Extended erweiterte f r nasse Beutel oder sehr feuchte L...

Страница 15: ...iebsart Vacuum Seal darf man diesen Einlass beim Anlegen des Beutels nicht verdecken 13 Vakuumkammer Den offenen Rand des Beutels in der Kammer anbringen die Luft wird aus dem Beutel angesaugt und auc...

Страница 16: ...5 Abb 6 7 Die obere Abdeckung schlie en und bis zum Klicken von beiden Seiten zusammendr cken Abb 5 8 Die Taste f r das manuelle Schwei en dr cken um mit dem Verschwei en des Beutels zu beginnen Abb...

Страница 17: ...s Ger t vor dem erneuten Gebrauch f r 1 Minute abk hlen zu lassen Nach dem Verpacken eines jeden Beutels muss man die Fl ssigkeiten und Lebensmittelr ckst nde aus der Vakuumkammer abwischen bzw entfer...

Страница 18: ...s nach dem Vakuumverpacken Um den Beh lter zu ffnen muss man die Taste f r die Freigabe der Blockade auf dem Deckel des Beh lters dr cken IV Marinieren des Fleisches mit Hilfe einer Schale zum Marinie...

Страница 19: ...reinstimmung des Steckers mit der Steckdose muss man das Ger t zwecks Aus tausch des Steckers an einen autorisierten technischen Servicedienst bergeben Lagerung des Vakuumschwei ger tes 1 Das Ger t mu...

Страница 20: ...Beutel undicht ist Er muss erneut verschwei t werden oder es ist ein anderer Beutel zu verwenden 4 Verwenden Sie nur daf r vorgesehene Beutel mit Pr gungen die vom Hersteller angeliefert wer den 5 Lec...

Страница 21: ...n das Ger t und den Beh lter richtig angeschlossen ist 2 Es ist zu pr fen ob der Drehknopf des Beh lters sich in der Stellung Schwei en befindet 3 Am Anfang der Luftabsaugung die Abdeckung ODER den Ad...

Страница 22: ...ende Abdeckung der Sicherung verwendet bzw installiert wurde Bei Steckern mit abgenommener Abdeckung der Sicherung muss der Ersatz der Farbe der Grund platte des Steckers oder den an Hand des Steckers...

Страница 23: ......

Страница 24: ...ze machine niet voor andere doeleinden dan deze waarvoor ze bedoeld is Stop het gebruik van de machine onmiddellijk als het snoer beschadigd is en laat het vervangen door een vakman Blijf uit de buurt...

Страница 25: ...er te gebruiken op deze ma chine Dompel geen delen van deze machine netsnoer of stekker in water of enige andere vloeistof Gebruik deze machine niet buiten of op een nat oppervlak het wordt alleen aan...

Страница 26: ...tteaf dichtingstijd Moist vocht knop voor natte zakken of voedsel met vocht met normale hitteafdichtings tijd Extended verlengd knop voor natte zakken of voedsel met hoog vochtgehalte met een verlengd...

Страница 27: ...aan op vacu mkamer en pomp Dek deze luchtinlaat niet af als u een zak inzet voor Vacuum Seal verrichtingen 13 Vacu mkamer Plaats het open uitiende van de zak in de kamer zuigt lucht uit de zak en vang...

Страница 28: ...t bovenste deksel en druk goed aan tot u Het aan beide zijden op zijn plaats hoort klikken Afb 5 8 Druk op de Manual Seal knop om het afsluiten te starten van de zakken Afb 6 9 Zet de voorste hendel n...

Страница 29: ...afkoelen vooraleer u deze opnieuw gebruikt Veeg alle overtollige vloestof of voedselresten uit de vacu mkamer na verpakking van elke zak Sluit niet continu na elkaar f om overhitting van het afsluite...

Страница 30: ...oor het blikdeksel drukken IV Marineer vlees met een marineerkom 1 Haal het slangjhulpstuk uit het binnendeksel steek het in de blikpoort van de machine en het middengat van het blikdeksel Afb 1 Afb 1...

Страница 31: ...t niet van te zorgen dat het deksel van de machine ontgrendeld is wanneer niet ge bruikt en in opslag Het deksel vergrendeld houden zal de schuimrubberen pakkingen vervor men en lekken veroorzaken 3 T...

Страница 32: ...ren pakking onder het deksel op puin en correcte positie Veeg schoon en breng mooi opnieuw op zijn plaats aan en probeer nogmaals 2 Ga na dat er geen breuken of vervormingen van de schuimrubberen afdi...

Страница 33: ...e uitrusting 2 Door te zorgen dat dit product correct wordt opgeruimd zult u potenti le negatieve gevolgen voor het milieu en menselijke gezondheid helpen voorkomen die anders kunnen veroorzaakt worde...

Страница 34: ...n de netvoedingskabel van deze machine niet overeenkomen met de gekleurde markeringen ter identificatie van de aansluitpunten in uw stekker ga dan als volgt te werk De BLAUW gekleurde draad moet worde...

Страница 35: ......

Страница 36: ...zenia Nie wtykaj adnych przedmiot w w obudow urz dzenia Nie dotykaj wtyczki kabla zasilaj cego wilgotnymi r kami Niebezpiecze stwo pora enia pr dem Nie nale y samodzielnie napra wia urz dzenia Wszelki...

Страница 37: ...ia W adnym wypadku nie zezwala na obs ug urz dzenia przez dzieci Urz dzenie wraz ze sznurem przechowywa poza zasi giem dzieci Nie dopu ci by dzieci wykorzystywa y urz dzenie do zabawy Zawsze od czy ur...

Страница 38: ...zgniecenia produkt w w przypadku kt rych wymagane jest ni sze ci nienie pr ni Domy lne ustawienia to normalne i wysokie ci nienie pr ni 4 Czas zgrzewania Trzy przyciski umo liwiaj wyb r czasu zgrzewan...

Страница 39: ...na przed u yciem funkcji Marinate albo Canister 12 Wlot powietrza Wlot powietrza cz cy komor pr niow z pomp Nie nale y zas ania tego wlotu podczas uk adania worka w trybie Vacuum Seal 13 Komora pr nio...

Страница 40: ...aw d worka na g rn cz listwy zgrzewaj cej ale nie wprowadza go do komory pr niowej Rys 4 Rys 4 Rys 5 Rys 6 7 Zamkn pokryw g rn i docisn do momentu klikni cia z obu stron Rys 5 8 Nacisn przycisk zgrzew...

Страница 41: ...worki Rys 4 UWAGA Aby uzyska najlepszy efekt zgrzewania zaleca si pozostawienie urz dzenia do ostygni cia na 1 minut przed ponownym u yciem Po zapakowaniu ka dego worka nale y zetrze p yny lub pozosta...

Страница 42: ...pr niowym Aby otworzy pojemnik nacisn przycisk zwolnienia blokady na pokrywie pojemnika IV Marynowanie mi sa za pomoc misy do marynowania Pojemnik z w em nale y zamawia osobno 1 Wyj przew d z obudowy...

Страница 43: ...znego w celu wymiany wtyczki Uwaga Gor ce jedzenie nale y sch odzi do temperatury pokojowej przed pakowaniem pr niowym W przeciwnym razie zawarto mo e wydosta si z pojemnik w Przechowywanie zgrzewarki...

Страница 44: ...cno fa d okruszk w t usz czu albo p yn w Otworzy worek przed ponownym zgrzaniem wytrze od wewn trz g rn cz worka i wyg adzi wzd u listwy zgrzewaj cej Urz dzenie nie przechodzi w tryb zgrzewania po ode...

Страница 45: ...zelk pokrywy 4 Sprawdzi czy nie wyst puj istotne uszkodzenia je li tak nale y wymieni pokryw 5 Sprawdzi dzia anie zgrzewarki pr niowej 6 Upewni si e kraw d pojemnika jest czysta W razie wykluczenia po...

Страница 46: ...s ony zast pczej nale y upew ni si e zastosowano i zainstalowano odpowiedni os on bezpiecznika W przypadku wtyczek ze zdejmowan os on bezpiecznika zamiennik musi odpowiada koloro wi podstawy wtyczki a...

Страница 47: ......

Страница 48: ...icati Non usare l appa recchio per scopi diversi da quello previsto Se il cavo apparecchio pspegnere immediatamente l apparecchio e far sostituire il cavo stesso da un professionista Tenersi a distanz...

Страница 49: ...o acqua Non immergere alcuna parte di questo apparecchio del cavo di alimentazione o della spina nell acqua o in qualsiasi altro liquido Non usare l apparecchio all esterno o su una superficie bagnat...

Страница 50: ...aling time Durata della sigillatura tre pulsanti per scegliere la migliore durata per la sigil latura del sacchetto pulsante Dry Asciutto per sacchetti asciutti e articoli privi di umidit con una dura...

Страница 51: ...abbassarla per sbloccare il coperchio e sollevarla per aprirlo 12 Presa dell aria la presa dell aria si collega alla camera del vuoto e alla pompa Non coprire la presa dell aria quando si posiziona il...

Страница 52: ...iudere il coperchio superiore e premerlo bene fino a sen tirne lo scatto in posizione da entrambi i lati Fig 5 8 Premere il pulsante Manual Seal per cominciare la sigillatura del sacchetto Fig 6 9 Sol...

Страница 53: ...nuto pri ma di usarlo nuovamente Dopo ogni confezionamento rimuovere con un panno l eventuale liquido in eccesso o i residui di cibo presenti nella camera del vuoto Non sigillare un sacchetto dopo l a...

Страница 54: ...coperchio quindi inserirlo nell attacco per il contenitore posto sull unit e nel foro centrale del coperchio del contenitore Fig 1 2 Controllare lo stato del LED Vacuum per avere conferma della pressi...

Страница 55: ...siasi attivit di manutenzione 4 Per eventuali riparazioni contattare se possibile un centro assistenza tecnica autorizzato 5 Usare solo parti di ricambio originali del fabbricante N B le guarnizioni d...

Страница 56: ...o Estrarle dalle scanalature lavarle e asciu garle accuratamente oppure sostituirle con delle guarnizioni di schiuma nuove procurarsele dal rivenditore o dal centro assistenza pistenza pip 3 Il sacche...

Страница 57: ...ZA PER SPINE SMONTABILI O STAMPATE I fili conduttori di questo apparecchio potrebbero gi essere forniti di una spina BS 1363 13 A Se il fusibile dev essere sostituito utilizzare un fusibile 13 A ASTA...

Страница 58: ...acest aparat n alte scopuri dec t cel inten ionat nceta i imediat s mai utiliza i ma ina n cazul n care cablul este deterio rat i solicita i asisten a unei persoane calificate pentru a l nlocui Feri i...

Страница 59: ...au apa Nu introduce i n ap sau orice alt lichid niciuna dintre componentele acestui aparat cablul de alimentare sau tec rul Se recomand utilizarea acestui produs numai n interior fiind de uz casnic i...

Страница 60: ...ede cu un timp extins de etan are Timpul de etan are mai scurt pentru pungile uscate reprezint setarea implicit 4 Recipient Pentru a ini ializa procesul de vidare prin furtun a recipientelor a capacel...

Страница 61: ...erul din aceasta i capteaz orice scurgere de lichid din pung 14 Band de etan are Pune i punga ce urmeaz a fi sigilat peste aceast band pe care trebuie s o cur a i i s o usca i sau s o nlocui i n cazul...

Страница 62: ...ambele capete Fig 5 8 Ap sa i Etan are manual pentru a porni procesul de etan are a pungilor Fig 6 9 Ridica i m nerul frontal pentru a deschide capacul i scoa te i punga din ma in Punga este realizat...

Страница 63: ...ile dac butonul de etan are este activat n ultimele 15 secunde ale ultimei activ ri Aparatul dumneavoastr poate func iona numai pentru pungile specifice furnizate de noi Nu ncerca i s utiliza i alte p...

Страница 64: ...i Fig 1 Fig 1 Fig 2 Verifica i starea LED ului vidare pentru a confirma presiunea de vidare dorit Normal mo derat n func ie de tipul de aliment Modul normal este op iunea implicit 3 Ap sa i butonul Ma...

Страница 65: ...auna ma ina nainte de a efectua opera iuni de ntre inere 4 Pentru orice repara ii contacta i un centru de asisten tehnic autorizat dac este posibil 5 Utiliza i numai piese de schimb originale Not Garn...

Страница 66: ...ump rat aparatul sau de la cel mai apropiat centru de service 3 Punga vidat poate prezenta o scurgere Pentru a verifica sigila i punga con in nd ceva aer n interior scufunda i o sub ap i aplica i pres...

Страница 67: ...E SAU CARE POT FI CABLATE DIN NOU Cablul de alimentare al acestui aparat este deja dotat cu un tec r BS 1363 13 A Dac este nece sar nlocuirea siguran ei utiliza i o siguran 13 A ASTA certificat BS 136...

Страница 68: ......

Страница 69: ......

Страница 70: ...Hendi Food Service Equipment GmbH Gewerbegebiet Ehring 15 5112 Lamprechtshausen Austria Hendi Polska sp z o o ul Magazynowa 5 62 023 G dki Poland Hendi Food Service Equipment Romania Srl Str Ecaterina...

Отзывы: