background image

9

EN

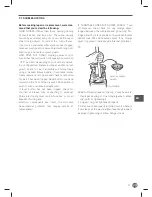
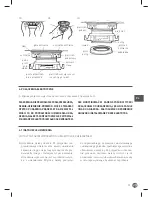
 7. OPERATING INSTRUCTIONS

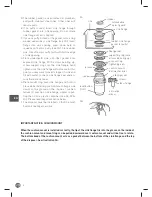
 The Anti-Jam Swivel Impellers make a clicking 
sound as they initially swing into place. This indi-
cates normal operation.
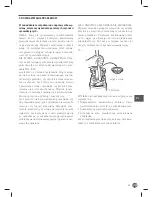
A. Remove sink stopper. Turn on a medium fl ow of 

cold water.

B. Turn switch to ON position; your motor is turning 

at full speed and ready to use.

C. Scrape in food waste. Down the drain go table 

scraps, peelings, rinds, seeds, pits, small bones 
and coffee grounds. To speed up food waste dis-
posal, cut or break up large bones, rinds and 
cobs. Large bones and fi brous waste require 
considerable grinding time and are more easily 

thrown away with other trash. Do not be alarmed 
that the disposer slows down while grind-
ing. The disposer is actually increasing torque 
(grinding power) and is operating under normal 
conditions.

D. Before turning disposer off, let water and dis-

poser run for approximately 15 seconds after 
shredding or grinding stops. This assures that 
all waste is thoroughly fl ushed through trap and 
drain.

E. It is not recommended to use hot water while 

running disposer. Cold water will keep waste and 
fats solid so disposer can fl ush away particles.

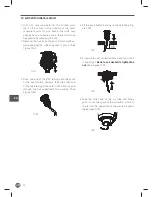
7.1  TIPS FOR SUCCESSFUL OPERATION

 A. Be sure disposer is empty before using your 

dishwasher so it may drain properly.

B. You may want to leave the stopper in the drain 

when not in use to prevent utensils and foreign 
objects from falling into the disposer.

C. Your disposer is ruggedly built to give you many 

years of trouble free service. It will handle all 
normal food wastes, but it will NOT grind or 
dispose of such items as plastic, tin cans, bot-
tle caps, glass, china, leather, cloth, rubber, 
string, clam and oyster shells, aluminum foil or 
feathers.

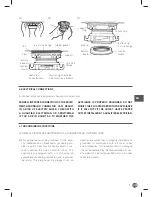
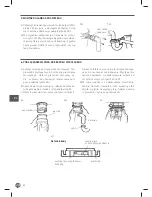
 8. CLEANING AND MAINTENANCE

 DO NOT ATTEMPT TO LUBRICATE YOUR DISPOSER!

The motor is permanently lubricated. The disposer 
is self cleaning and scours its internal parts with 
each use.
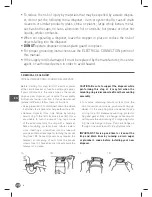
NEVER put lye or chemical drain cleaners into the 
disposer, as they cause serious corrosion of met-
al parts. If used, resulting damage can be easily 

detected and all warranties are void. Mineral de-
posits from your water can form on the stainless 
steel turntable, giving the appearance of rust. DO 
NOT BE ALARMED, the stainless steel turntables 
used will not corrode.

Содержание 979983

Страница 1: ...ully before using the appliance Przed uruchomieniem urz dzenia nale y koniecznie dok adnie przeczyta niniejsz instrukcj obs ugi User manual Instrukcja obs ugi FOOD WASTE DISPOSER WITH AIR SWITCH M YNE...

Страница 2: ...TIONS 7 5 ATTACHING DISCHARGE ELBOW 8 6 CONNECTING DISPOSER TO MOUNT ASSEMBLY 8 7 OPERATING INSTRUCTIONS 9 8 CLEANING AND MAINTENANCE 9 9 TROUBLESHOOTING 11 10 AIR SWITCH INSTALLATION 12 11 WARRANTY 1...

Страница 3: ...label af xed to bottom of the disposer For your convenience write down the model and serial numbers prior to installation IMPORTANT SAFETY INSTRUCTIONS INSTRUCTIONS PERTAINING TO A RISK OF FIRE ELECTR...

Страница 4: ...follow these instructions Use a pipe wrench to disconnect drain line where it attaches to disposer discharge elbow see 1A Remove disposer from sink ange by turning mount ring to the left clockwise se...

Страница 5: ...se drain disposer 3 INSTALLATION OF MOUNTING ASSEMBLY READ COMPLETELY BEFORE STARTING NOTE Pay close attention to the order of mount assembly parts as they have been correctly as sembled by the factor...

Страница 6: ...ring over sink ange and hold in place while installing cushion mount large side down so the groove on the inside of cushion mount ts over lip on sink ange similar to put ting the lid on a plastic cont...

Страница 7: ...G PROVIDED WITH THE APPLIANCE IF IT WILL NOT FIT THE OUTLET HAVE A PROPER OUTLET INSTALLED BY A QUALIFIED ELECTRICIAN 4 1 GROUNDING INSTRUCTIONS FOR WASTE DISPOSERS EQUIPPED WITH A GROUNDED PLUG IN PO...

Страница 8: ...ns into mount ring slots Turn mount ring about 1 4 to right so that dis poser is temporarily supported see 6A B Turn mount ring and disposer until disposer el bow lines up with trap see 6B C Turn moun...

Страница 9: ...r while running disposer Cold water will keep waste and fats solid so disposer can ush away particles 7 1 TIPS FOR SUCCESSFUL OPERATION A Be sure disposer is empty before using your dishwasher so it m...

Страница 10: ...uty 260 mm Deluxe 260 mm Premium 260 mm Builder Economy WHITE ELBOW BLACK ELBOW Heavy Duty Builder Economy Heavy Duty Builder Standard Deluxe Builder Standard Deluxe Mid Duty Premium Mid Duty Premium...

Страница 11: ...Reset button is red and located on the front of the disposer Push button in until it clicks and remains depressed If reset button has not been tripped check for shorted or broken wire connecting to di...

Страница 12: ...0A 3 Push one end of the PVC tubing onto the spout of the push button bellows feed the other end of the tube through the hole in the work top and through the nut underneath the worktop See Figure 10B...

Страница 13: ...t affected If the appliance is claimed under warranty state where and when it was purchased and include proof of purchase e g receipt In line with our policy of continuous prod uct development we rese...

Страница 14: ...3 INSTALACJA ZESPO U MOCUJ CEGO 17 4 PO CZENIA ELEKTRYCZNE 19 5 MONTA KOLANKA SPUSTOWEGO 20 6 POD CZANIE M YNKA DO ZESPO U MOCUJ CEGO 20 7 INSTRUKCJA OBS UGI 21 8 MYCIE I KONSERWACJA 21 9 ROZWI ZYWANI...

Страница 15: ...umer seryjny Powy sze informacje wskazane s na etykiecie przymocowanej do urz dzenia od spodu Dla w asnej wygody warto zapisa numery modelu i seryjny przed instalacj WA NE INSTRUKCJE BEZPIECZE STWA Pr...

Страница 16: ...w kt rym pod czona jest do kolanka spustowego m ynka patrz rys 1A Zdj m ynek z ko nierza zlewu obracaj c pier cie mocuj cy w lewo patrz rys 1B Je li niemo liwe jest odkr cenie pier cienia mocu j cego...

Страница 17: ...gumowy ko ek przew d zmywarki spust m ynek 3 INSTALACJA ZESPO U MOCUJ CEGO PRZED ROZPOCZ CIEM UWA NIE PRZECZYTA INSTRUKCJE UWAGA Zwr ci uwag na kolejno cz ci po niewa s one fabrycznie ustawione w odpo...

Страница 18: ...ek do zlewu i nape ni go wod aby sprawdzi szczelno H Umie ci pier cie mocuj cy nad ko nierzem i zainstalowa podk adk wi ksz cz ci do do u tak aby na o y rowek wewn trz podk adki na j zyczek ko nierza...

Страница 19: ...M ALBO SERWISANTEM NIE MODYFIKOWA W ADEN SPOS B WTYCZKI DO CZONEJ DO URZ DZENIA JE LI NIE PASUJE ONA DO GNIAZDKA ZASTOSOWA ODPOWIEDNIE GNIAZDKO INSTALOWANE PRZEZ ELEKTRYKA 4 1 INSTRUKCJE UZIEMIENIA DO...

Страница 20: ...r cienia mocuj cego Obr ci pier cie mocuj cy ok 1 4 w prawo aby zapewni tymczasowe pod parcie m ynka patrz 6A B Obraca pier cie mocuj cy i m ynek do momen tu dopasowania kolanka z syfonem patrz 6B C O...

Страница 21: ...dkr ca nia gor cej wody Zimna woda nie rozpu ci od padk w ani t uszczu co u atwi sp ukanie resztek z m ynka 7 1 WSKAZ WKI DOTYCZ CE OBS UGI A Przed u yciem zmywarki upewni si czy m y nek jest pusty ab...

Страница 22: ...y 260 mm Deluxe 260 mm Premium 260 mm Builder Economy KOLANKO BIA E KOLANKO CZARNE Heavy Duty Builder Economy Heavy Duty Builder Standard Deluxe Builder Standard Deluxe Mid Duty Premium Mid Duty Premi...

Страница 23: ...znajduje si z przodu m ynka Wcisn przycisk a kliknie i nie odskoczy Je li przycisk nie by uruchamiany sprawdzi czy na przewodzie cz cym z m ynkiem nie wyst pi o zwarcie i czy nie jest przerwany Sprawd...

Страница 24: ...rys 10A 10A 3 Wcisn jeden z ko c w za czonego przewodu PCV w otw r przycisku patrz rys 10B 10B 4 W przycisk w wywiercony otw r w blacie patrz rys 10C 33 10C 5 Odkr con uprzednio nakr tk nakr ponownie...

Страница 25: ...a W przypadku zg oszenia urz dzenia do naprawy lub wymiany w ramach gwaran cji nale y poda miejsce i dat zakupu urz dzenia i do czy dow d zakupu np paragon Zgodnie z nasz polityk ci g ego doskonalenia...

Страница 26: ...26...

Страница 27: ...27...

Страница 28: ...Fax 43 0 6274 200 10 20 Email of ce austria hendi eu Find Hendi on internet www hendi eu www facebook com HendiFoodServiceEquipment www linkedin com company hendi food service equipment b v www youtu...

Отзывы: