4
EN
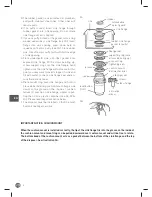
• To reduce the risk of injury by materials that may be expelled by a waste dispos-
er, do not put the following into a disposer: clam or oyster shells; caustic drain
cleaners or similar products; glass, china or plastic; large whole bones; metal,
such as bottle caps, tin cans, aluminum foil or utensils; hot grease or other hot
liquids; whole cornhusks.
• When not operating a disposer, leave the stopper in place to reduce the risk of
objects falling into the disposer.
•
DO NOT
operate disposer unless splash guard is in place.
• For proper grounding instructions see the ELECTRICAL CONNECTION portion of
this manual.
• If the supply cord is damaged, it must be replaced by the manufacturer, its service
agent, or authorized person in order to avoid hazard.
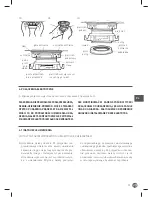
1. REMOVAL OF OLD UNIT
TYPICAL INSTRUCTIONS, YOUR MODEL MAY VARY.
Before starting this step, turn off electrical power
at the circuit breaker or fuse box. Unplug disposer.
If your old mount is the same type as the mount
on your new disposer, just reverse the assembly
instructions found in section 3. If your new mount
system is different, follow these instructions:
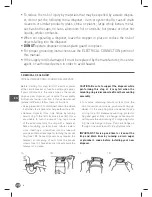
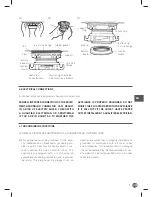
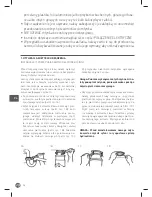
• Use a pipe wrench to disconnect drain line where
it attaches to disposer discharge elbow (see 1A).
• Remove disposer from sink fl ange by turning
mount ring to the left clockwise (see 1B). If you
are unable to turn the mount ring, tap on one
of the extensions from the ring with a hammer.
Some mounting systems have tubular exten-
sions. Inserting a screwdriver into one tube will
provide additional leverage for turning the mount
ring (see 1B). Some disposers may require the
removal or loosening of nuts from the mount
screws (see 1C). Some disposers may require the
removal of a clamp.
CAUTION: Be sure to support the disposer while
per-forming this step or it may fall when the
mounting ring is disconnected from the mounting
assembly.
• To remove remaining mount system from the
sink, loosen mount screws, push mount ring up.
Under it is the snap ring. Use screwdriver to pop
off ring (see 1D). Remove mount ring, protector
ring and gasket from sink fl ange. Some mounts
will require the unscrewing of a large ring hold-
ing the sink fl ange in place. Pull sink fl ange up
through sink and clean off old putty from sink.
IMPORTANT: This is a good time to clean out the
trap and drain lines by running a drain auger
or plumber’s snake before installing your new
disposer.
1A
1B
1C
1D


