background image

18

Einbau einer HELIX Extension Card

Der HELIX DSP ULTRA kann durch die Montage 

einer  HELIX  Extension  Card  (HEC)  um  weitere 

Funktionen erweitert werden – beispielsweise um 

eine 

Bluetooth

®

 Audio Streaming Funktion, einem 

weiteren optischen Digitaleingang oder einen USB 

Audio-Eingang.

Zur Montage einer HEC muss das Seitenblech des 

DSP ULTRA demontiert und gegen das der HEC 

beiliegende Seitenblech ausgetauscht werden. 

Achtung: Installieren Sie ausschließlich für den 

DSP ULTRA vorgesehene HEC Module an der 

dafür vorgesehenen Position. Die Benutzung 

eines nicht für das Gerät spezifizierten HEC Mo

-

duls oder eine Installation an einer nicht dafür 

vorgesehenen Position im Gerät kann zu Schä-

den am HEC Modul, dem Signalprozessor, des 

Radios oder anderen angeschlossenen Geräten 

führen.

Im folgenden Abschnitt nun die wichtigsten Schritte 

zum Einbau und der ersten Inbetriebnahme eines 

HEC Moduls:

1.

  Ziehen Sie zunächst alle

  Steckverbindungen 

vom Gerät ab.

2.

  Lösen Sie die fünf Kreuzschlitzschrauben des 

Seitenblechs der Geräteseite mit dem USB Ein-

gang und entfernen dieses.   

3.

  Ziehen Sie nun das Bodenblech zur Seite he-

raus. 

4.

  Bereiten Sie das Modul für den Einbau in das 

Gerät vor. Informationen dazu entnehmen Sie 

bitte der Bedienungsanleitung des jeweiligen 

HEC Moduls.

5.

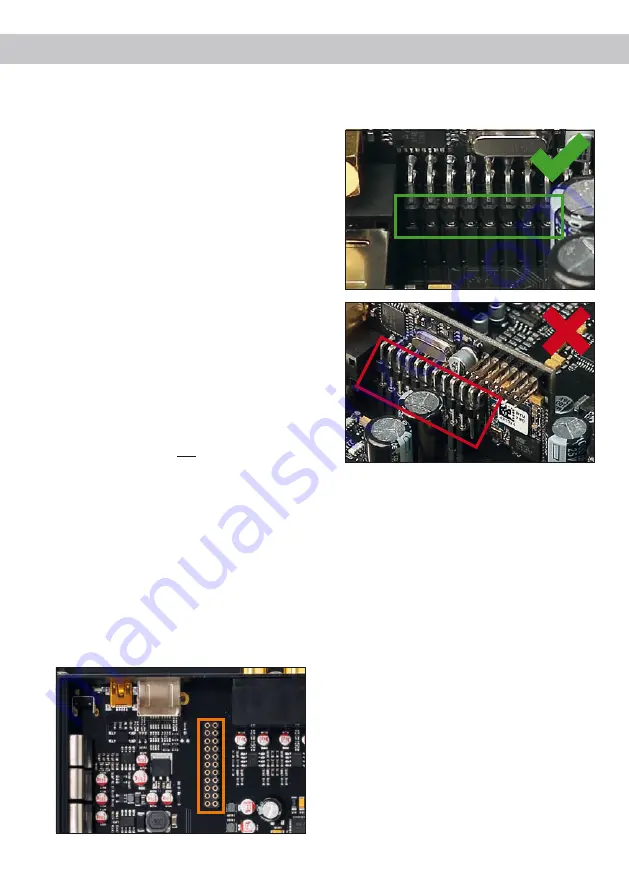
  Stecken Sie das HEC Modul in den im Gerät 

vorgesehenen  Sockel  (siehe  Markierung  im 

nachfolgenden Bild). 

6.

  Achten Sie auf den richtigen Sitz des HEC Mo-

duls und darauf, dass alle Kontaktstifte vollstän

-

dig im Sockel stecken.

7.

  Schieben Sie das Bodenblech wieder seitlich in 

das Gehäuse des Signalprozessors. Anschlie-

ßend befestigen Sie das neue, dem HEC Modul 

beiliegende Seitenblech mit den Kreuzschlitz-

schrauben. 

8.

  Verschrauben  Sie  das  HEC  Modul  mit  dem 

Seitenblech. Genaue Informationen zur Befes-

tigung entnehmen Sie bitte der Bedienungsan-

leitung des jeweiligen Moduls.

9.

  Schließen  Sie  alle  Steckverbindungen  wieder 

an das Gerät an.

10.

 Schalten Sie den Signalprozessor ein. Das in-

stallierte HEC Modul wird nun automatisch vom 

Gerät erkannt und die Status LED des HEC Mo-

duls leuchtet grün. 

11.

 Das Modul kann nun in der DSP PC-Tool Soft-

ware konfiguriert werden.

Содержание DSP ULTRA

Страница 1: ...DSP ULTRA deutsch english Digitaler High Res 12 Kanal Signalprozessor mit 96 kHz 32 Bit Signalweg Digital High Res 12 channel signal processor with 96 kHz 32 Bit signal path ...

Страница 2: ... wärmeabstrah lenden Teilen oder elektronischen Steuerungen des Fahrzeuges Im Sinne der Unfallsicherheit muss der Signalprozessor professionell befestigt werden Dieses geschieht über Schrauben die in eine Mon tagefläche eingeschraubt werden die wiederum genügend Halt bieten muss Bevor Sie die Schrauben im Montagefeld befesti gen vergewissern Sie sich dass keine elektrischen Kabel und Komponenten h...

Страница 3: ...rwendet werden 1 Line Input Cinch Eingänge zum Anschluss eines Vorverstärkersignals 2 Coax Input Elektrischer Eingang im SPDIF Format für digitale Stereosignale 3 Optical Input Optischer Eingang im SPDIF Format für digitale Stereosignale 4 Clipping LED Diese LED leuchtet rot wenn einer der Analogeingänge übersteuert wird 5 Auto Remote Dient zum Aktivieren bzw Deaktivieren der automatischen Einscha...

Страница 4: ...ng konfiguriert Hinweis Der koaxiale und optische Digitaleingang können gleichzeitig genutzt werden die Umschal tung zwischen diesen beiden Eingängen kann aber nur durch eine optionale Fernbedienung DIRECTOR oder die WIFI CONTROL erfolgen 4 Clipping LED Diese LED leuchtet rot wenn einer der acht Line Inputs oder Highlevel Inputs übersteuert wird Die LED hat keine Funktion bei Ansteuerung über eine...

Страница 5: ...wird das Gerät resettet und der gesamte interne Speicher gelöscht Anschließend wird dies durch ein durchgehendes rotes Leuchten und grünes schnel les Dauerblinken der Status LED angezeigt Hinweis Werkseitig sind die Speicherbereiche eins und zwei eingestellt Zum manuellen Umschalten zwischen den zwei Setups muss der Control Taster eine Sekunde lang gedrückt werden Der Umschalt vorgang wird durch e...

Страница 6: ...bel an die Vorverstärker Lowlevel Cinch Aus gänge des Radios angeschlossen werden Im Signalprozessor lassen sich die Signaleingän ge über die DSP PC Tool Software frei den Vor verstärkerausgängen Line Output zuweisen Die Einschaltautomatik des Signalprozessors funktioniert bei den Vorverstärkereingängen nicht so dass der Remote Eingang zwingend belegt werden muss Achtung Der Highlevel und der Vorv...

Страница 7: ...s indem Sie die fünf Kreuzschlitzschrauben lösen Nun können Sie das Bodenblech aus dem Kühlkörper zur Seite hinausziehen und erhalten so Zugriff auf die acht Drehregler mit denen jeder Kanal ein zeln justiert werden kann siehe Markierung im nachfolgenden Bild Hinweis Die Einstellung der Drehregler beein flusst sowohl die jeweiligen Vorverstärkerein gänge als auch die Highlevel Eingänge Um die Eing...

Страница 8: ...ssen weich ge koppelt 7 Anschluss der Stromversorgung Vor dem Anschluss des 12 V Versorgungs kabels an das Bordnetz muss die Autobatte rie abgeklemmt werden Schließen Sie die Stromversorgung aus schließlich über den mitgelieferten Stecker mit Schraubklemmen an Achten Sie unbedingt auf eine korrekte Polarität Die Masseleitung muss an einer nicht isolierten Stelle mit dem Kfz Chassis verbunden werde...

Страница 9: ...tig ist die automatische Ein schaltung über den Hochpegel Lautsprecher eingang des DSP ULTRA aktiviert 10 Konfiguration des DSPs Es wird dringend empfohlen vor der ersten Inbetriebnahme die grundlegenden Einstel lungen im DSP mit Hilfe der DSP PC Tool Software vorzunehmen Eine Missachtung kann zur Zerstörung der angeschlossenen Verstärker der Lautspre cher führen Informationen zum Anschluss des Si...

Страница 10: ...itt lesen Sie die wichtigsten Schritte zum Anschluss und der ersten Inbetrieb nahme 1 Laden Sie die DSP PC Tool Software unter www audiotec fischer com herunter und in stallieren diese auf ihrem Computer 2 Schließen Sie danach den DSP ULTRA mit dem beiliegenden USB Kabel an den Compu ter an Wenn Sie längere Distanzen zu über brücken haben verwenden Sie bitte eine aktive USB Verlängerung mit integr...

Страница 11: ...itert den bisherigen Umfang des Gerätes um eine neue Ebene an prozessierten Kanälen welche sich zwischen den Ein und Ausgängen befindet Insgesamt stehen acht zusätzliche prozessierte virtuelle Kanäle und 12 prozessierte Ausgangskanäle zur Verfügung Diese virtuelle Kanalebene bietet diverse Vorteile gerade in komplexen Systemkonfigurationen Die Hauptvorteile dieses Konzeptes sind folgende Ausgangsk...

Страница 12: ...lautsprecher Nach Aktivierung des Virtual Channel Processing sind auch die DSP Soundeffekte wie das RealCenter Management oder das Augmented Bass Processing aktiviert Diese sind nicht mehr fest mit den Ausgängen verknüpft sondern an bestimmte virtuelle Kanäle gebunden Dadurch ist es möglich die DSP Soundeffekte auf beliebig viele Ausgänge zu routen um beispielsweise 2 oder gar 3 Wege Centerlautspr...

Страница 13: ...d h die Eingangssignale auf der linken Sei te werden per Drag Drop auf die jeweilige Summierungsmatrix gelegt Der Unterschied zum normalen Modus ist dass die Namen und Signaleigenschaften der virtuellen Kanäle an dieser Stelle festgelegt sind Front L Full Front R Full Rear L Full Rear R Full Front Center Full etc a Zunächst müssen alle Eingangssignale auf die entsprechenden festgelegten Signaltype...

Страница 14: ...uellen Kanäle den jeweiligen Ausgangskanälen zuzuweisen werden im Ausgangsrouting Virtual to Output Routing die jeweiligen virtuellen Signale per Drag Drop auf die Ausgangskanäle gezogen An dieser Stelle müssen die Signale in der Regel nicht mehr summiert werden so dass je dem Ausgangs signal nur ein virtuelles Signal zugeordnet wird beispielsweise wird dem vorderen linken Hochtöner das Signal Fro...

Страница 15: ...nd effekte wie das Augmented Bass Processing den StageEQ den RealCenter und mehr Um in den Genuss der DSP Soundeffekte zu kommen müssen bei der Hard und Softwarekonfiguration bestimmte Einstellungen vorgenommen werden Hinweis Die DSP Soundeffekte stehen beim DSP ULTRA nur im Virtual Channel Processing zur Verfü gung Dieses kann im DCM Menü der DSP PC Tool Software aktiviert werden Hinweise für das...

Страница 16: ... aus Hinweise für das Augmented Bass Processing mit seiner Dynamic Bass Enhancement und SubX pander Funktion Für das Augmented Bass Processing müssen bestimmte Einstellungen vorgenommen werden um dessen Soundeffekte anwenden zu können 1 Mindestens einer der virtuellen Subwoofer Kanäle Subwoofer 1 oder Subwoofer 2 muss mit einem Eingangssignal belegt sein siehe Workflow Schritt 1 2 Wechseln Sie in ...

Страница 17: ...plätze um schalten Diese zwei Speicherplätze können in der URC Setup Switch Configuration festgelegt wer den Werkseitig sind die Speicherbereiche eins und zwei ausgewählt Um zwischen allen internen Spei cherplätzen umschalten zu können wird die optional erhältliche Display Fernbedienung DIRECTOR oder die HELIX WIFI CONTROL empfohlen Remote Output Configuration An dieser Stelle kann festgelegt werd...

Страница 18: ...ie fünf Kreuzschlitzschrauben des Seitenblechs der Geräteseite mit dem USB Ein gang und entfernen dieses 3 Ziehen Sie nun das Bodenblech zur Seite he raus 4 Bereiten Sie das Modul für den Einbau in das Gerät vor Informationen dazu entnehmen Sie bitte der Bedienungsanleitung des jeweiligen HEC Moduls 5 Stecken Sie das HEC Modul in den im Gerät vorgesehenen Sockel siehe Markierung im nachfolgenden B...

Страница 19: ...ss eines zu sätzlichen Signalprozessors Fehlermeldungen oder gar Fehlfunktionen auftreten können Der neue ADEP 3 Schaltkreis Advanced Diagnostics Error Protection Generation 3 verhindert diese Probleme ohne die Lautsprecherausgänge des Radios bei ho hen Pegeln unnötig zu belasten Start Stopfähigkeit Das Netzteil im HELIX DSP ULTRA stellt die interne Spannungsversorgung auch bei kurzfristigen Ein b...

Страница 20: ...delsmarken und Handelsnamen gehören den jeweiligen Inhabern Eingänge 8 x Cinch 8 x Hochpegel Lautsprechereingang 1 x Optisch SPDIF Format 12 96 kHz 1 x Koaxial SPDIF Format 12 192 kHz 1 x Remote In Eingangsempfindlichkeit Cinch 1 8 Volt Hochpegel 4 32 Volt Ausgänge 12 x Cinch 1 x Remote Out Ausgangsspannung 8 Volt Frequenzbereich 10 Hz 44 000 Hz DSP Auflösung 64 Bit DSP Rechenleistung 2 x 295 MHz ...

Страница 21: ...ocessor The HELIX DSP ULTRA signal processor may only be installed in vehicles which have a 12 Volts nega tive terminal connected to the chassis ground Any other system could cause damage to the signal pro cessor and the electrical system of the vehicle The positive cable from the battery for the entire sound system should be provided with a main fuse at a distance of max 30 cm from the battery Th...

Страница 22: ...urn on these devices 1 Line Input RCA inputs for connecting pre amplifier signals 2 Coax Input Electrical input for digital stereo signals SPDIF format 3 Optical Input Optical input for digital stereo signals SPDIF format 4 Clipping LED This LED lights up red if one of the analog inputs is overdriven 5 Auto Remote This switch allows to activate deactivate the automatic turn on feature of the signa...

Страница 23: ...red if one of the eight lowlevel Line Inputs or Highlevel Inputs is overdriven The LED has no function if the device is fed with dig ital input signals If this LED lights up reduce the input sensitivity by using the internal controls see page 25 Adjustment of the input sensitivity until the LED goes out 5 Auto Remote The DSP ULTRA will be turned on automatically if the Highlevel Input is used or i...

Страница 24: ...n DSP is ready for operation Orange Power Save Mode is active Red Protection Mode is active This may have different root causes The HELIX DSP ULTRA is equipped with protection circuits against over and undervoltage as well as overheating Please check for connecting failures such as short circuits or oth er wrong connections If the DSP is overheated the internal temperature protection switches off ...

Страница 25: ...versed polar ity it may affect the performance of the signal processor If this input is used the remote input does not need to be connected as the signal processor will automatically turn on once a loudspeaker signal is received 3 Connecting a digital signal source If you have a signal source with an optical or coaxial digi tal output you can connect it to the signal processor using the appropriat...

Страница 26: ...ge in order to avoid dam age to the signal processor As soon as the input sensitivity of an individual channel is set between 11 V and 32 V the Load Jumper inside the device has to be removed e g if an OEM amplifier is used as signal source To get access to the Load Jumper the device has to be opened as described in item 4 Adjustment of the input sensitivity To remove the Load Jumper see marking i...

Страница 27: ...te input terminal The Auto Remote switch page 23 item 5 Auto Remote allows to deactivate the automatic turn on fea ture of the highlevel inputs The feature should be deactivated Auto Remote Off if there are e g noises while switching on off the signal processor Note If the automatic turn on function is deac tivated it is mandatory to use the remote input terminal to power up the signal processor T...

Страница 28: ... Tool software available on our website www audiotec fischer com and install it on your computer 2 Connect the signal processor to your comput er using the USB cable that is included in de livery If you have to bridge longer distances please use an active USB extension cable with integrated repeater or the optionally available WIFI CONTROL interface 3 First turn on the signal processor and then st...

Страница 29: ... of the device by an additional layer of processed channels which is located between the inputs and outputs A total of eight additional processed virtual channels and twelve processed output channels are available This virtual channel layer offers several advantages especially in complex system configurations The main advantages of this concept are Cross channel group equalizers that affect severa...

Страница 30: ... even 3 way center speaker After activating Virtual Channel Processing the DSP sound effects such as RealCenter management or Augmented Bass Processing are also available These are no longer linked to the outputs but tied to specific virtual channels This makes it possible to route the DSP sound effects to any number of outputs for example to realize 2 or even 3 way center speaker configurations T...

Страница 31: ...me as in normal mode means that the input signals on the left side are dragged and dropped onto the respective summation matrix The difference to normal mode is that the names and signal properties of the virtual channels are defined here Front L Full Front R Full Rear L Full Rear R Full Front Center Full etc a First all input signals must be applied to the respective designated signal types of th...

Страница 32: ...ve output channels the individual virtual signals in the output routing matrix Virtual to Output Routing are dragged and dropped onto the output channels At this point the signals typically needn t to be summed means that each output of this matrix only re ceives one virtual signal For example the output Front L Tweeter is linked to the virtual signal Front L Full the same is done for the Front L ...

Страница 33: ...RealCenter and more when Virtual Channel Processing is enabled In order to enjoy the DSP sound effects certain settings must be made in the hardware and software configuration Note The DSP sound effects are only available in the DSP ULTRA when Virtual Channel Processing is enabled VCP can be activated in the DCM menu of the DSP PC Tool software Notes for center processing with its features RealCen...

Страница 34: ...rocessing with its Dynamic Bass Enhancement and SubXpander function For Augmented Bass Processing certain settings have to be made in order to use it 1 An input signal has to be assigned to at least one of the virtual subwoofer channels Subwoofer 1 or Subwoofer 2 see workflow step 1 2 Change to the Virtual to Output Routing matrix and route the channel s Virtual K Subwoofer 1 and or Virtual L Subw...

Страница 35: ...en memory locations These two memory lo cations can be determined in the URC Setup Switch Configuration The memory locations one and two are preassigned ex works To switch between all internal memory locations the optionally available DIRECTOR display remote control or the HELIX WIFI CONTROL is recommended Remote Output Configuration This function controls if the remote output which switches on an...

Страница 36: ...e panel where the USB input is located by removing the five Phillips screws 3 Pull out the bottom plate sideways 4 Prepare the module for installing it into the de vice Any further mounting information will be found in the instruction manual of the respective HEC module 5 Insert the HEC module into the specific slot of the device which is marked in the following picture 6 Make sure that the HEC mo...

Страница 37: ...ios are equipped with additional monitoring functions so that failure messages and loss of spe cific features e g fader function quite often appear if a signal processor will be hooked up but not with the DSP ULTRA The new ADEP 3 circuit Advanced Diagnostics Error Protection 3rd Generation avoids all these problems without loading the speaker outputs of the OE radio during high volumes unnecessari...

Страница 38: ...nverters A D Asahi Kasei 32 Bit D A Asahi Kasei 32 Bit Signal to noise ratio digital input 117 dB A weighted Signal to noise ratio analog input 111 dB A weighted Total harmonic distortion THD N digital input 0 0004 Total harmonic distortion THD N analog input 0 001 IM distortion IMD digital input 0 002 IM distortion IMD analog input 0 004 Crosstalk 90 dB Operating voltage 9 6 18 Volts max 5 sec do...

Страница 39: ... reserved For damages on the vehicle and the device caused by handling errors of the device we can t assume liability This product is tagged with a CE Certifikation mark Thereby these devices are certified for the use in vehicles within the European Community EC Note The Bluetooth word mark and logos are registered trademarks owned by Bluetooth SIG Inc and any use of such marks by Audiotec Fischer...

Страница 40: ...Audiotec Fischer GmbH Hünegräben 26 57392 Schmallenberg Germany Tel 49 2972 9788 0 Fax 49 2972 9788 88 E mail helix audiotec fischer com Internet www audiotec fischer com ...

Отзывы: