


9
Revised 2019
USE CAUTION WHEN CHECKING THE SEALING CYCLE AS SOME
SURFACES ARE HOT. THE CYCLE FOR THE SEALER CAN ALSO BE
CHECKED WITH THE POWER OFF.
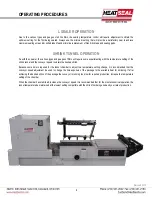
OPERATING PROCEDURES
MACHINE CONTROLS
There is two controllers for the operation of your machine. The Main Control Panel (1) will control Seal Time, Dwell Time,
and Conveyor Speed. It will also control Seal Conveyor Run Time if the HSE-100 is equipped with a Seal Conveyor. The
Tunnel Temperature Controller is located on the top right portion of the tunnel. Use the temperature dial as a reference
point as actual tunnel temperature may vary slightly. The power indicator light (3) will illuminate when there is power
running to the tunnel.
It is essential that related functions be properly controlled to provide the sequence necessary for the satisfactory
performance of the L Sealer and Shrink Tunnel. These control settings should be made before operating this equipment.
Seal Time: (0-2 seconds) The amount of time the sealing
wire is energized for while the magnet holds down the seal
arm down.
Dwell Time: (0-2 seconds) The amount of time the seal
arm is held down after the seal time has expired and seal
wire has de-energized.
Conveyor Speed: (0-10 seconds) Controls the speed both
the tunnel conveyor and seal conveyor will run at.
Seal Conveyor Run Time: (0-10 seconds) Controls how
long the seal conveyor will run after the seal arm is raised.
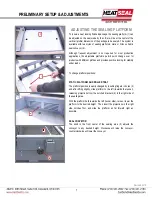
ADJUSTING OF THE SEALING CYCLE
Located at the back of the sealing area is an adjustment screw type
actuator and button (4) which starts the sealing cycle as the sealing
arm is brought into sealing position. This is a function adjusted at the
factory but if adjustment is necessary, proceed with the following
steps:
The timed impulse must start when the seal arm (5) is approximately
1/16 of an inch (or the thickness of a quarter) above the sealing pad
(6).
Bring the arm down slowly toward the sealing position, the wires will
begin heating, or the magnet will engage when the sealing process
has begun.
If the arm is too high from the sealing pad (over 1/16 of an inch),
adjust the screw (7) away from the Microswitch (4).
If the arm reaches the sealing position without actuating the sealing
cycle, adjust the screw closer to the microswitch to actuate at 1/16 of
an inch above the sealing pad.
Содержание HSE-100
Страница 15: ...15 Revised 2019...


