


3
Revised 2019
INSTALLATION AND OPERATION OF THIS SYSTEM MUST BE IN COMPLIANCE
WITH ALL APPLICABLE ELECTRICAL AND SAFETY STANDARDS. A QUALIFIED
ELECTRICIAN MUST CHECK THE ELECTRICAL SUPPLY CIRCUIT TO INSURE
CORRECT VOLTAGE AND CAPACITY. THE SYSTEM IS DESIGNED FOR
INDUSTRIAL USE BY QUALIFIED PERSONNEL ONLY.
ELECTRICAL REQUIREMENTS
A single, GROUNDED 110/120 volt circuit with a maximum 20 amp capacity dedicated circuit is all that is required to
operate this system. Note that the three prong power cord plug has an offset blade denoting its 20 amp capacity. (A
complete wiring diagram is included with your system.)
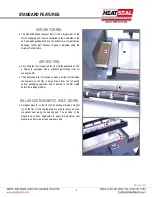
UNPACKING THE SYSTEM
The HSE-100 system is a unitized shrink wrapping machine that combines an L Bar Sealer with a Shrink Tunnel. Your
system is shipped fully assembled with leg kit, or as a tabletop on a pallet with the L Sealer and Shrink Tunnel in separate
boxes. Once unpacked, the L Sealer and Shrink Tunnel are assembled together following assembly instructions.
Once the system has been unpackaged, check the system for any damage or missing parts. For your convenience, a wiring
diagram is packaged with your unit. Heat Seal is not responsible for damage once the equipment has left our factory. Report
any damage to your distributor and the shipping company. If there are missing parts, contact your distributor immediately.
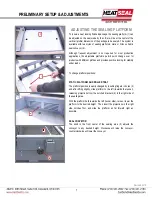
ELECTRICAL REQUIREMENTS & SETUP
Содержание HSE-100
Страница 15: ...15 Revised 2019...


