background image

5

203017-02

TROUBLESHOOTING GUIDE

SPECIFICATIONS

Range ........................... Up to 70 ft. (21 m); 100 ft. (30.5 m) with Range Boost.  [varies with surrounding temperature]
Sensing Angle .............. Up to 110°
Electrical Load .............. Up to 200 Watt Maximum Incandescent [Up to 100 Watt maximum each lamp holder] 
Power Requirements .... 120 VAC, 60 Hz
Operating Modes .......... TEST, AUTO and MANUAL MODE
Lamp Modes ................. Security, BulbSaver, AlertFlash
Time Delay ................... 1, 5, 20 minutes

D

ual

B

rite

®

 Timer .......... Off, 3, 6 hours, Dusk-to-Dawn

Replacement lamp ........ T4 100W, G8 halogen bi-pin 120 VAC

SYMPTOM

POSSIBLE CAUSE

SOLUTION

Light will not come on.

1.  Light switch is turned off.
2.  Lamp is loose or burned out.
3.  Fuse is blown or circuit breaker is turned off.
4.  Daylight turn-off is in effect.
5.  Incorrect circuit wiring, if this is a new installation.
6.  Sensor does not detect objects in desired area.

1.  Turn light switch on.
2.  Check lamp and replace if burned out.
3.  Replace fuse or turn circuit breaker on.
4.  Recheck after dark.
5.  Verify wiring is correct.
6.  Re-aim sensor to cover desired area. Increase sen-

sitivity.

Light comes on in day-
light.

1.  Light  control  may  be  installed  in  a  relatively  dark 

location.

2.  Light control is in TEST.

1.  Relocate light fixture to another junction box with 

increased amount of daylight.

2.  Set control switch to 1, 5, or 20 minutes.

Light  comes  on  for  no 
apparent reason.

1.  Light control may be sensing small animals or auto-

mobile traffic.

2.  Range is set too high.
3. 

D

ual

B

rite

®

 timer is on.

1.  Re-aim light control.

2.  Reduce range. Turn Range Boost off.
3.  Turn 

D

ual

B

rite

®

 Timer off.

Light turns off too late in 
Dusk-to-Dawn setting.

Light control may be installed in a relatively dark location. Relocate light control, or use 3 hr. or 6 hr. setting.

Light stays on continu-
ously.

1.  A lamp is positioned too close to the light control or 

pointed at nearby objects that cause heat to trigger 
the light control.

2.  The light control may be picking up a heat source 

like an air vent, dryer vent, or brightly painted, heat-
reflective surface.

3.  Light control is in manual mode.

1.  Reposition the lamp away from the light control or 

nearby objects.

2.  Reduce range. Re-aim sensor. Turn Range Boost off.

3.  Switch light control to AUTO.

Light flashes on and off. 1.  Heat or light from the lamps may be turning the light 

control on and off.

2.  Heat being reflected from other objects may be turn-

ing the light control on and off.

3.  Light control is in the TEST mode and warming up.
4.  Light control is in AlertFlash mode.

1.  Reposition the lamps away from the light control.

2.  Reposition light control.

3.  Flashing is normal under these conditions.
4.  Flashing is normal in this mode. Select Security or 

BulbSaver mode to turn flash mode off.

Light flashes once, then 
stays  off  in  manual 
mode.

Light control is detecting its own light.

Reposition lamps to keep area below the light control 
relatively dark.

Содержание 5596

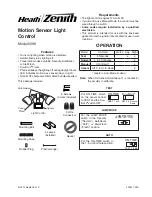
Страница 1: ...n the sensor bottom to TEST and the Dual Brite switch OFF OPERATION resets to Auto Mode at dawn ON TIME TEST 1 5 20 AUTO Note When first turned on wait about 1 1 2 minutes for the circuitry to calibrate Requirements The light control requires 120 volts AC If you want to use Manual Mode the control must be wired through a switch Some codes require installation by a qualified electrician This produc...

Страница 2: ... will continue to work as described in this manual If motion is sensed the light turns on full bright for the ON TIME 1 5 or 20 minutes then returns to dim mode Lamp Modes There are three lamp modes light turn on effects avail able when motion is detected SECURITY NORMAL Light instantly comes on BULBSAVER SOFT Light starts dim and grad ually increases to full brightness Light gradually dims to hal...

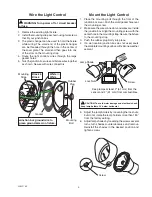
Страница 3: ...oseningthescrewsseveral turns turn shades counterclockwise and remove Reinstall the shades in the desired position and tighten screws 1 Remove the existing light fixture 2 Installthemountingstrapasshownusingtwoscrews that fit your junction box 3 The plastic hanger can be used to hold the fixture while wiring The small end of the plastic hanger can be threaded through the hole in the center of the ...

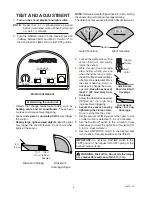
Страница 4: ... 3 6 Hrs Dusk to Dawn 9 Set the LAMP MODE switch to the desired light turn on effect Security BulbSaver AlertFlash Bottom of Sensor Avoid aiming the control at Objects that change temperature rapidly such as heating vents and air conditioners These heat sources could cause false triggering Areas where pets or unwanted traffic may trigger the control Nearby large light colored objects reflecting li...

Страница 5: ...ent reason 1 Light control may be sensing small animals or auto mobile traffic 2 Range is set too high 3 DualBrite timer is on 1 Re aim light control 2 Reduce range Turn Range Boost off 3 Turn DualBrite Timer off Light turns off too late in Dusk to Dawn setting Lightcontrolmaybeinstalledinarelativelydarklocation Relocate light control or use 3 hr or 6 hr setting Light stays on continu ously 1 A la...

Страница 6: ...ENTAL OR CONSEQUENTIAL DAMAGES REPAIR OR REPLACEMENT SHALL BE THE SOLE REMEDY OF THE CUSTOMER AND THERE SHALL BE NO LIABILITY ON THE PART OF HEATHCO LLC FOR ANY SPECIAL INDIRECT INCIDENTAL OR CONSEQUENTIAL DAMAGES INCLUDING BUT NOT LIMITED TO ANY LOSS OF BUSINESS OR PROF ITS WHETHER OR NOT FORESEEABLE Some states or provinces do not allow the exclusion or limitation of incidental or consequential ...

Страница 7: ...e 120 VCA Para usar el Sobrecontrol Manual conecte el control con un interruptor Algunos códigos requieren instalación por un electricista calificado Se recomienda usar este producto con el empaque provisto y con una caja de empalme marcada para uso en lugares húmedos Nota Cuando lo prenda por primera vez espere 1 1 2 minutos para que el circuito se calibre Para PRUEBA TEST 1 5 20 ON TIME Off 3 6 ...

Страница 8: ... a media luz Fases de Lámpara Hay tres fases de lámpara efectos al prender la luz disponibles cuando se detecta movimiento SEGURIDAD NORMAL La luz se prende ins tantáneamente ECONOMIZA BOMBILLAS SOFT La luz co mienza tenue y gradualmente aumenta a su brillo total La luz gradualmente disminuye a medio brillo hace pausa y continúa disminuyendo hasta que se apaga cuando ya no detecta movimiento y des...

Страница 9: ...roles Controles Blanco a Blanco Negro a Negro Cable de a tierra de la caja de empalme al tornillo verde de a tierra del aparato Empaquetadura Lámina de Montaje Perno de Montaje Enchufe de Caucho 1 Quite el aparato de luz existente 2 Instale la lámina de montaje a la caja de empalme usandotornillosapropiadosparalacajadeempalme 3 Se puede usar el colgador plástico para sostener el aparato mientras s...

Страница 10: ...palme Alinee el tornillo de montaje con el agujero central de la lámina de montaje Asegure el aparato a la lámina de montaje 3 Empuje el tapón de caucho firmemente hasta que encaje 4 Si no se usó una caja de empalme en un lugar húmedo calafatee la superficie de montaje de la placa de la pared con un sellador de silicona contra la intemperie Contratuercas CUIDADO Para evitar daño por agua y sacu di...

Страница 11: ...de Off 3 6 odelDusk to Dawn atardecer al amanecer 9 Fije el interruptor de FASE DE lámpara al efecto deseado de encendido de luz Seguridad Econo miza bombillas Destello de alerta Evite apuntar el control hacia Objetos que cambien rápidamente de temperatura tales como ductos de calefacción y acondiciona dores de aire Estas fuentes de calor pueden causar falsas alarmas Áreas donde las mascotas o el ...

Страница 12: ...eja el calor 3 El control de luz está en el modo manual 1 Reubique el faro lejos del control de luz o de objetos cercanos 2 Reduzca la sensibilidad Reapunte el control de luz Apague el Aumento de Distancia 3 Cambie el control de luz a AUTO La luz se prende y se apaga 1 Elcalorolaluzdelosfarospuede estarencendiendo y apagando el control de luz 2 El calor reflejado por otros objetos puede estar ence...

Страница 13: ...CONSECUENTES LA REPARACIÓN O EL REEMPLAZO DEBERÍA SER LA ÚNICA SOLUCIÓN DEL CLIENTEY NO HABRÁ RESPONSABILIDAD POR PARTE DE HEATHCO LLC POR CUALQUIER DAÑO ESPECIAL INDIRECTO INCIDENTAL O CONSECUENTE INCLUIDOS PERO NO LIMITADOS A CUALQUIER PÉRDIDA DE NE GOCIO O GANACIAS SEAN O NO PREVISIBLES Algunos estados o provincias no permiten la exclusión o limitación de daños incidentales o consecuentes de mo...

Страница 14: ...la position correspondant à 1 5 ou 20 minutes Revient au mode automatique au lever du soleil LAMP MODE NORMAL SOFT FLASH MODE D ÉCLAIRAGE Placez le commutateur du mode d éclairage en position Sécurité Normal Écono mise les ampoules Soft ou Alerte avec clignotement Flash Note Après mise en circuit attendre enfiron 1 1 2 minute pour que l étalonnage du circuit soit complété Mode Temps en circuit En ...

Страница 15: ...i 1 5 ou 20 minutes puis revient en mode faible intensité Modes D Éclairage Troismodesd éclairage façondontl éclairagesedéclen che sont proposés lorsqu un mouvement est détecté SÉCURITÉ NORMAL L éclairage s allume ins tantanément ÉCONOMISE LES AMPOULES SOFT L éclai rage s allume à faible intensité et celle ci s accroît graduellement jusqu à l intensité normale L intensité décroîtensuitegraduelleme...

Страница 16: ...ndes Commandes Bride de montage Garniture de joint Noir Noir Blanc Blanc Vis de Montage Bouchon de Caoutchouc Raccorder le fil de terre de la boîte de jonction à la vis de terre verte sur l appareil 1 Enlever l appareil d éclairage existant 2 Installer la bride de montage comme indiqué avec deux vis correspondant à votre boîte de jonction 3 Le crochet en plastique peut servir à supporter le lumina...

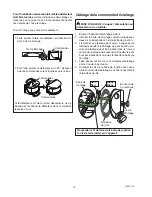
Страница 17: ...vis de montage sur le centre du trou de la bride de montage Fixer l appareil à la bride de montage 3 Poussez le bouchon de caoutchouc fermement en place 4 Si une boîte de jonction pour endroit mouillé n a pas été utilisée calfeutrer la surface de montage de la plaque murale avec un scellant silicone d extérieur Abat jour Vis Vis AVERTISSEMENT Afin d éviter les dégâts causés par l eau et les chocs ...

Страница 18: ...électionnez l effet d éclairage souhaité Sécurité Économise les ampoules ou Alerte avec clignotement AVERTISSEMENT Risque d incendie Ne pas pointer les lampes vers une surface combustible située à moins de 1 mètre Vis de blocage Rotule Pointer le détec teur vers le bas pour réduire la couverture Pointer le détec teur vers le haut pour augmenter la couverture Le moins sensible Le plus sensible Déte...

Страница 19: ...chaleur 3 La commande d éclairage est en mode manuel 1 Modifiez l orientation du projecteur de sorte qu il ne soit pas dirigé vers la commande ni vers un objet à proximité 2 Réduisez la portée Modifiez l orientation de la com mande Fermez l amplificateur de portée 3 Faites passer le commutateur à la position AUTO L éclairage clignote 1 La chaleur ou la lumière des projecteurs active et désactive l...

Страница 20: ...S OU SECONDAIRES LE REMPLACEMENT OU LA RÉPARATION CONSTITUENT LE SEUL RECOURS DU CLIENT ET HEA THCO LLC NE POURRA ÊTRE TENUE RESPONSABLE DE TOUS DOMMAGES SPÉCIAUX DIRECTS INDIRECTS OU SECONDAIRES Y COMPRIS SANS S Y LIMITER LES PERTES COMMERCIALES ET PERTES DE PROFIT QU ELLES SOIENT PRÉVISIBLES OU NON Certaines provinces n autorisent pas l exclusion ou la limitation des dommages indirects ou second...

Отзывы: