background image

2-14


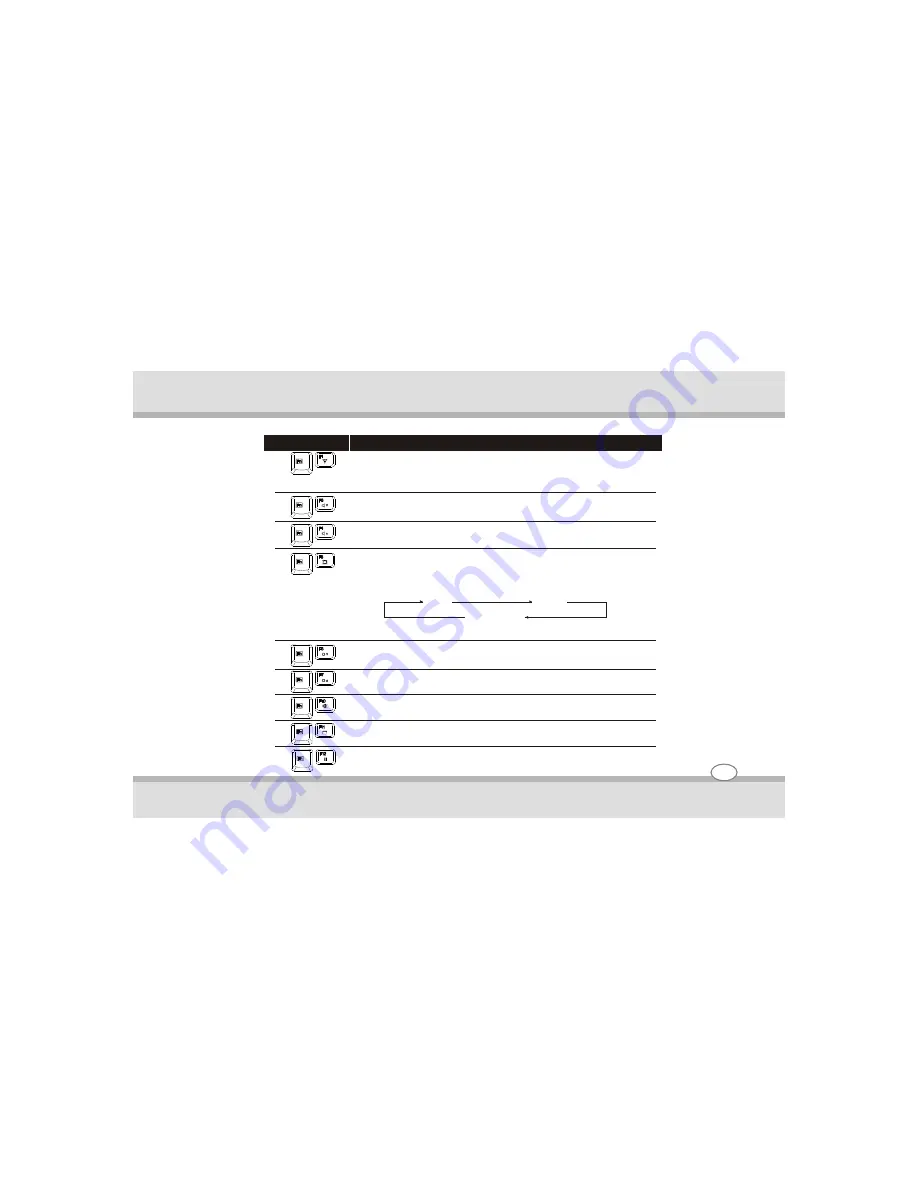
Switches the wireless LAN


radio on and off.


Note :


This function works only if an optional  m ini PCI- E


wireless LAN card is installed.


Decreases the sound volume

.


Increases the sound volume.


Switches the display output  to one of the following when 
external devices  are connected.  

Upon booting  the system with CRT:  


LCD  

CRT  


LCD & CRT  

NOTE : 

This function only applies to Plug & Play display devices


Decreases the LCD brightness


Increases the LCD brightness


Switches the system sound output off (mute)


 and on.


Switches the display on and off.


Key

Description


Serves as the sleep button  that you can define with Windows

’ 

Power  Options

Operating your computer

Содержание L-19 series

Страница 1: ......

Страница 2: ... if not followed may result in loss of data or damage to the computer Keyboard keys are shown in a bold typeset For example Press Enter to complete When keys are joined by a plus sign press the first key and while keeping the first key down press the remaining keys finally release all the keys When necessary keys are also shown in graphics Atitle command setup item or button that you can see on th...

Страница 3: ...iew Managing Power Chapter 3 Operating Your Computer Expanding Your Computer Chapter 4 Caring for the Computer Chapter 5 Troubleshooting Chapter 6 Chapter 2 Getting Started Chapter 1 1 1 2 1 3 1 4 1 5 1 6 1 ...

Страница 4: ...on DO NOT press or touch the display panel DO NOT place on uneven or unstable work surfaces DO NOT use your notebook computer under harsh conditions DO NOT expose to direct sunlight DO NOT use or store in extreme temperatures DO NOT subject the computer to magnetic fields DO NOT place or drop objects on the computer and DO NOT apply heavy pressure on it ...

Страница 5: ... NOT slam your notebook shut and never pick up or hold your notebook by the display DO NOT expose to dust and or corrosive chemicals DO NOT tamper with the batteries Keep them away from children DO NOT place near fire or other sources of heat DO NOT expose the computer to rain or moisture Avoid sudden changes in temperature or humidity by keeping it away fromA C and heating vents ...

Страница 6: ...User s Guide Getting started Getting Started Chapter 1 1 1 ...

Страница 7: ...nd your Notebook PC and diskettes through airport X ray machines However it is recommended that you do not send your Notebook PC or diskettes through airport magnetic detectors or expose them to magnetic wands Unpacking After unpacking the shipping carton you should find these standard items Notebook computer Accessories AC adapter AC power cord Driver CD Inspect all the items If any item is damag...

Страница 8: ...mputer for the very first time Caution UseonlytheACadapterincludedwithyourcomputer UsingotherACadaptersmaydamagethecomputer 1 Make sure that the computer is turned off 2 Plug the DC cord of theAC adapter to the power connector of the computer u 3 Plug the female end of theAC power cord to theAC adapter and the male end to an electrical outlet v 1 3 Getting started ...

Страница 9: ...ady to turn on the computer Caution When you disconnect theAC adapter disconnect from the electrical outlet first and then from the computer Areverse procedure maydamagetheACadapterorthecomputer Whenunpluggingtheconnector alwaysholdtheplughead Neverpullonthecord Note WhentheACadapterisconnected italsochargesthebatterypack 1 4 Getting started ...

Страница 10: ...ecomputer Open the top cover by sliding the cover latch toward the right u and lifting up the cover v You can tilt the cover forward or backward for optimal viewing clarity Turning On and Off the Computer Turning On 1 Make sure that the computer is connected toAC power 2 Press the power button 1 5 Getting started ...

Страница 11: ...h as Windows should start Turning Off To turn off the computer power use the Shut Down command of your operating system Caution If you have to turn the computer on again immediately after turning it off wait for at least five seconds Turning the computer off andonrapidlycandamageit 2 3 1 6 Getting started ...

Страница 12: ...you purchased the appearance of your computer may not be exactly the same as those shown in this manual Right SideComponents Note Dependingupontheconfigurationtheopticaldiskdrivetypemayvary Ref Component Description Combo Drive DVD Dual Drive Super Multi Drive Accepts a optical disc for installing or loading software accessing data and playing music video 1 7 Getting started ...

Страница 13: ...ice such as a USB disk printer digital camera joystick and more Audio Output Connector Connects a set of headphones external speakers with amplifier or an audio recording device Microphone Connector Connects an external microphone ExpressCard Slot Accepts an ExpressCard for additional functions 1 8 Getting started ...

Страница 14: ...uter to a stationery object for security RJ 11 Connector Connects the telephone line RJ 45 Connector Connects the LAN cable VGA Port Connects an external monitor USB Ports Connect a USB device such as a USB disk printer digital camera joystick and more 1 9 Getting started ...

Страница 15: ...your computer when external power is not connected WLAN Card Slot Inside is the Mini PCI E WLAN card Memory Slot Inside is the memory slot for expanding the memory size Hard Disk Drive Compartment Inside is the hard disk drive CPU Socket Inside is the CPU 1 10 Getting started ...

Страница 16: ...top cover LCD Screen Displays the output of the computer Easy Start Buttons Provide a quick way to launch programs Starts Internet Explorer Starts Microsoft Outlook P1 Program 1 user customized quick launch key P1 1 11 Getting started Top open components ...

Страница 17: ...indicator Glows in amber when the computer is in the Standby mode Glows in green when the battery is fully charged and connected to AC power Glows in amber when the battery is being charged Battery Charge indicator Bli nks red when the battery is almost completely discharged Caps Lock indicator Num Lock indicator ODD drive Hard disk drive in use indicator 1 12 Getting started ...

Страница 18: ...t device of the computer Touchpad Serves as the pointing device of the computer Stereo Speaker Sends out sound and voice from the computer Power Button Turns the computer power ON and OFF Ref Component Description 1 13 Getting started ...

Страница 19: ...ystem if your See the operating system manual dealer has not already done so To know more about the operating Read the operating system manual system To set a power on password See Security Menu in Chapter To charge the battery pack for the See Charging the Battery Pack first time in Chapter Do this 1 14 Getting started ...

Страница 20: ...already a computer user but are new to notebook computers you may choose to read only the parts containing information unique to your computer Described in this chapter are the operating basics of these components Keyboard Touchpad ODD drive And these features Starting and stopping the computer Video features Audio features Communication features Operating your computer Operating Your Computer Cha...

Страница 21: ...rd disk and CD disc The computer will automatically load the OS after you turn it on This process is called booting Note An operating system is the platform for all your software application programs to run on The most widely used operating system todayisMicrosoftWindowsXP StoppingtheComputer When you finish a working session you can stop the computer by turning off the power or leaving the comput...

Страница 22: ...Depending on your settings in Windows you can place the computer in Standby mode by Press any key Closing the display cover Pressing the Fn F12 hot key Pressing the power button Hibernation Depending on your settings in Windows you can place the computer in Hibernation mode by Press the power button Closing the display cover Pressing the Fn F12 hot key Pressing the power button If you choose to st...

Страница 23: ...buttons are three pre defined buttons located on the left above the keyboard The Easy Start buttons allow you to start the frequently used programs with one single press of a button from left to right Internet Explorer Microsoft Outlook P1 Program 1 user customized quick launch key see the next section for details P1 2 4 Operating your computer ...

Страница 24: ...lity The quick launch key utility allows you to define the P1 quick launch key To start the utility double click the HotKey icon on the taskbar The ESB window appears as shown next Box Cancel Open 2 5 Operating your computer ...

Страница 25: ...g box as shown next and select the desired program Then click Open to complete the process The appropriate icon will then appear in the box as shown next To launch the program press the P1 quick launch key or if the ESB window is open double click the box containing the icon If you want to cancel the assignment of a program click the Cancel icon under the box 2 6 Operating your computer ...

Страница 26: ...ions of a full sized computer keyboard plus a Fn key added for specific functions The standard functions of the keyboard can be further divided into four major categories Typewriter keys Cursor control keys Numeric keys Function keys 2 7 Operating your computer ...

Страница 27: ...the program you are using The Shift key is used with alphabet letter keys to produce uppercase letters when typing It is also used in combination with other keys for program specific functions The Backspace key moves the cursor left one space and deletes the character in that space Typewriter Keys Typewriter keys are similar to the keys on a typewriter Several keys are added such as the Ctrl Alt E...

Страница 28: ...n when you press or arrow key Scroll Lock does not work for all programs Pressing this key toggles the Caps Lock on and off Wh en on light on the Caps Lock keeps the letter keys in uppercase The Pausekey temporarily stops screen scrolling Scroll Lock does not work for all programs The Print Screen key prints the displayed screen Print screen does not work for all programs Key Description Operating...

Страница 29: ... The word cursor refers to the indicator on the screen that lets you know exactly where on your screen anything you type will appear Itcantaketheformofaverticalorhorizontalline ablock oroneofmanyothershapes Operating your computer ...

Страница 30: ...ument Moves the cursor to the end of the line or document Switches typing between insert and overtype modes Insert mode means any character typed will be inserted to the current cursor position overtype mode means any character typed will overwrite the text in the current cursor position Deletes the character to the right of the cursor and moves the following text left one space Key Description Op...

Страница 31: ... the numeric keys are activated which means you can use these keys to enter numerals Note When the numeric keypad is activated and you need to type the English letter in the keypad area you can either turn Num LockofforyoucanpresstheFnkeyandthentheletterkeywithoutturningNumLockoff Some software may not be able to use the numeric keypad on the computer If so use the numeric keypad on an external ke...

Страница 32: ...nd F12 keys by your computer See Hot Keys later in this chapter for information Fn Key The Fn key at the lower left corner of the keyboard is used with another key to perform the alternative function of a key The letter Fn and the alternative functions are identified by the color of blue on the keytop To perform a desired function first press and hold the Fn key then press the other key Hot Keys H...

Страница 33: ...o one of the following when external devices are connected Upon booting the system with CRT LCD CRT LCD CRT NOTE This function only applies to Plug Play displaydevices Decreases the LCD brightness Increases the LCD brightness Switches the system sound output off mute and on Switches the display on and off Key Description Serves as the sleep button that you can define with Windows Power Options Ope...

Страница 34: ...r by controlling the location of the pointer on the screen and making selection with the buttons The touchpad consists of a rectangular pad and a left and right buttons To use the touchpad place your forefinger or thumb on the pad The rectangular pad acts like a miniature duplicate of your display As you slide your fingertip across the pad the pointer also called cursor on the screen moves accordi...

Страница 35: ...rapidly Drag and drop Press and hold the left button then move your finger until you reach your destination drag Finally release the button drop when you finish dragging your selection to the destination The object will drop into the new location or Gently tap twice on the pad and on the second tap keep your finger in contact with the pad Then move your finger across the pad to drag the selected o...

Страница 36: ...he edge To move horizontally place your finger on the top or bottom edge of the pad and slide your finger left and right This function works only after you install the touchpad driver supplied with the computer and it may not work for all applications Table Note If you swap the left and right buttons tapping on the touchpad as an alternative method of pressing the left button will no longer be val...

Страница 37: ...re powerful features Using the DVD Drive Your computer comes with a DVD drive usually configured as drive D The drive uses removable 5 25 inch silver discs which look like standard music CDs It is an ideal medium to use for distributing multimedia because of the huge amount of data that a disc can store Depending on the model your drive is one of the following Combo drive can work both as a DVD dr...

Страница 38: ...t wipe the lens using materials with rough surface such as paper towel Instead use a cotton swab to gently wipe the lens FDA regulations require the following statement for all laser based devices Caution Use of controls or adjustments or performance of procedures other than those specified herein may result in hazardous radiation exposure Note The DVD drive is classified as a Class 1 laser produc...

Страница 39: ...verseengineeringordisassemblyisprohibited Inserting and Removing a Disc Follow this procedure to insert or remove a disc 1 Turn on the computer 2 Press the eject button and the DVD tray will slide out partially Gently pull on it until it is fully extended 3 To insert a disc place down the disc in the tray with its label facing up Slightly press the center of the disc until it clicks into place 4 G...

Страница 40: ...terenterstheStandbyorHibernationmodewhentheLCDisclosed IfyouwanttousethecomputerwiththeLCD closed setDoNothingtothe WhenIclosethelidofmyportablecomputer optioninthePowerOptionsProperties Thusthe computerdoesnotentertheStandbyorHibernationmodewhentheLCDisclosed Configuring the Display Modes Note WhenusinganexternalCRTmonitor theresolutiondependsontheCRTmonitor ssupportedresolution Your computer has...

Страница 41: ...fordetails Ifyouexperienceinterferencewhilerecording tryloweringthemicrophonerecordingvolume The audio subsystem of your computer features External audio connectors u and Set of speakers v Ways of playing and recording sound vary with the operating system used See your operating system documentation or online help for specific information Operating your computer ...

Страница 42: ... devices Note Afterconnectinganexternalaudiodevice makesurethatyouspecifytheuseofthecorrectaudiodeviceinWindows Audio Output Connector can be connected to speakers headphones or earphone set Microphone Connector can be connected to an external microphone for recording voice or sound Operating your computer ...

Страница 43: ...onnect to an online service or bulletin board To connect the telephone line to the modem connect one end of the modem cable to the RJ 11 connector on the computer and the other end to the phone line Note Whenusingthecommunicationsoftware youmayhavetodisablepowermanagement SettheCOMportofthemodemtoCOM3 Setparameterssuchasmodemspeed baudrate andlinetype pulsedialingortonedialing DonotentertheStandby...

Страница 44: ...cable to the RJ 45 connector on the computer and the other end to the network hub Using the Wireless LAN Depending on your model an internal mini PCI E wireless LAN WLAN card may have been pre installed in your computer This card allows you to access corporate networks or the Internet in a wireless environment The WLAN features include Peer to Peer Ad Hoc andAccess Point Infrastructure modes suppo...

Страница 45: ... 462 2 4 Modulation Technology OFDM Orthogonal Frequency Division Multiplexing DSSS Direct Sequence Spread Spectrum OFDM Orthogonal Frequency Division Multiplexing Note TotakeadvantageoftheLANfeature theLANdriversuppliedwithyourcomputermustbeinstalled To take advantage of the WLAN feature make sure that the WLAN driver is installed correctly Operating your computer ...

Страница 46: ...roximately 30 seconds for your computer to make a successful WLAN connection and approximately 10 seconds to disconnect Connecting to a Wireless Network 1 Make sure that the WLAN radio is on 2 Double click the Wireless Network Connection icon located on your Windows system tray If any wireless network is detected the following window appears on screen 3 Select a wireless network to connect to by c...

Страница 47: ...ry performance it is important that you use the battery in the proper way The topics in this chapter include What is anAC adapter How to charge the battery pack When and how to initialize the battery pack How to check the battery level How to replace the battery pack What happens when the battery is low and what actions to take What is Power Management How to save power 3 1 Managing power ...

Страница 48: ...n you disconnect the AC adapter disconnect from the electrical outlet first and then from the computer A reverse proceduremaydamagetheACadapterorcomputer Whenunpluggingtheconnector alwaysholdtheplughead Neverpullonthecord The AC adapter serves as a converter from AC Alternating Current to DC Direct Current power because your computer runs on DC power but an electrical outlet usually providesAC pow...

Страница 49: ...chargingprocesswillstopandtheBatteryChargeIndicatorflashesredwhent hebatterystemperaturegetsabove60C 140F Ifthishappens thebatterypackmaybedamaged Pleasecontactyourdealer During charging do not disconnect the AC adapter before the battery has been fully charged otherwise you will get a prematurelychargedbattery The battery pack is the internal power source for the computer It is rechargeable using...

Страница 50: ...harging do not disconnect the AC adapter before the battery has been fully charged otherwise you will get a prematurelychargedbattery The battery pack is the internal power source for the computer It is rechargeable using theAC adapter The operating time of a fully charged battery pack depends on how you are using the computer When your applications often access peripherals you will experience a s...

Страница 51: ... System Configuration Utility a ppears press the F2 key to invoke the program 3 Disconnect theAC adapter and leave the computer on until the battery is fully discharged The computer will shut down automatically 4 Connect theAC adapter to fully charge the battery pack Checking the Battery Level Note Any battery level indication is an estimated result The actual operating time can be different from ...

Страница 52: ... often rely on battery power for a long period of time while traveling you may consider the purchase of an additional battery pack from your dealer and keep it with you in a fully charged state as a backup To replace the battery pack follow these steps 1 Make sure that the computer is not turned on or connected toAC power 2 Place the computer upside down 3 Press the two battery release levers inwa...

Страница 53: ...s would click into position Battery Low Signals andActions Battery Low occurs when the battery has approximately 10 Windows default setting of its charge remaining The computer gives warning beeps or messages and the Battery Charge Indicator blinks red to alert you to take actions Note YoucansetupyourthresholdandsignalsofBatteryLowunderWindows Managing power ...

Страница 54: ...ing battery low periods This is because the access may take longerthanthetimeittakesthebatterytorunoutofcharge thusmakingyouraccesstothecardunsuccessful Ifyoufailtosaveyourdatawhenthebatterycompletelyrunsoutofcharge thenyouloseyourdata 3 8 Power Management Your computer supports ACPI Advanced Configuration and Power Interface for power management The power management feature allows you to reduce t...

Страница 55: ...ou close the cover The computer enters the Standby mode The hard disk and display are turned off and the entire system consumes less power When you press the power button When you press theFn F12 hot key When you close the cover The computer enters the Hibernation mode See the next subsection for more information When you press the power button Depends on your settings in Windows For detailed info...

Страница 56: ...ile on the hard disk and then shuts down The next time you turn on your computer you return to exactly where you left off Power Saving Tips Aside from enabling your computer s power saving mode see previous section you can do your part to maximize the battery s operating time by following these suggestions Do not disable Power Management Decrease the LCD brightness to the lowest comfortable level ...

Страница 57: ...nnecting other peripheral devices When using a device be sure to read the instructions accompanying the device together with the relevant section in this chapter This chapter gives guidelines on installing and using these devices External monitor USB device ExpressCard Expanding your computer ...

Страница 58: ...nto the power socket on the monitor and the other end to an electrical outlet 4 To use the monitor turn on the monitor before turning on the computer 5 The monitor should respond by default If not you can switch the display to the monitor or to both simultaneous display or to multi display by pressing the Fn F5 hot key In Windows you can also change the display through the settings in Display Prop...

Страница 59: ... ports for connecting USB devices such as a digital camera scanner printer modem and mouse USB Universal Serial Bus is specified to be an industry standard extension to the PC architecture It supports Plug and Play technology so you can install and remove USB devices without turning off the computer With its multiple connection capability up to 127 devices can be connected in a daisy chain configu...

Страница 60: ...rting speeds of up to 2 5 Gbps and 480 Mbps respectively improving speed in data transfer while conserving power usage ExpressCard Type The ExpressCard slot can accommodate a 54 mm ExpressCard 54 or 34 mm ExpressCard 34 wide ExpressCard Typical ExpressCards support a very extensive range of applications including memory wired and wireless communication cards and security devices Shown next are the...

Страница 61: ...rocess To remove an ExpressCard 1 Double click on the Safely Remove Hardware icon found on the Windows taskbar and the Safely Remove Hardware window appears on screen 2 Select highlight the ExpressCard from the list to disable the card 3 Push the ExpressCard slightly to release the card 4 Pull the card out of the slot Internal Components Upgrade You can upgrade your computer by changing the CPU an...

Страница 62: ... risk of damage to your computer This chapter gives you guidelines covering these areas of maintenance How to protect the computer What to note when using and storing the computer How to clean the computer What to note when using the battery pack What to note when traveling with the computer 5 1 Caring for the computer ...

Страница 63: ... requesting for the password appears on the screen whenever the computer is turned on The password is set via the BIOS Setup program Using the Cable Lock You can use a Kensington type cable lock to protect your computer against theft The cable lock is available in most computer stores To use the lock loop the lock cable around a stationary object such as a table Insert the lock to the Kensington l...

Страница 64: ... vibration direct sunlight or heavy dust Do not cover or block any ventilation openings on the computer For example do not place the computer on a bed sofa rug or other similar surface Otherwise overheating may occur that results in damage to the computer Keep the computer at least 13 cm 5 inches away from electrical appliances that can generate a strong magnetic field such as a TV refrigerator mo...

Страница 65: ... a result of power management Avoid using a screen saver or other software that prevents the power management from working Cleaning Guidelines Never clean the computer with its power on Use a soft cloth moistened with water or a non alkaline detergent to wipe the exterior of the computer Gently wipe the display with a soft lint free cloth Do not use alcohol or detergent on the display Dust or grea...

Страница 66: ...sing the computer for a long period of time more than two weeks remove the battery pack from the computer If you remove the battery pack make sure that the battery terminals do not contact any conductors such as metal objects or water Otherwise the battery may become unusable as a result of a short circuit If you need to store the battery pack store it in a cool dry place Never allow the temperatu...

Страница 67: ...ry charger Hand carry the computer Do not check it in as luggage If you need to leave the computer in the car put it in the trunk of the car If you need to leave the computer in the car put it in the trunk of the car to avoid exposing the computer to excessive heat When going through airport security it is recommended that you send the computer and flash disks through the X ray machine the device ...

Страница 68: ...e software or both When you encounter any problem it might be a typical problem that can easily be solved This chapter tells you what actions to take when solving common computer problems It is divided into three sections Preliminary checklist Solving common problems Resetting the computer ...

Страница 69: ...nections are correct and secure Make sure that the configuration information is properly set in the BIOS Setup program Make sure that all the device drivers are correctly installed Make notes of your observations Are there any messages on the screen Do any indicators light Do you hear any beeps Detailed descriptions are useful to the service personnel when you need to consult one for assistance If...

Страница 70: ...comes shorter If you often partially recharge and discharge the battery might not be charged to its full potential Initialize the battery to solve the problem See Initializing the Battery Pack in Chapter 3 for instructions The battery operating time indicated by the battery meter does not match the actual operating time The actual operating time can be different from the estimated time depending o...

Страница 71: ...rive driver is installed correctly Make sure that the computer supports the disc or the files contained You cannot eject a disc The disc is not properly seated in the drive Manually release the disc following the method described next 1 Turn off the computer 2 Insert a small rod such as a straightened paperclip into the drive s manual eject hole and push firmly to release the tray 3 Pull the tray ...

Страница 72: ...To switch the display back to the LCD press the Fn F5 hot key or change the display through the settings in Display Properties The characters on the screen are dim Adjust the brightness and or contrast Bad dots appear on the display at all times A small number of missing discolored or bright dots on the screen are an intrinsic characteristic of TFT LCD technology It is not regarded as a LCD defect...

Страница 73: ...urn on the external monitor before turning on the computer Press the Fn F5 hot key to toggle through the display options or change the settings in Display Properties in Windows ExpressCard Problems The ExpressCard does not work Make sure that the ExpressCard is correctly seated If the card requires an IRQ Interrupt ReQuest make sure that there is one available The ExpressCard stops communicating p...

Страница 74: ...r cords for correct connections For an external device that has its own power switch make sure that the power is turned on Hard Disk Drive Problems The hard disk drive error message appears on the screen The hard disk drive has defects Ask your dealer for help The hard disk drive operations seem slow The data files stored on the hard disk drive may be fragmented Use a tool such s as Window Disk De...

Страница 75: ... Num Lock is switched on Check if the Num Lock Indicator glows or not The external keyboard does not work Make sure that the keyboard cable is properly connected The USB mouse does not work Make sure that the mouse cable is properly connected The touchpad does not work or the pointer is difficult to control with the touchpad Make sure that the touchpad driver is correctly installed Make sure that ...

Страница 76: ...ctor and the network hub Make sure that the network configuration is appropriate Make sure that the user name or password is correct WLAN Problems I cannot use the WLAN feature Make sure that the mini PCI E WLAN card is correctly installed Make sure that the necessary driver s is correctly installed Make sure that the WLAN feature is turned on 6 9 Troubleshooting ...

Страница 77: ... your dealer or an experienced radio technician for help I cannot connect to another WLAN device Make sure that the WLAN feature is turned on Make sure that the SSID setting is the same for every WLAN device in the network Your computer is not recognizing changes Restart the computer Make sure that the IPaddress or subnet mask setting is correct I cannot communicate with the computer in the networ...

Страница 78: ...nt Use the Web Manager Telnet of theAccess Point to check whether it is connected to the network Reconfigure and reset theAccess Point I cannot access the network Make sure that the necessary driver s is correctly installed Make sure that the network configuration is appropriate Make sure that the user name or password is correct You have moved out of range of the network Turn off power management...

Страница 79: ...uter does not enter Standby or Hibernation mode if the connection is actively in use Make sure that the Standby or Hibernation time out is enabled The computer does not enter Standby or Hibernation mode immediately If the computer is performing an operation it normally waits for the operation to finish The computer does not resume from Standby or Hibernation mode The computer automatically enters ...

Страница 80: ... work correctly Make sure that the software is correctly installed If an error message appears on the screen consult the software progra s mdocumentation for further information If you are sure the operation has stop reset the computer See Resetting the Computer later in this chapter Sound Problems No sound is produced Make sure that the volume control is not set too low Make sure that the audio d...

Страница 81: ...omputer is equipped with the driver needed Click the speaker symbol on the taskbar and check the Windows volume control Check the volume control of your computer Startup Problems When you turn on the computer it does not respond and the Power Status Indicator does not light green If you are using an externalAC power make sure that theAC adapter is correctly and securely connected If so make sure t...

Страница 82: ...place the disc with a bootable one and press any key to continue booting If this message appears when you are booting from the hard disk insert a bootable CD disc in the DVD drive and check the condition of the hard disk Other Problems The date time is incorrect Correct the date and time via the operating system or BIOS Setup program After you have performed everything as described above and still...

Страница 83: ...s irregularly the program may be accessing data and preventing you from using the keyboard If you are sure the operation has stopped and you cannot use the restart function of the operating system reset the computer Reset the computer by any one of these methods Press Ctrl Alt Del If the above action does not work turn off the computer Wait for at least five seconds and turn it on again Caution Re...

Отзывы: