background image

14 

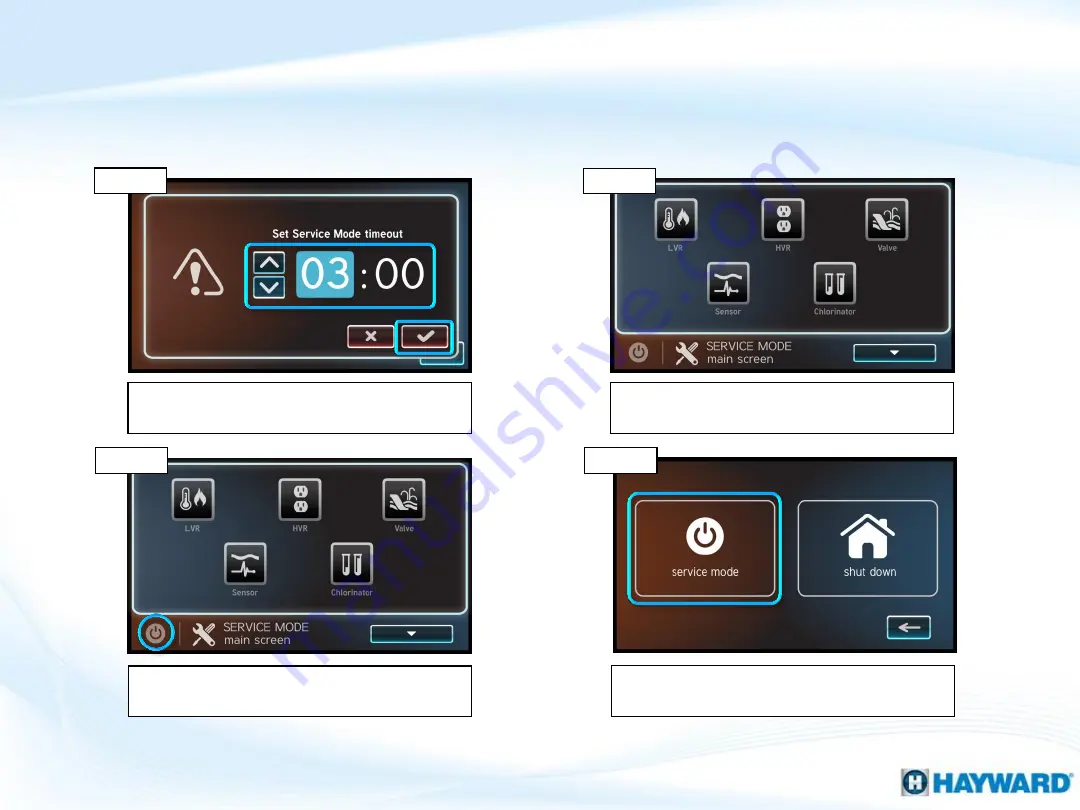
Select the ‘service mode’ option on the  far 

left. 

How To: Enter/Exit Service Mode Timed 

(cont.) 

Step 8 

Step 7 

Service Mode Timed allows professionals to enter service mode for a predetermined 

period of time; the system will return to automatic control once the timer expires. 

Set duration using up/down arrows. Then 

select the check mark. 

The system is now in service mode for the 

amount of time specified (in step 5). 

Step 6 

Step 5 

To exit service mode prematurely, select the 

power button again. 

Содержание VS Omni

Страница 1: ...VS Omni Consumer How To Guide CTSG VSO100a Copyright 2018 Hayward Industries Inc ...

Страница 2: ... can shock burn cause serious injury and or death To reduce the risk of electrocution and or electric shock hazards Only qualified technicians should remove service and install equipment Replace damaged wiring immediately Ensure applicable equipment is properly grounded and bonded ...

Страница 3: ...ents VS Omni Overview Pg 4 Smart Relay Interface Pg 5 How To Pg 6 20 Download 7 Upgrade Firmware 8 9 Back Up Config 10 Connect to Wi Fi 11 12 Enter Exit Service Mode 13 15 Create a Theme 16 19 Create a Schedule 20 3 ...

Страница 4: ...ble of connecting to a home network broadcasting 2 4ghz Wi Fi signals The VS Omni features a touch screen display that provides easy navigation in virtually any lighting condition Each VS Omni unit supports up to 2 smart relays up to 2 VSPs 1 valve 1 heater and 3 sensors Its USB port supports the ability to upgrade the system firmware as well as backup and restore configuration files 4 ...

Страница 5: ...Function Remote Green communicating with wiring hub Red not communicating with wiring hub Relay Green Relay is ON Load power RED Relay is OFF No Load power ON OFF Provides manual override only when the wiring hub comm is down unassigned ...

Страница 6: ...VS Omni How To ...

Страница 7: ...be connected to your computer Step 3 From the Save As window navigate to the desired USB drive Note please make sure to select the root directory of the USB drive Step 4 Before saving change the Save as type to All Files AND remove the txt file extension that automatically appears Then click on Save button Note failing to remove the txt file extension will result in an unreadable firmware upgrade ...

Страница 8: ...n Select either Yes or Timed to continue How To Upgrade Firmware 8 Press the power button Select service mode Step 4 Step 2 Step 3 Step 1 Insert USB drive into the bottom of the controller follow the steps provided below ...

Страница 9: ...t USB latest file and then check mark Once the upgrade has started DO NOT power off while in process Once the firmware upgrade has completed press the check mark to power cycle the unit Step 8 Step 6 Step 7 Step 5 NOTE Make sure all devices are up to the latest firmware revision ...

Страница 10: ...hanges and corrupted configurations On the right of the dashboard locate and tap the config icon Select the Backup config option third down on the left most column Select Backup to USB after inserting a USB drive then press the check mark Once the backup is confirmed press the check mark to finalize Step 4 Step 2 Step 3 Step 1 ...

Страница 11: ...has been setup prior select the desired Wi Fi signals otherwise skip to Step 6 Step 4 Step 2 Step 3 Step 1 The following identifies how to connect to a 2 4Ghz Wi Fi signal Select the network option on the right side of the screen NOTE The network password IS CASE SENSITIVE To confirm connection go to Config Network and verify IP addresses appear under the dynamic tab ...

Страница 12: ...k diagnostic tool will check for possible connection issues A network diagnostics test will run if all green check marks appear press the back button Test Description Verifying Netlink Confirms network password acceptance Verifying Network Address Verifies the Controller has an IP credentials supplied by router Verifying Network Connection Confirms the router is communicating Verifying DNS Conduct...

Страница 13: ...Timed Step 4 Step 3 The following steps outline how to enter exit service mode Press the power button it does not matter what screen is showing at the time Select the service mode option which appears on the far left Step 2 Step 1 A warning will appear prior to entering service mode If qualified tap the check mark ...

Страница 14: ...nals to enter service mode for a predetermined period of time the system will return to automatic control once the timer expires Set duration using up down arrows Then select the check mark The system is now in service mode for the amount of time specified in step 5 Step 6 Step 5 To exit service mode prematurely select the power button again ...

Страница 15: ...e mode without a countdown is the same It is important to note that if the timed service mode is not utilized the system will stay in service indefinitely until reversed On the far left select the service mode exit option to return to normal operation Once complete the system will return to the main dashboard view Step 8 Step 7 ...

Страница 16: ...e a Theme Verify all equipment is running then select the back arrow to return Step 4 Step 3 The following steps if you need to create a theme Select the body of water desired theme equipment resides Activate all desired equipment to be included in the theme Step 1 Step 2 ...

Страница 17: ...heme cont Once complete review that the name and icon are correct then press the check mark Step 8 Step 7 The OmniLogic supports up to 25 themes Select the button to add a new theme use the check mark confirming equipment is on Change the name icon and verify it is added as a favorite Step 6 Step 5 ...

Страница 18: ...s on How To Edit a Theme Navigate and select the themes icon to manage existing themes Step 4 Step 3 The following steps if you need to edit a theme Locate and activate the theme in need of editing Select additional equipment desired Once complete select the back arrow Step 2 Step 1 ...

Страница 19: ...k mark to confirm that the theme should be deleted Step 8 NOTE When editing a theme the new theme can have the same icon and name as the old theme Change the name icon and verify it is added as a favorite Select check mark to confirm Select the old theme then select the trash can icon top left to delete Step 5 Step 7 Step 6 ...

Страница 20: ...t to schedule a time window for each piece of equipment or the countdown icon for a one time countdown event below schedule You can set multiple schedules for each item NOTE it is recommended to leave a small gap between consecutive schedules ex 8am 5pm and 5 01pm to 8pm Select the icon that corresponds with the desired filter pump Step 1 Step 3 Step 2 Select the body of water desired theme equipm...

Отзывы: