16
IMPORTANT TIPS
Periodically check the water flow/vacuum to be sure that your
Cleaner is operating as efficiently as possible.
Remember, too much vacuum is just as bad as too little.
Periodically check to make sure that the Cleaner hose is securely
attached to its suction source (i.e. Skimmer, Vac Lock, etc.)
Disconnect the Cleaner hose from the Skimmer/Regulator Valve,
or, if using a “dedicated line,” turn cleaner valve off prior to
“backwashing”, so as not to restrict water flow.
DO NOT COIL HOSE
When storing your Cleaner, the hose sections must be stored
straight. A coiled hose will create a memory in the hose that will
impede the Cleaner’s ability to move properly.
Coiled hoses are not covered under the Hayward Warranty.
Use only original Hayward spare parts and hoses to insure proper
operation.
Содержание NAVIGATOR POOLVAC V-Flex
Страница 14: ...13 Étape 7 Immerger le robot dans l eau pour en chasser l air et remplir complètement le tuyau d eau Étape 8 ...
Страница 18: ...17 Déconnecter le tuyau principal de la tête du robot dès que le robot est sorti de la piscine ...
Страница 20: ...19 Étape 2 Étape 1 Remplacement des semelles ...
Страница 21: ...20 Remplacement des ailes Étape 1 Étape 2 CONSEILS DE MAINTENANCE ...
Страница 22: ...21 Étape 3 Étape 4 ...
Страница 39: ...13 Step 7 Submerge the Cleaner into the water to remove all air Fill hose completely with water Step 8 ...
Страница 43: ...17 When the Cleaner is out of the pool always disconnect the leader hose from the Cleaner s head ...
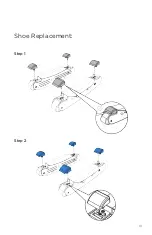
Страница 45: ...19 Step 2 Step 1 Shoe Replacement ...
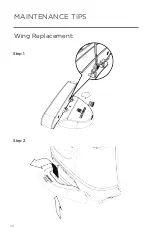
Страница 46: ...20 Wing Replacement Step 1 Step 2 MAINTENANCE TIPS ...
Страница 47: ...21 Step 3 Step 4 ...
Страница 48: ...22 MAINTENANCE TIPS Easy Opening Bottom For Turbine Access and Inspection Step 1 Step 2 ...
Страница 70: ...19 Etapa 2 Etapa 1 Cambio de las suelas ...
Страница 71: ...20 Cambios de las aletas Etapa 1 Etapa 2 CONSEJOS DE MANTENIMIENTO ...
Страница 72: ...21 Etapa 3 Etapa 4 ...
Страница 93: ...17 Desligar o tubo principal da cabeça do robô assim que este saia da piscina ...
Страница 95: ...19 Etapa 2 Etapa 1 Substituição das sapatas ...
Страница 96: ...20 Substituição das asas Etapa 1 Etapa 2 SUGESTÕES DE MANUTENÇÃO ...
Страница 97: ...21 Etapa 3 Etapa 4 ...
Страница 98: ...22 SUGESTÕES DE MANUTENÇÃO Acesso facilitado à turbina para controlo e manutenção mais simples Etapa 1 Etapa 2 ...
Страница 118: ...17 Den Hauptschlauch vom oberen Teil des Roboters trennen sobald dieser aus dem Schwimmbad genommen wird ...
Страница 120: ...19 Schritt 2 Schritt 1 Austausch der Gleitschuhe ...
Страница 121: ...20 Austausch der Flügel Schritt 1 Schritt 2 HINWEISE FÜR DIE WARTUNG ...
Страница 122: ...21 Schritt 3 Schritt 4 ...
Страница 123: ...22 HINWEISE FÜR DIE WARTUNG Einfacher Zugang zur Turbine für vereinfachte Kontrolle und Wartung Schritt 1 Schritt 2 ...
Страница 139: ...13 Stap 7 Dompel de robot onder in het water om de lucht te verwijderen en vul hem volledig met water Stap 8 ...
Страница 143: ...17 Koppel de hoofdslang los van de robotkop zodra de robot uit het zwembad wordt verwijderd ...
Страница 145: ...19 Stap 2 Stap 1 Glijblokjes vervangen ...
Страница 146: ...20 Vleugels vervangen Stap 1 Stap 2 ONDERHOUDSTIPS ...
Страница 147: ...21 Stap 3 Stap 4 ...
Страница 148: ...22 ONDERHOUDSTIPS Gemakkelijke toegang tot de turbine voor controle en onderhoud Stap 1 Stap 2 ...
Страница 164: ...13 Fase 7 Immergere il robot in acqua per eliminare l aria e riempire completamente il tubo di acqua Fase 8 ...
Страница 168: ...17 Scollegare il tubo principale dalla testa del robot non appena il robot è uscito dalla piscina ...
Страница 170: ...19 Fase 2 Fase 1 Sostituzione dei piedini ...
Страница 171: ...20 Sostituzione delle alette Fase 1 Fase 2 CONSIGLI DI MANUTENZIONE ...
Страница 172: ...21 Fase 3 Fase 4 ...
Страница 173: ...22 CONSIGLI DI MANUTENZIONE Facile accesso alla turbina per semplificare il controllo e la manutenzione Fase 1 Fase 2 ...
Страница 177: ...Hayward is a registered trademark of Hayward Industries Inc 2016 Hayward Industries Inc ...


