7
NAVIGATOR V-FLEX
Configuración del Navigator V-Flex
para las piscinas liner y poliéster
El Navigator V-Flex está configurado de manera predeterminada para las piscinas
hormigón. Para las piscinas liner o poliéster, hay que cambiar las suelas y la boca
de aspiración.
Retire las suelas de santopreno
Instale las suelas de corcho
incluidas en el kit de adaptación
Etapa 1
Retire la boca de aspiración especial
hormigón
Instale la boca de aspiración especial
liner incluida en el kit de adaptación
Etapa 2
CONSEJO:
Para las piscinas con baldosas, hay que adquirir suelas de
cerámica (AXV014CP) y dejar la boca de aspiración especial hormigón
.
Содержание NAVIGATOR POOLVAC V-Flex
Страница 14: ...13 Étape 7 Immerger le robot dans l eau pour en chasser l air et remplir complètement le tuyau d eau Étape 8 ...
Страница 18: ...17 Déconnecter le tuyau principal de la tête du robot dès que le robot est sorti de la piscine ...
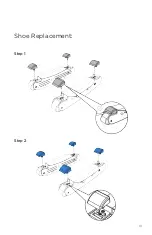
Страница 20: ...19 Étape 2 Étape 1 Remplacement des semelles ...
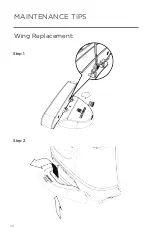
Страница 21: ...20 Remplacement des ailes Étape 1 Étape 2 CONSEILS DE MAINTENANCE ...
Страница 22: ...21 Étape 3 Étape 4 ...
Страница 39: ...13 Step 7 Submerge the Cleaner into the water to remove all air Fill hose completely with water Step 8 ...
Страница 43: ...17 When the Cleaner is out of the pool always disconnect the leader hose from the Cleaner s head ...
Страница 45: ...19 Step 2 Step 1 Shoe Replacement ...
Страница 46: ...20 Wing Replacement Step 1 Step 2 MAINTENANCE TIPS ...
Страница 47: ...21 Step 3 Step 4 ...
Страница 48: ...22 MAINTENANCE TIPS Easy Opening Bottom For Turbine Access and Inspection Step 1 Step 2 ...
Страница 70: ...19 Etapa 2 Etapa 1 Cambio de las suelas ...
Страница 71: ...20 Cambios de las aletas Etapa 1 Etapa 2 CONSEJOS DE MANTENIMIENTO ...
Страница 72: ...21 Etapa 3 Etapa 4 ...
Страница 93: ...17 Desligar o tubo principal da cabeça do robô assim que este saia da piscina ...
Страница 95: ...19 Etapa 2 Etapa 1 Substituição das sapatas ...
Страница 96: ...20 Substituição das asas Etapa 1 Etapa 2 SUGESTÕES DE MANUTENÇÃO ...
Страница 97: ...21 Etapa 3 Etapa 4 ...
Страница 98: ...22 SUGESTÕES DE MANUTENÇÃO Acesso facilitado à turbina para controlo e manutenção mais simples Etapa 1 Etapa 2 ...
Страница 118: ...17 Den Hauptschlauch vom oberen Teil des Roboters trennen sobald dieser aus dem Schwimmbad genommen wird ...
Страница 120: ...19 Schritt 2 Schritt 1 Austausch der Gleitschuhe ...
Страница 121: ...20 Austausch der Flügel Schritt 1 Schritt 2 HINWEISE FÜR DIE WARTUNG ...
Страница 122: ...21 Schritt 3 Schritt 4 ...
Страница 123: ...22 HINWEISE FÜR DIE WARTUNG Einfacher Zugang zur Turbine für vereinfachte Kontrolle und Wartung Schritt 1 Schritt 2 ...
Страница 139: ...13 Stap 7 Dompel de robot onder in het water om de lucht te verwijderen en vul hem volledig met water Stap 8 ...
Страница 143: ...17 Koppel de hoofdslang los van de robotkop zodra de robot uit het zwembad wordt verwijderd ...
Страница 145: ...19 Stap 2 Stap 1 Glijblokjes vervangen ...
Страница 146: ...20 Vleugels vervangen Stap 1 Stap 2 ONDERHOUDSTIPS ...
Страница 147: ...21 Stap 3 Stap 4 ...
Страница 148: ...22 ONDERHOUDSTIPS Gemakkelijke toegang tot de turbine voor controle en onderhoud Stap 1 Stap 2 ...
Страница 164: ...13 Fase 7 Immergere il robot in acqua per eliminare l aria e riempire completamente il tubo di acqua Fase 8 ...
Страница 168: ...17 Scollegare il tubo principale dalla testa del robot non appena il robot è uscito dalla piscina ...
Страница 170: ...19 Fase 2 Fase 1 Sostituzione dei piedini ...
Страница 171: ...20 Sostituzione delle alette Fase 1 Fase 2 CONSIGLI DI MANUTENZIONE ...
Страница 172: ...21 Fase 3 Fase 4 ...
Страница 173: ...22 CONSIGLI DI MANUTENZIONE Facile accesso alla turbina per semplificare il controllo e la manutenzione Fase 1 Fase 2 ...
Страница 177: ...Hayward is a registered trademark of Hayward Industries Inc 2016 Hayward Industries Inc ...


