10
GB
Presentation:
Congratulations, you have just purchased our AquaVac automatic cleaner equipped with its own micropro-
cessor. This handbook contains important information on the use and maintenance of your cleaner that you
should read carefully before use.
AquaVac scrubs, vacuums, and filters your pool.
You do not need to install your cleaner or fit accessories to it. You just immerse it in the water and switch
it on. AquaVac is fully automatic.
The filter is very easy to clean thanks to its new patented cartridge.
The Adaptive Seek Control Logic (ASCL) microprocessor optimises cleaning for each pool size and each
pool shape.
AquaVac is equipped with an electronic self-diagnostic system and with electrical surge protection. A very
simple steering system steers the appliance, with anti-corrosion bearings offering greater reliability.
Use:
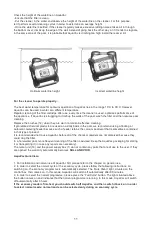
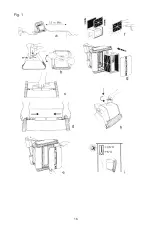
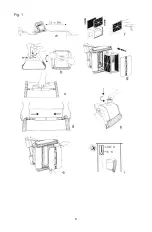
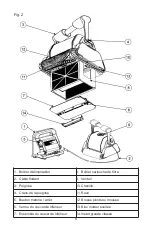
Take some time to become acquainted with your AquaVac by looking at the drawings (Figures 1 and 2).
Throughout the handbook we refer to these drawings when we are talking about the various components
of AquaVac.
1. Choose a 220-240 volt socket (outlet) that is close and protected from short-circuits.
Fit a 30 mA diffe-
rential protection device to protect people from electric shock caused by a possible break in the elec-
trical insulation.
2. Install the power supply box (1) so that your AquaVac can reach all of the walls/surfaces
of the pool. The power supply box should be at least 3.5 metres from the edge of the pool (Figure 1a).
The standard length of the AquaVac cable is 18 metres.
3. Plug the floating cable into the power supply box.
Caution: use the original power supply box only.
4. AquaVac has an adaptable handle (3). The handle should be locked in the diagonal position in order
to guarantee optimum cleaning results. Reverse the position of the handle after use every time it is used
(Figure 1b) to enable the cord to be wound up without twisting.
5. Place AquaVac in the pool. It will sink gently to the bottom of the pool as it gradually empties itself
of the air that it contains.
6. Plug the power supply box into the socket and switch on the appliance. AquaVac will programme
a self-diagnostic test for a few minutes before it starts cleaning the pool.
Caution:
DO NOT SWITCH AQUAVAC ON OUTSIDE THE WATER. You might damage the pump and render the
warranty NULL AND VOID.
7. AquaVac switches off automatically after a 3-hour cycle. If your pool is clean in under 3 hours, you can
switch off the cleaner by switching off the power supply box.
If a second clean is necessary, wait for 30 seconds before switching back on again.
8. Once the pool is clean, switch off the power supply box before you take AquaVac out of the water.
9. Take AquaVac out of the water from the shallow end of the pool by pulling the cable until the cleaner
comes up to the surface. Then, lift it out gently by using the handle, NOT the cable.
CAUTION:
while pulling the cable, wind it in around both of your hands and above all not around your arm.
To make AquaVac last, remove the water from it after use, every time it is used.
DO NOT GO INTO THE POOL WHILE AQUAVAC IS OPERATING.
Содержание AquaVac
Страница 7: ...16 5 C 46 C Fig 1...
Страница 14: ...8 5 C 46 C Fig 1...


