DIVA T/A ISDN Modem User’s Guide 9
Connecting the Cables
To connect the cables to your DIVA T/A:
1
Turn off your computer before you connect the cables.
2
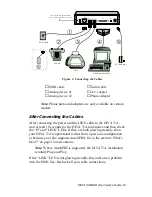
Connect the RJ45 end of the ISDN cable (see
➀
in Figure 1 on
page 11) to the jack labeled ISDN on the rear of the DIVA T/A.
See below to complete the connection:
•
Integrated NT1 (U) model
Connect the other smaller end (RJ11) of the ISDN cable to
your ISDN wall jack.
•
S/T Interface model
Connect the other end of the ISDN cable to an NT1
interface, whether part of the ISDN service (e.g. corporate
phone switch) or external.
You might have to change the setting of the termination
resistor switch (see “Appendix A: ISDN Line Termination”
on page 104 for more information).
3
(This step is optional) Connect cables (see
➁
and
➂
in the figure
below) from analog devices (telephone, fax machine, modem,
etc.) to the jacks labeled PHONE on the rear of the DIVA T/A. It
is recommended that you use PHONE 1 for voice, and PHONE 2
for Data (modem or fax). In France and the United Kingdom you
must attach the analog devices to the phone adapters (see
⑥
in
Figure 1) before connecting them to the DIVA T/A. Note that
Phone ports and adapters are only available on certain models.
4
Connect one end of the serial cable (see
➃
in Figure 1 on page
11) to the port labeled SERIAL on the rear of the DIVA T/A,
and the other end to the appropriate serial port on your PC.
5
Connect the A/C adapter connector (see
➄
in Figure 1 on page
11) to the power jack on the rear of the DIVA T/A, and plug the
adapter into an AC power outlet.
Содержание DIVA T/A ISDN
Страница 1: ...DIVA T A ISDN Modem User s Guide...

