background image

ENGLIS

H

aDDITIONaL SaFETY WaRNINGS

• 

Hold power tools by insulated gripping surfaces when performing 

an operation where the cutting tool may contact hidden wiring or its 

own cord. Contact with a ″live″ wire will make exposed metal parts 

of the tool ″live″ and shock the operator.

• 

Use clamps or other practical way to secure and support the 

workpiece to a stable platform. Holding the work by hand or against 

your body is unstable and may lead to loss of control.

• 

Do not drill, fasten or break into existing walls or other blind areas 

where electrical wiring may exist. If this situation is unavoidable, 

disconnect all fuses or circuit breakers feeding this worksite.

• 

Always wear safety goggles or eye protection when using this tool. 

Use a dust mask or respirator for applications that generate dust.

• 

Use thick cushioned gloves and limit the exposure time by taking 

frequent rest periods. Vibration caused by hammer-drill action may 

be harmful to your hands and arms.

• 

Secure the material being drilled. Never hold it in your hand 

or across legs. Unstable support can cause the drill bit to bind 

causing loss of control and injury.

• 

Never leave the trigger locked "ON". Before plugging the tool in, 

check that the trigger lock is "OFF". Accidental start-ups could 

cause injury.

• 

Position the cord clear of rotating bit. Do not wrap the cord around 

your arm or wrist. If you lose control and have the cord wrapped 

around your arm or wrist it may entrap you and cause injury.

• 

Position yourself to avoid being caught between the tool or side 

handle and walls or posts. Should the bit become bound or 

jammed in the work, the reaction torque of the tool could crush 

your hand or leg.

• 

If the bit becomes bound in the workpiece, release the trigger 

immediately, reverse the direction of rotation and slowly squeeze 

the trigger to back out the bit. Be ready for a strong reaction torque. 

The drill body will tend to twist in the opposite direction as the drill 

bit is rotating.

• 

Do not grasp the tool or place your hands too close to the spinning 

chuck or drill bit. Your hand may be lacerated.

• 

Do not use the switch "lock-on" feature in situations where drill bit 

binding is likely. (For example: just before the bit is ready to break 

through the material, anytime when using a "Hole Saw", auger 

bits........ etc.) When the bit binds, the drill's body will twist or kick-

back in opposite direction and the release of the trigger "lock-on" 

may be difficult.

• 

Be aware of the location and setting of the switch "lock-on" button. 

If the switch is locked "ON" during the use, be ready for emergency 

situations to switch it "OFF", by first pulling the trigger then 

immediately releasing it without pressing the "lock-on" button.

• 

When installing a drill bit, insert the shank of the bit well within 

the jaws of the chuck. If the bit is not inserted deep enough, the 

5

Содержание 59595069

Страница 1: ...fety instructions operating procedures and warranty Put it and the original sales invoice in a safe dry place for future reference Notre personnel du service à la clientèle est disponible pour vous aider Pour obtenir de l aide pour le montage de votre produit pour signaler des pièces endommagées ou manquantes ou pour toute autre information veuillez composer notre numéro sans frais 1 866 206 0888 ...

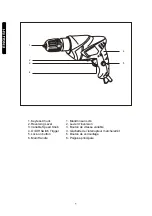
Страница 2: ...Variable Speed Knob 4 On Off Switch Trigger 5 Lock on button 6 Main Handle 1 Mandrin sans clé 2 Levier d inversion 3 Bouton de vitesse variable 4 Gâchette de l interrupteur marche arrêt 5 Bouton de verrouillage 6 Poignée principale 1 2 3 4 5 6 1 ...

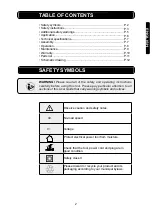
Страница 3: ...ctions carefully before using this tool Please pay particular attention to all sections of this User Guide that carry warning symbols and notices Observe caution and safety notes n0 No load speed V Voltage Protect electrical power tool from moisture Check that the tool power cord and plug are in good condition Safety class II Please discard or recycle your product and its packaging according to yo...

Страница 4: ...e power tools to rain or wet conditions Water entering a power tool will increase the risk of electric shock c Handle the cord carefully Never use the cord for carrying pulling or unplugging the power tool Keep cord away from heat oil sharp edges and moving parts Damaged or entangled cords increase the risk of electric shock d If operating a power tool in a damp location is unavoidable use a Groun...

Страница 5: ...ower tools Such preventive safety measures reduce the risk of starting the power tool accidentally d Store idle power tools out of the reach of children and do not allow persons unfamiliar with the power tool or these instructions to operate the power tool Power tools are dangerous in the hands of untrained users e Maintain power tools Check for misalignment or binding of moving parts breakage of ...

Страница 6: ...it Do not wrap the cord around your arm or wrist If you lose control and have the cord wrapped around your arm or wrist it may entrap you and cause injury Position yourself to avoid being caught between the tool or side handle and walls or posts Should the bit become bound or jammed in the work the reaction torque of the tool could crush your hand or leg If the bit becomes bound in the workpiece r...

Страница 7: ...stander Do not run the drill while carrying it at your side A spinning drill bit could become entangled with clothing and injury may result a PPLICaTION Read all safety warnings and instructions Failure to follow the warnings and instructions may result in electric Intended Use This HAUSSMANN drill driver is intended for driving in and loosening screws as well as for drilling in wood metal ceramic...

Страница 8: ... This positions the bit properly giving maximum contact between the chuck jaws and the bit shank To tighten hold the chuck collar firmly with one hand and securely tighten the chuck sleeve with the other hand FIG 2 2 REMOVING CHUCK Open the chuck all the way remove left hand thread screw inside chuck by turning it clockwise Fig 3 Insert the short arm of a 3 8 hex key wrench and close jaws on flats...

Страница 9: ...lock depress the trigger switch and release it 3 REVERSING SWITCH LEVER The reversing lever 2 is located above the trigger switch and is used to reverse rotation of the drill bit The reversing switch should only be activated when the motor is OFF and when bit is at a complete standstill Fig 1 To use tool in Forward rotation move lever to left side of tool to Reverse the rotation of the bit move th...

Страница 10: ...uch as aluminum copper or cast iron If the hole to be drilled is fairly large drill a smaller hole first then enlarge to the required size Maintain enough pressure to make sure that the bit does not just spin in the hole This will dull the bit and greatly shorten its life MAINTENANCE WARNING To prevent serious injury from accidental operation Turn the power switch of the tool to its OFF position a...

Страница 11: ... etc please contact one of our service technicians at our toll free service line at 1 866 206 0888 from 8 AM to 6 PM Monday to Friday Eastern time RONA reserves the right to repair or replace the defective tool at its discretion The product is guaranteed for 36 months if used for normal trade purposes Any guarantee is invalid if the product has been overloaded or subject to neglect improper use or...

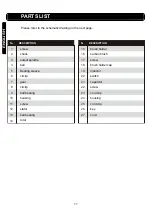
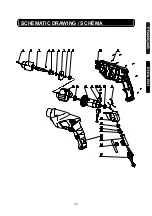
Страница 12: ...N PARTS LIST Please refer to the schematic drawing on the next page screw chuck output spindle ball Bearing sleeve circlip gear circlip ball bearing housing screw stator ball bearing rotor brush holder carbon brush screw brush holder cap inductor switch capacitor screw cord clip housing cord clip key cord 11 ...

Страница 13: ...FRANÇAIS ENGLISH SCHEMATIC DRAWING SCHÉMA 12 ...

Страница 14: ...illez consulter le schéma à la page précédente Vis Mandrin Arbre de sortie Bille Coussinet Circlip Engrenage Circlip Roulement à billes Boîtier Vis Stator Roulement à billes Rotor Porte balai Balai de carbone Vis Capuchon porte balais Inducteur Interrupteur Condensateur Vis Pince pour cordon Boîtier Pince pour cordon Clé Cordon 13 ...

Страница 15: ...r cet outil Veuillez accorder une attention particulière à tous les paragraphes de ce guide d utilisation contenant des symboles d avertissement et des remarques Respecter les avertissements et les remarques de sécurité n0 Vitesse à vide V Tension Protéger l outil électrique contre l humidité Vérifier que l appareil le cordon d alimentation et la prise sont en bon état Classe de sécurité II Veuill...

Страница 16: ...ectement communiquez avec un électricien qualifié pour faire installer une prise polarisée Ne changez pas de fiche La double isolation élimine le besoin d un cordon d alimentation à trois fils mis à la terre et un système d alimentation électrique mis à la terre b N exposez pas les outils électriques à la pluie ou à des conditions humides De l eau pénétrant dans un outil électrique augmentera le r...

Страница 17: ...es vêtements amples ni de bijoux Maintenez vos cheveux vos vêtements et vos gants éloignés des parties en mouvement Les vêtements amples les bijoux ou les cheveux longs peuvent être happés par les parties en mouvement 4 Utilisation et entretien de l outil électrique a Ne surchargez pas l outil Utilisez le correctement pour votre application Une utilisation correcte garantit un travail meilleur et ...

Страница 18: ... été conçu pourrait entraîner une situation dangereuse h Les réparations ne doivent être effectuées que par un Omettre de respecter cette consigne peut entraîner un grave danger pour l utilisateur un risque d électrocution et de blessures i Respectez toujours les règles générales de prévention des incendies lorsque vous travaillez avec des outils électriques dans votre demeure ou votre atelier Il ...

Страница 19: ...main ou en travers de vos jambes Un support instable peut entraîner le coincement du foret et causer ainsi une perte de contrôle et des blessures 7 Ne jamais laisser la gâchette verrouillée en marche Avant l outil est enfoncé Le démarrage accidentel peut causer des blessures 8 Placez le cordon à l écart du foret Ne pas enrouler le cordon autour de votre bras ou poignet Si vous perdez le contrôle e...

Страница 20: ...ppropriés en manipulant le foret ou accessoire Les accessoires peuvent être chauds après une utilisation prolongée 17 Assurez vous que les clés de réglage sont retirées de la perceuse avant de mettre l outil en marche Les clés peuvent s envoler à grande vitesse et frapper vous même ou un spectateur 18 19 Ne pas faire fonctionner la perceuse en la portant sur votre côté Un foret en rotation peut s ...

Страница 21: ...ue chose manque ou si une pièce est brisée veuillez communiquer avec le Service à la clientèle sans frais au 1 866 206 0888 du lundi au vendredi de 8h à 18h Hn E Caractéristiques du produit La numérotation des caractéristiques du produit renvoie à l illustration la page des représentations graphiques page 2 1 Mandrin sans clé 2 Levier d inversion 3 Bouton de vitesse variable 4 g âchette de l inter...

Страница 22: ...le collier du mandrin d une main puis serrer solidement le manchon du mandrin de l autre main Fig 2 2 RETRAIT DU MANDRIN Ouvrir entièrement le mandrin retirer la vis filetée se trouvant à l intérieur en tournant dans le sens horaire Fig 3 Insérer le bras court d une clé hexagonale de 3 8 po 9 5 mm et fermer les mâchoires sur la partie plate de la clé Fig 4 Faire tourner d un coup sec le bras long ...

Страница 23: ... sur l interrupteur 4 enfoncer le bouton de verrouillage 5 situé sur le côté de la poignée puis tout en maintenant enfoncé le bouton de verrouillage relâcher l interrupteur Pour déverrouiller appuyer sur l interrupteur du déclencheur et le relâcher LEVIER DE L INVERSEUR Le levier de l inverseur 2 est situé au dessus de l interrupteur à gâchette et sert à inverser la rotation du foret L inverseur n...

Страница 24: ... et plus la vitesse sera lente des métaux souples tels que l aluminium le cuivre et la fonte Si le trou à percer est relativement grand commencer par percer un petit trou en l élargissant jusqu à la taille requise Ceci permet d aller plus vite à vide dans le trou Ceci émousserait le foret et en réduirait grandement la durée de vie ENTRETIEN AVERTISSEMENT Pour éviter de graves blessures résultant d...

Страница 25: ...vant la date d achat Cette garantie n a aucune incidence sur vos droits prévus par la loi En cas de mauvais fonctionnement de votre outil bris pièces manquantes etc composez notre numéro sans frais pour parler à un technicien au 1 866 206 0888 du lundi au vendredi de 8h à 18 h heure de l Est RONA se réserve le droit de réparer ou remplacer l outil défectueux à sa discrétion Ce produit est garanti ...

Отзывы: