background image

4

L / M . . / 07.96

P 0 1 2 3

58    50a    15           19       17

P

, 0, 1

30

86

30

87

85

86

30

87

85

30

50

M

G

U

D+

B+

P

u

P

h

P1

n

P2

15

W - 2

0

7

Y1

0

Y3

3

AW

7

HW

S1

G1

G2

M1

31

30

15

50

19

17

22
1

3

W - 6

W

7

4

17

5

2

X1

X2

8
6

14

0

X1

X1

X1

S8

S7

S6

H1     H4

V1

V1

V1

V1

K4

V1

R1

R1

H6

V2

H6

K2

S5

K3

F1

8A

V2

U30  U50  U15

Win  GND  A

u

s

86      30

85      87a

K1

A4

31

87

15

50

SE

12

3

4

56

Engine

4 L / M 31,40,41 only

Instr

ument bo

x

P

o

w

e

r supply

Charging de

vice

Star

ting de

vice

Monitor

ing + displa

y

Engine shut-do

w

n

P

re-heating

Optiones

(Hour-r

un meter

, speed adjustment)

Cir

cuit dia

gram 12

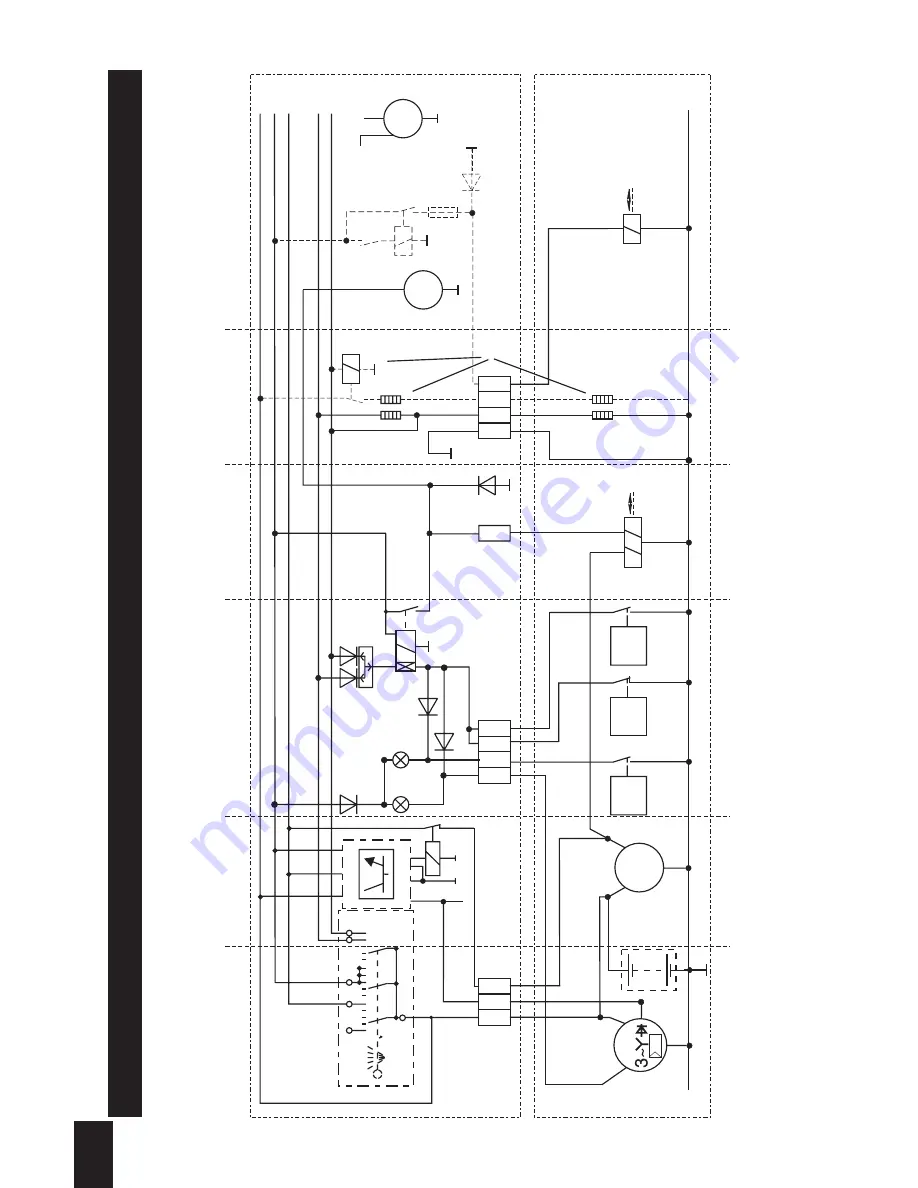
V - system with automat.

shut do

wn and star

ter pr

otection module

Содержание 2-4L30

Страница 1: ...Workshop manual 2 4L30 H2 3L30 2 4L31 2 4L40 2 4L41 2 4M31 2 4M40 2 4M41 438 402 00 1 97 0 4 Printed in Germany...

Страница 2: ......

Страница 3: ...r muffler A 04 00 Mechanical starting A 04 10 Crank handle A 04 20 Automatic decompressor A 04 70 Engine rotating device A 04 80 Start release A 05 00 Electric starting A 05 40 Alternator A 07 00 Lubr...

Страница 4: ...n pump PFR 1K 90 M 12 30 with injection pump PFR 1K 90 from serial No L M31 12 M40 16 2L40 19 3 4L40 18 and L M41 M 13 00 Fan M 14 00 Fuel injection equipment M 14 00 Injection pump functional test M...

Страница 5: ...tools will be available even if not called for specifi cally in this manual Please refer to the operating manual for details of routine maintenance work operating fluids and materials troubleshooting...

Страница 6: ......

Страница 7: ...1 L M 10 98 1 General...

Страница 8: ...r 7 Side panel 8 Cooling fan with built in alternator 9 Cooling fan drive belt 10 Hydraulic belt tensioner 11 Stop device 12 Governor housing 13 Cooling air duct for lub oil cooler 21 Cyclone type pre...

Страница 9: ...Cover for capsule 15 Air intake duct of capsule 16 Outgoing air duct 17 Exhaust silencer encapsulated 20 Cover for air duct housing Access to governor housing of engine 22 Eye hook for transport disa...

Страница 10: ...ine 10 Oil drain plug 11 Speed control lever 12 Lub oil filter 13 Oil drain plug oil sump 14 Cooling air duct for lub oil cooler 15 Access to fuel feed pump 1 L M 10 98 Flywheel side Engine 2 4 M 31 2...

Страница 11: ...il pressure switch 16 Fuel feed pump Bosch Governor and exhaust side Engine H 2 L 30 H 3 L 30 1 Cooling water inlet 2 Rain protection cap 3 Air filter 4 Cylinder head cover 5 Fuel pressure pipe 6 Temp...

Страница 12: ...ect fuel quantity in 1 100 mm Engine number Type No 064 10 81 031814 MOTORENFABRIK HATZ KG D 94099 RUHSTORF GMBH CO TYP KENNZ MOTOR FABRIK NO ABE AUSF MIN NH PV CM MADE IN GERMANY 1 3 Displacement in...

Страница 13: ...rod on engines with oil cooler 12 Oil suction strainer 13 Balancing shaft s 14 Lub oil filter with bypass valve 15 Oil cooler 16 Oil pressure switch 17 Oil pressure relief valve Lubricating oil circu...

Страница 14: ...ht approx kg L 30 S 223 222 255 271 291 L 30 Z 228 228 262 279 306 L 30 C K 276 331 396 386 Lubricating oil pressure at n 800 rpm min 0 9 bar Lubricating oil consumption max 1 of fuel consumption at f...

Страница 15: ...air requirement at n 3000 rpm m3 min 2 1 2 6 3 2 3 9 4 2 5 2 Net weight approx kg L 31 S L 40 S M 40 223 255 291 L 31 Z L 40 Z M 40 Z 228 262 306 L 31 C K L 40 C K 276 331 396 386 Lubricating oil pres...

Страница 16: ...rement at n 3000 rpm m3 min 1 9 2 9 3 9 Net weight approx kg M 41 S 223 255 291 M 41 Z 228 262 306 L 41 C K 276 331 396 386 Lubricating oil pressure at n 800 rpm min 0 9 bar Lubricating oil consumptio...

Страница 17: ...tite Activator 500 ml B 502 231 00 Loctite 573 50 ml C 502 232 00 Loctite 601 50 ml D 502 233 00 Loctite 221 50 ml E 502 234 00 Loctite 648 10 ml F 502 238 00 Technicoll 8058 750 g 502 239 00 Technico...

Страница 18: ...03 1 2 03 1 2 03 2 2 06 2 1 06 1 2 06 1 2 05 1 1 Pressing in drift 9 mm for valve guides Reamer 9 H 6 for valve guide Clamp for fuel line Impact extractor with accessories Test nozzle 400 bar Valve li...

Страница 19: ...Special tools and workshop equipment 1 L M 10 98 1 2 3 4 5 6 7 8 9 10 11 12 13 14 15 16 17 18 19 20 21 22 Injection pump timing set A B E C D Relais Funktions und Testbox 15 86 87 87a 50...

Страница 20: ...29 055 00 05 1 1 05 1 1 05 1 1 05 1 1 05 1 1 05 1 1 05 1 1 03 1 1 03 1 1 03 1 1 03 1 1 05 1 1 03 1 1 03 1 1 03 1 1 01 1 2 02 1 1 05 1 1 05 2 1 5Q 1 1 5Q 1 1 5Q 1 1 03 2 1 03 2 1 02 1 2 Marking device...

Страница 21: ...Special tools and workshop equipment 1 L M 10 98 23 24 25 26 27 28 29 30 31 32 33 34 35 36 37 38 39 40 44 47 42 43 44 46 45...

Страница 22: ......

Страница 23: ...2 L M 09 96 2 Additional equipment...

Страница 24: ...e fuel delivery pump 1 in the numerical order of parts illustrated Fig 182 Note Since September 1992 fuel strainer 12 has been replaced by O ring 5 Because of this an input side fuel filter must alway...

Страница 25: ...more recent versions the exhaust pipe is secured with a clip Take out the machine screws 184 3 and remove the connecting cover 184 4 Unscrew and remove the hex bolts 185 1 Remove the machine screws 1...

Страница 26: ...losure sections and the silencer for fractured welds or tapped holes which are unfit for further use Installing Install by following the removal instruc tions in the reverse order as appropriate The s...

Страница 27: ...injury if the shaft of the crank handle or its tubular handgrip are worn Preparations Demontage Inspection repair Visual inspection Inspect shaft 1 and tubular handgrip 2 for wear or breakage Note If...

Страница 28: ...ws 4 Take off cover 5 with great care so that leaf spring 11 cannot escape Risk of injury Remove parts in the order 6 10 as illustrated Hold torsion spring 13 in position in order to maintain its tens...

Страница 29: ...s not trapped insert its longer end into the groove on the corresponding locating pin Preload torsion spring 13 against the normal spring pressure until the hook eye of the spring engages behind the e...

Страница 30: ...s 94 23 Camwheel 94 22 is then used at the second cylinder flywheel side instead of the gearwheel Dismantling the automatic decompres sor Unscrew and remove screw plug 94 1 Take out sealing ring 94 2...

Страница 31: ...94 19 make sure that pressure pin 94 17 engaged in the locating slot on shaft 94 14 Adjusting the automatic decompressor Adjustment is needed if a the decompression effect is no longer sufficient b t...

Страница 32: ...seating If it does not project sufficiently grind the rocker away slight ly at the appropriate point Install the rocker finally noting the endplay adjust valve clearance and check dimension 95 B again...

Страница 33: ...bearing bracket 11 Detach the hydraulic shutdown device see M 20 00 Remove the timing case cover see M 11 00 Take out machine screws 6 with spring washers 5 Take off starting sleeve 4 Checking parts C...

Страница 34: ...les emerge from the cylinder it must be renewed Check flexible gaiter for damage and renew if necessary Re assembling the start release device Follow the dismantling instructions in reverse order as a...

Страница 35: ...e lever the locking collet must move back to the Start position Prime the fuel delivery pump with the lever and at the same time check whether the piston in cylinders 114 2 moves the lever 114 4 corre...

Страница 36: ...of the risk of voltage peaks these could damage electronic components 2 L M 09 96 Checking operation of the alternator with voltage regulator checking charging current With the engine stopped and the...

Страница 37: ...s and pull the rotor with alternator out forwards Unscrew the hex nut holding the rotor and drive the alternator shaft through by striking it with a plastic faced hammer see Fig 123 Checking parts Exa...

Страница 38: ...bon brushes the fan housing was also modified in the regulator area when the PARIS RHONE generator was introduced A cutout in the housing and deletion of the retaining screw which previously passed th...

Страница 39: ...gilled tubes 197 3 with O ring seals 197 4 Note The gilled tube oil cooler is only used on two cylinder engines without enclosure and rated for engine speeds up to a certain limit Checking parts Make...

Страница 40: ...ing seal 199 5 Checking parts Make a visual check for cracks or damage to the sealing faces Installing Install the oil cooler by following the removal instructions in the reverse order as appropriate...

Страница 41: ...m open ended wrench Pull out the eccentric shaft and remove washer 205 5 lever 205 6 washer 205 7 and spring 205 8 Inspection repair Use a new O ring seal 205 10 Check flexible gaiter for damage and r...

Страница 42: ...lling the shutdown device Set the speed control to the Stop posi tion Coat both sides of the gasket 208 1 for the housing with sealant H Apply only a thin coat of the sealant so that the oil passage i...

Страница 43: ...exagon until a clicking sound is clearly heard to indicate that the gover nor lever is dropping into the increased volume starting position Slowly turn thermo element 4 back to a lower setting until t...

Страница 44: ...fied torque Note Apply sealant D to the bolt above inspection hole 200 4 since this is a through hole On engines without a connecting housing the equivalent screw plug should also be coated with seala...

Страница 45: ...nt 8 with seal 9 from housing 10 Checking parts Check housing for evidence of damage Note If the following damage is detected renew complete pump element 8 Damaged pump impeller Worn sealing ring in p...

Страница 46: ...Suspend the thermostat insert and a thermometer in the centre of a vessel filled with water see Fig 203 Heat the water while stirring it Check that the thermostat insert opens at the temperature stam...

Страница 47: ...3 Basic engine 3 L M 09 96...

Страница 48: ...gine and drive the shaft out towards the flywheel end see Fig 3 Drive out the thrust bushing timing end Take the balancing weights and driver out of the lower part of the crankcase Inspection repair C...

Страница 49: ...g 5 Note The timing end thrust bushing 5 1 forms part of the sealing face at the timing case cover and must therefore be flush with the endface of the crankcase after driving in the shaft Endplay can...

Страница 50: ...ls and pull them out Mark the installed positions of the bearing journals Invert the lower part of the crankcase Note The joint line is a sealing face and must not be damaged Place the crankcase on a...

Страница 51: ...gearwheels and the crankshaft end gearwheel for the balancing weights for damage Assembling Blow through the oilways thoroughly with compressed air Note Before installing the bearing bushings make su...

Страница 52: ...ge side Insert splash plate as shown in Fig 14 insert the lower machine screws 14 1 and tighten them Screw the upper ma chine screws 14 2 in only hand tight Insert the balancing weight with circle and...

Страница 53: ...d screw in hex bolts 17 4 hand tight Insert machine screws 17 1 and tigh ten also tighten hex bolts 17 4 Turn the lower part of the crankcase back upright again joint line at the top Insert the machin...

Страница 54: ...in the housing Oil spray jets First check for firm location and accura te spray direction if necessary re align the spray jet with light hammer blows or bend it carefully by hand until the cor rect p...

Страница 55: ...e bearing seat Fig 173 Check the position of the jet outlet again and adjust if necessary Apply sealant E again where the spray jet passes through opposite the bearing seat the capillary action of the...

Страница 56: ...nnecting hou sing Detach the timing case cover see M 11 00 Take off the starter motor Dismantling Remove machine screws and spring washers for end cover and pull off the end cover see Fig 19 Unscrew t...

Страница 57: ...kcase insert two M 8 x 65 machine screws retaining screws of setting down device at the timing end and two M 14 x 50 hex bolts used to secure connecting housing at the flywheel end in the holes provid...

Страница 58: ...this will ex pose the line marking 25 1 on the crankshaft Heat the gearwheel to app 125 C and pull it on so that the line marking 25 1 on the crankshaft is aligned with the O marking 25 2 on the gear...

Страница 59: ...n the cranks haft Insert the bearing half shells 28 2 into the lower part of the crankcase and apply oil to them Place the crankshaft in the lower part of the crankshaft and make sure that the gearwhe...

Страница 60: ...coat them with oil Position the thrust washers so that the groove 32 1 faces upwards in each case Lift upper part of crankcase and place it very carefully Note When installing make sure that the two...

Страница 61: ...he two marks 35 1 are aligned and the mark for the crankshaft gearwheel faces downwards Engage the crankshaft gearwheel no ting the position of the mark and tigh ten it to the specified torque Place t...

Страница 62: ...p pliers and remove the shim washers Stand up the upper part of the crankca se take the circlip 38 1 out of the sa fety groove and press the valve tappet 38 2 off the camshaft Using a 47 mm driving ou...

Страница 63: ...ankcase for score marks and incorrect dimensions for values see Section 4 Check the camshaft gearwheel for score marks Check the camshaft ball bearings for wear Check the tappets for score marks Check...

Страница 64: ...the circlip 44 1 Insert shim washers 43 3 push in co ver with O ring seal 43 4 and attach circlip 43 5 Note Check camshaft endplay for values see Section 4 If necessary insert shim washers 43 3 A spec...

Страница 65: ...shaft Take off the circlip 45 1 and unscrew the splash plate 45 2 Pull off the gearwheel with the puller 30 and the forcing off screw 31 see Fig 46 Note The two ball bearings in the intermediate gearw...

Страница 66: ...rwheel on using impact sleeve 9 noting the positions of the markings see Fig 47 Place the circlip on the shaft Note Before pulling on place the intermediate gearwheel uniformly on the shaft to pre ven...

Страница 67: ...L 40 16 M 40 13 and all L 31 and M 31 engines Remove circlip 48a 51 and pull out spacing ring 48a 50 spring plate 48a 49 and governor spring 48a 45 Remove the spring at the governor col lar 48a 11 an...

Страница 68: ...0 Turn the gearwheel counter clockwise by hand against the spring loading and lift it carefully off the support disc Take off the centrifugal weights 51 1 retaining blocks 51 2 and pins 51 3 with coil...

Страница 69: ...jection timer After placing the gearwheel on the sup port disc check that the slots in the gearwheel and support disc are aligned as shown in Fig 52 Turn the injection timer clockwise and allow it to...

Страница 70: ...governor 55 1 so that the endface of the tapered sec tion points in the direction of rotation Renewing governor spring without detaching the timing case cover Preparations Remove the engine shutdown...

Страница 71: ...n pressing in the conrod bushing make sure that the oil holes are aligned and that the bushing projects by an equal amount on each side Insert the big end bearing half shells into the conrod making su...

Страница 72: ...to the cylinder axis Use feeler gauges to measure the piston ring end gap where the ends of the piston ring come together For limit values see Section 4 65 Checking cylinder wear and suitability for f...

Страница 73: ...oning clean the cylinder with warm or hot water and a cold cleanser using a brush then oil the cylinder wall Attention Do not hone for too long period and do not dry hone Use honing oil or a mixture o...

Страница 74: ...off the piston Inspection repair Examine the cylinder for seizure marks or score marks on the cylinder wall Check cylinder dimensions and state of wear see Section 4 Inspect piston for seizure marks...

Страница 75: ...t the ba se of that cylinder see Fig 70 Example Figure on crankcase 15 Figure on cylinder 20 Shim plate thickness needed 35 0 35 mm These shim plates compensate for cylin der and crankcase manufacturi...

Страница 76: ...liary pins back and forth until the pistons enter the cy linders Take off the piston ring clamping tools and move the centre piston back and forth during the lowering movement until it enters its cyli...

Страница 77: ...e shouldered nuts 73 1 and bolts 73 2 Pull off the centering flanges 73 3 Detach the support plate mounts Press the air guide housing and suction shaft apart Lift off the support plate see Fig 74 Deta...

Страница 78: ...ankcase is renewed Measure at all cylinders with cold engine Clamp the cylinder down with a suitable tensioning strap and use a depth gau ge see Fig 75 Turn the engine over until the piston reaches an...

Страница 79: ...8 2 thrust rings 78 3 and O ring seals 78 4 into the bore in the crankcase Note Always renew the O ring seals 78 4 du ring cylinder or cylinder head repairs Insert the pushrods 78 5 Attach the cylinde...

Страница 80: ...ig 80 Install the support plate and the injector centering flanges Tighten the cylinder head uniformly in a cross wise pattern to the specified tor que Take off the exhaust manifold attach the gaskets...

Страница 81: ...rlay washers 81 6 and lift off the rocker housing 81 7 Lift off the intermediate plate 81 8 and take out the valve cone Checking parts Check the valve guides and valve stems for score marks and correc...

Страница 82: ...h for projection see section 4 Using a hand held reamer 2 ream out the valve guides to their nominal diameter see Fig 83 Re machine the valve seats with a valve seat milling cutter see Fig 84 Note The...

Страница 83: ...alled If repair work is carried out in this area the second valve spring should be retro fitted On M 31 M 40 engines up to 2300 rpm cylinder heads with the code letter H high swirl are used above 2300...

Страница 84: ...erse order shown in Fig 86 or 87 Unscrew and remove the nuts in the same order Unscrew the hex nuts 85 5 with spring washers 85 6 and take off the rocker pedestals Lift off the cylinder head Take off...

Страница 85: ...y Insert the pushrods Install the rocker pedestals Make sure that the adjusting screws are inserted correctly into the pushrods if necessary unscrew them Coat the thread of the tierod in the oil cavit...

Страница 86: ...gs 89 4 with underlay washers 89 6 Note Engines with a running speed of less than 2300 rpm are equipped with adjusting screws with longitudinal slots for the rockers 89 13 and valve stem seals 89 5 Yo...

Страница 87: ...valve guides out with pressing in tool 1 Fig 91 Press in new valve guides with the same tool 1 Note The pressing in depth must be correct for projection see Fig 92 Ream out the valve guides to nominal...

Страница 88: ...il should seep through past the valve seats Note correct valve recess measurement see Fig 90 and Section 4 Assembling cylinder head The cylinder head is assembled by follo wing the removal procedure i...

Страница 89: ...are included with the spare part Assembly Using a plastic faced hammer drive the needle roller bearing flush into the crankcase Insert the oil pump with bearing journal into the needle roller bearing...

Страница 90: ...with flexible hose 13 Install the side panel and hood to enclosure Start the engine and compare the oil pressure when it is at regular operating temperature with the values in Section 4 see Fig 99 Be...

Страница 91: ...d into the air intake pipe until early 1987 Since then it has been secured in the air intake pipe by two O rings Remove the circlip 102 1 and coil spring 102 2 from the pull rod of the engine shutdown...

Страница 92: ...two screws 103 7 with spring washer 103 8 Note On older L 30 L 40 H L 30 engines there is no support mount for the hy draulic pump drive H2L30 and H3L30 engines do not have a hydraulic belt tensioner...

Страница 93: ...ve housing in the insert 105 3 with sealant E and then seal all around with sealant H If the insert is renewed use sealant C for bonding in The hose spigot opening in the air intake pipe must face tow...

Страница 94: ...ip 107 2 and pull out the end cover 107 3 and the piston 107 4 with spring 107 5 Take out circlip 107 6 with spring plate 107 7 spring 107 8 and ball 107 9 Inspection repair Inspect the piston and cyl...

Страница 95: ...be applied so that the oily in the extra fuel device is not blocked Install the machine screws with sealant D Adjusting the extra fuel device Piston 107 4 also acts as the full load stop for the gove...

Страница 96: ...antling the engine monitoring block Unscrew and remove the cover 111 9 with sealing ring 111 10 on version with electric engine shutdown unscrew the solenoid valve 110 21 and take it off complete with...

Страница 97: ...plate 112 2 To do this on engines with the lo wer idle speed governed to 1700 rpm the shaft 111 12 must be turned coun ter clockwise when assembling Check when the monitoring block is installed by tu...

Страница 98: ...vo block Inspection repair Turn lever 165 1 in the Start direc tion Shaft 165 2 is then turned by locking pin 165 3 and the sickle pat tern lever 165 4 moved to the starting position When the lever is...

Страница 99: ...hole Apply sealant D to machine screws 164 3 and tighten them to a torque of 6 5 Nm Attention If the tightening torque is too high the servo piston may seize distortion Assembling Set the speed contr...

Страница 100: ...free passage between bores 3 and 4 Apply the electric current to connection 3 green wire the valve pin must extend fully F 30 50 N very difficult to overcome loading with finger pressure free pas sage...

Страница 101: ...out screws 117 1 Pull out the fan housing Checking parts Check the fan housing sealing strips for signs of damage if necessary attach new sealing strips with adhesive G Installing Apply a slip agent...

Страница 102: ...the other injection pumps with absorbent cleaning cloths Move the speed control lever to the start position and run the starter If the spray pattern is correct the pump you have checked is in good me...

Страница 103: ...strictor screw for the injection pump at the timing end has a return flow restrictor During repairs make sure that the cor rect hollow screw is used or else the volume of fuel in the injection pump wi...

Страница 104: ...ear enclosure panel must be taken off Checking parts Check the governor rod for score marks in the governor rod guide area Installing the governor rod Install the governor rod by following the instruc...

Страница 105: ...124 Check the position of the other grooves and if necessary reposition the sliding elements on the governor rod Insert the injection pumps and tighten them in position For adjusting work see M 14 50...

Страница 106: ...not be changed or else the start of fuel injection will be altered Removing and installing governor rod Pull out locking collet 170 5 Remove the roller guide at the flywheel end paper washers 170 3 a...

Страница 107: ...stalling a new injection pump add up the figures on the pump flange and the crankcase The total of the two figures is the thickness of the shim washers with gaskets to be inserted in tenths of a milli...

Страница 108: ...ion tube with test pres sure gauge for fuel injection system 37 to the pressure tube connection for the injection pump see Fig 129 Connect the injector to the tester cover the remaining injection pump...

Страница 109: ...ide is at the top towards the injector Tighten the hex nuts to retain the injec tor and the collar nuts on the pressure pipe to the specified torques see Sec tion 4 holding the pressure pipe con necti...

Страница 110: ...faces on the nozzle holder for damage Assembling Install the shim washers spring pres sure pin and spacer in the nozzle holder again as shown in Fig 132 in the oppo site order from their removal Attac...

Страница 111: ...e stroke before removal and restore when installing Removing and installing governor rod Renewing governor rod Synchronising Synchronising Effective stroke Measure effective stroke before removal and...

Страница 112: ...l feed line from the test tank Note The test tank must be attached at least 200 mm 8 in above the injection pump Turn the crankshaft in the normal direc tion of rotation counter clockwise when looking...

Страница 113: ...top dead centre point If necessary correct the start of fuel de livery as follows If the reading is smaller than the desired value fuel delivery starts too late Remove shims If the reading is larger...

Страница 114: ...governor rod by hand fully to the right to the Stop position and hold it there Loosen all sliding elements 135 1 on the governor rod the toothed rack on the flywheel side injection pump must be in the...

Страница 115: ...il the injection pump has just reached the start of fuel delivery approx 1 droplet of fuel emer ges every 5 6 seconds Set the dial gauge to zero and continue to turn the crankshaft in the normal di re...

Страница 116: ...3 L M 09 96 137 6 Note on changing the power setting Measure and make a note of the original power setting Remember that as a result of tolerances the actual effective stroke setting may not coincide...

Страница 117: ...ction pumps Adjusting injected volume for nominal power output Renewing start charge control Adjusting injected volume for nominal power output Adjusting damper spring generator operation only Renewin...

Страница 118: ...normal direction of engine rotation until the start of deli very mark on the flywheel 15 before TDC for the cylinder in question is alig ned with the fixed mark on the crank case or in the inspection...

Страница 119: ...unting hole 3 Adjusting injection volume for nominal power output engine stopped Move the speed control lever to the Stop position Remove the screw plug from the moni toring block housing or replace t...

Страница 120: ...s 141 and 145 This determines the X position of the governor rod In this position set the dial gauge scale on the adjusting device precisely to 0 Pull out the locating pin the needle of the dial gauge...

Страница 121: ...justment data 0 26 mm Difference from adjustment values 0 39 mm The adjusting tool 28 must therefore be turned counter clockwise until the dial gauge of the measuring device 24 reads 0 39 mm If the en...

Страница 122: ...ng Drive locking collet 148 1 into the end of the crankshaft at the flywheel end to provide the necessary centering action Attach the flywheel so that the locking collet enters the centering hole Plac...

Страница 123: ...ng washers and remove the drive pulley 150 4 the drive pulley is not fitted from year of manufacture 1985 onwards Pull the belt pulley 150 5 out of its centering mount and take it off together with th...

Страница 124: ...restrictor screw 153 1 out of the back of the housing Press the shaft out of the piston and remove the tensioning roller Take off the Nilos rings 151 8 Drive the ball bearings 151 9 out towards the o...

Страница 125: ...s 151 8 with anti friction bearing grease when assem bling Note for older versions of L 30 L 40 engines The circlip 152 1 support washer 152 2 and quad rings 152 4 and 152 5 have been installed since...

Страница 126: ...eaner housing cover 177 2 Remove dirt adhering in the region of the air cleaner housing Slacken off screws 177 3 only enough to permit the cover 177 4 with filter element 177 7 to be raised Cover the...

Страница 127: ...ke you are recommend to check the condition of the diaphragm Dismantling Pull housing 1 with cap 2 and dia phragm 3 out of the intake manifold and hose 4 Fig 178 Pull cap 2 out of housing 1 and remove...

Страница 128: ...over to the timing side and pull it out downwards Dismantling the speed control Pull out the cotter pin or locking collet 156 1 and push out the bolt 156 2 Drive out the locking collet 156 3 pull off...

Страница 129: ...disc circlip and tensio ning plate Push on the fork 157 3 and drive the locking collet 157 4 in flush with the fork see Fig 157 Push on the sleeve 158 1 and torsion spring 158 2 then drive in the lock...

Страница 130: ...ut downwards Dismantling the speed control Fig 180 Drive out locking collet 1 Slide out pin 2 and take off governor lever 3 Take out locking collet 4 for stop 5 and pull out control shaft 6 Disconnect...

Страница 131: ...installation by following the re moval instructions in the reverse order Note Since there are various patterns of gover nor lever make sure when repairing the speed control that the original governor...

Страница 132: ...159 2 side panel 159 3 and cover plate 159 4 Detach the air outlet shaft 160 1 and cover plate 160 2 Note for 4 L 40 C Take out the cooling air guide lining ele ments Take off the cross member above t...

Страница 133: ...63 Checking the parts Examine the various sections of the en closure for damage Renew damaged or incomplete sealing strips Assembling Assemble the enclosure by following the dismantling instructions i...

Страница 134: ......

Страница 135: ...4 L M 07 96 4 Tables...

Страница 136: ...81 10 kpm Nm 1 3558 lb ft 8 8 5 8 10 9 12 9 Thread Screw strength rating M 4 M 5 M 6 M 8 M 10 M 12 M 14 M 16 M 18 M 20 M 22 1 7 3 4 6 0 14 29 50 80 120 170 240 320 2 8 5 5 9 5 23 46 80 130 190 270 38...

Страница 137: ...ozzle 85 85 L 41 M 41 40 50 Machine screws at balancing weight bearing journals 4 cyl 30 30 Machine screws at drive gearwheel for balancing weights 4 cyl Coat thread with sealant D 75 75 Hex nut for a...

Страница 138: ...ar limit mm 8 85 Inlet valve head mm 43 1 0 3 40 1 0 3 Exhaust valve head mm 39 1 0 3 35 1 0 3 Recess of valve head max mm 0 15 1 70 1 70 1 70 min mm 0 00 0 85 0 85 0 85 outer mm 15 0 046 0 038 Valve...

Страница 139: ...44 0 Length of outer valve spring off load mm 58 0 Wear limit mm 56 5 Rocker shaft mm 19 f 6 0 020 0 033 Wear limit mm 18 90 Bore in rocker mm 21 H 7 0 021 0 Rocker bushing innen mm 19 0 046 0 012 We...

Страница 140: ...earing seat 0 008 Internal diameter of bearing bore in crankcase Governor side mm 54 H 7 0 030 bushing for 54 0 058 0 camshaft 0 002 Wear limit mm 54 10 Centre mm 54 H 7 0 030 0 Wear limit mm 54 10 Fl...

Страница 141: ...009 Axial clearance two cylinder engines mm 0 15 0 6 three cyliner engines mm 0 15 0 7 Wear in the needle roller mm bis 27 97 bearing area Bearing point diameters four cylinder engines Bearing journa...

Страница 142: ...mm 0 08 0 08 0 08 Cylinder Bore mm 95 0 01 102 0 01 Wear limit mm 95 15 102 15 Oversize mm 1 0 0 5 1 0 Roughness Ra 0 9 1 3 1 1 1000 mm Piston Normal mm 94 94 101 92 101 90 Oversize mm 1 0 0 5 1 0 Cl...

Страница 143: ...ap mm normal max 1 I Standard Trapezoidal 102 x 93 4 x3 0 40 0 65 1 2 Oversize 102 5 x 93 9 x 3 103 x 94 4 x 3 II Standard Cutaway micro chamfer 102 x 93 4 x 2 5 0 40 0 65 2 5 Oversize 102 5 x 93 9 x...

Страница 144: ...max mm 0 05 0 05 Conicity max mm 0 003 0 003 Width mm 32 0 3 32 0 3 Radius mm 3 5 0 2 3 75 0 2 Main bearing journal mm 72 h 6 0 72 h 6 0 governor side 0 019 0 019 Out of roundness max mm 0 05 0 05 Con...

Страница 145: ...0 083 0 040 0 040 Wear limit mm 59 7 63 7 Normal wall thickness mm 1 468 1 480 1 468 1 480 Undersize mm 1 718 1 730 1 718 1 730 Internal installed main bearing Normal mm 72 0 099 72 0 099 0 056 0 056...

Страница 146: ...0 PFR 1 K 80 A 442 2 1 PFR 1 K 80 A 442 11 1 PFR 1 K 80 A 467 1 2 501 407 00 17 18 before TDC PFR 1 K 80 A 467 3 501 407 10 2 4 L 40 2 4 M 40 PFR 1 K 80 A 477 2 502 368 00 17 18 before TDC PFR 1 K 80...

Страница 147: ...governor spring the spacing ring ident No 037 729 00 is deleted Fig 48a 50 Speed Application Governor spring Governor weight Ident No Ident No Wire mm 2300 Normal operation 036 012 01 3 0 035 729 00 2...

Страница 148: ...certain cases engines of versions S and Z are not equipped with an oil cooler In this case the oil content is reduced by approx 0 2 0 5 litre In all cases fill to the max mark on the dipstick Engine t...

Страница 149: ...intenance switch H 5 Belt break warning light H 6 Pre heat monitor telltale light H 7 Fan monitor warning light H 8 Remote desplay engine light K 1 Control relay 1 for start start repeat interlock K 2...

Страница 150: ...switch S 10 Pre heat temperature switch S 11 Remote start switch S 12 Remote stop switch T 1 Transducer for speed measurement V 1 Decoupling diode V 2 Freewheeling diode V 3 Zener diode V 4 Suppressor...

Страница 151: ...ontrol motor 12 Oil pressure sensor 13 Reserved for special purpose 14 Speed control solenoid hold on winding 15 Reserved for special purpose 16 Decompression solenoid 17 Air filter maintenance switch...

Страница 152: ...2 15 W 1 0 7 Y1 0 Y3 3 AW 7 HW S1 G1 G2 M1 31 30 15 50 19 17 22 1 3 W 6 W 7 4 17 5 2 X1 8 6 14 0 X1 X1 X1 S8 S7 S6 H1 H4 H2 H3 V1 R1 R1 H6 H6 K2 S5 K3 F1 8A V2 V2 1 2 3 4 5 6 Engine 4 L M 31 40 41 onl...

Страница 153: ...X1 8 6 14 0 X1 X1 X1 S8 S7 S6 H1 H4 H2 H3 V1 R1 R1 H6 H6 K2 S5 K3 F1 8A V2 V2 U30 U50 U15 Win GND Aus 86 30 85 87a K1 A4 1 2 3 4 5 6 Engine 4 L M 31 40 41 only Instrument box Power supply Charging de...

Страница 154: ...X1 X1 X1 S8 S7 S6 H1 H4 V1 V1 V1 V1 K4 V1 R1 R1 H6 V2 H6 K2 S5 K3 F1 8A V2 U30 U50 U15 Win GND Aus 86 30 85 87a K1 A4 31 87 15 50 SE 1 2 3 4 5 6 Engine 4 L M 31 40 41 only Instrument box Power supply...

Страница 155: ...2 8 6 14 0 X1 X1 X1 S8 S7 S6 H1 H4 V1 V1 V1 V1 V1 K4 K7 K1 V1 R1 R1 H6 V2 H6 K2 S5 K3 F1 8A V2 31 31 50 86 87 87 87a 87 15 30 30 50 15 85 SE 1 2 3 4 5 6 Engine 4 L M 31 40 41 only Instrument box Power...

Страница 156: ...S7 S6 H1 H4 V1 V1 K4 K7 K5 K6 K1 S4 V1 R1 R1 H6 V2 H6 K2 S5 K3 F1 8A V2 31 31 31 50 85 87 87 87 87 15 30 30 30 SE 15 15 86 50 1 2 3 4 5 6 30 87 61 31 50e Engine 4 L M 31 40 41 only Instrument box Powe...

Страница 157: ...50 19 17 22 1 3 W 6 W 7 4 17 5 2 X1 8 6 14 0 X1 X1 X1 S8 S7 S6 H1 H4 H2 H3 V1 R1 R3 R2 H6 S5 K3 F1 8A V2 V2 1 2 3 4 5 6 Engine 4 L M 31 40 41 only Instrument box Power supply Charging device Starting...

Страница 158: ...8 6 14 0 X1 X1 X1 S8 S7 S6 H1 H4 H2 H3 V1 R1 R3 R2 H6 S5 K3 F1 8A V2 V2 U30 U50 U15 Win GND Aus 86 30 85 87a K1 A4 1 2 3 4 5 6 Engine 4 L M 31 40 41 only Instrument box Power supply Charging device St...

Страница 159: ...1 X1 S8 S7 S6 H1 H4 V1 V1 V1 V1 K4 V1 R1 R3 R2 H6 V2 S5 K3 F1 8A V2 U30 U50 U15 Win GND Aus 86 30 85 87a K1 A4 31 87 15 50 SE 1 2 3 4 5 6 Engine 4 L M 31 40 41 only Instrument box Power supply Chargin...

Страница 160: ...6 14 0 X1 X1 X1 S8 S7 S6 H1 H4 V1 V1 V1 V1 V1 K4 K7 K1 V1 R1 R3 R2 H6 V2 S5 K3 F1 8A V2 31 31 50 86 87 87 87a 87 15 30 30 50 15 85 SE 1 2 3 4 5 6 Engine 4 L M 31 40 41 only Instrument box Power supply...

Страница 161: ...ine shut down Pre heating Optiones Hour run meter speed adjustment P 0 1 2 3 58 50a 15 19 17 P 0 1 30 86 30 87 85 30 50 M G U D B P u P t h P1 n P2 15 W 1 0 7 Y1 0 Y3 3 AW 7 HW S1 G1 G2 M1 31 30 15 50...

Страница 162: ...xciter or positive diode in generator Worn carbon brushes Oxide desposit on sliprings exciter winding is interrupted V belt loose at generator Poor earth ground connection in instrument box Wiring err...

Страница 163: ...ily discharged for a lengthy period greyish white cell plates sulphati sed Battery poles connected wrongly destroying one or more diodes in the generator Charge current too weak esp in winter Battery...

Страница 164: ...Engine run continuous ly several days with very little electrical consumption e g as a boat engine Defect in voltage regu lator or generator Acid level is too high Overloading or natural water loss b...

Страница 165: ...coating on plates Battery is exhausted active substance has fallen out of plates Acid level too low Remedy Check ratings of battery and generator if necessary fit a special Z or HD battery Install it...

Страница 166: ...7 V after recharging 12 V nominal voltage or to 14 V 24 V nominal voltage Cause Fault in generator volta ge regulator or wiring connections V belt too loose To many consumers connected or generator i...

Страница 167: ...r motor turns Cause Poor connections loose or corroded break in cable or short to earth ground Battery flat or defective Battery is flat Line between terminal 50 and starter switch or bet ween termina...

Страница 168: ...or field coils defective Battery is flat Low current flow because of loose or corroded connections Carbon brushes sticking Carbon brushes worn Commutator dirty Commutator scored or burnt Armature or...

Страница 169: ...s defecti ve only significant at temperatures below 10 to 15 C Remedy Switch of engine manually at once set speed control lever to stop and discon nect battery Consequential damage electronic compo ne...

Страница 170: ...nt is bent and shorting inside engine Broken pre heat wires in a line resistor winding shorted to an earthed component Since the pre heat monitor pre heat plug or heating flange and also the second pr...

Страница 171: ...tery is used Poor connections open circuit contact resistance or short cir cuit in charging circuit Battery is defective internal short circuit Battery capacity has dropped severely through being left...

Страница 172: ...ective pre heat start switch poor contacts Defective wiring line resistance in charging circuit or line to generator telltale light Defective voltage regulator Short circuit in an alternator exciter o...

Страница 173: ...il circuit Oil lost from damaged sump Defective oil pump Defective valve solenoid or fuel shut off valve Defective diode between generator telltale light and terminal 15 at pre heat start switch or di...

Страница 174: ...g winding burned out No power supply or open circuit Defective switch or relay Decoupling diode between generator telltale light and terminal 15 is mis sing or defective applies only to shut down sole...

Отзывы: