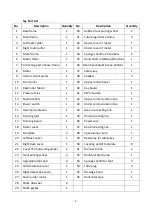
hattrick TRENDY M Скачать руководство пользователя страница 20


- 18 - 


12

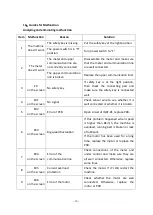
Guides for Malfunction 

Analyzing and eliminating malfunction  

Item 

Malfunction 

Reason 

Solution 

The machine 

doesn’t work 

The safety key is missing 

Put the safety key at the right position 

The power switch is in “0” 
position 

Turn power switch to “1” 

The meter 

doesn’t work 

The meter and upper 
communication line are 
not correctly connected 

Disassemble  the  meter  and  make  sure 
that the meter and communication line 
are well connected. 

The upper communication 
line is broken 

Replace the upper communication line! 

E0  

on the screen 

No safety key 

If  safety  key  is  at  the  right  position, 
then  check  the  connecting  part  and 
make  sure  the  safety  key  is  connected 
well. 

E01  

on the screen 

No signal 

Check  sensor  wire  to  see  whether  it  is 
well connected or whether it is broken. 

E02  

on the screen 

Error of PCB 

Open circuit of IGBT-CE, replace PCB. 

E03  

on the screen 

Big speed fluctuation  

If  this  problem  happened  when  speed 
is  higher  than  8km/h,  the  machine  is 
overload, running belt is broken or lack 
of lubricant. 

If  the  motor  has  been  used  for  a  long 
time,  replace  the  motor  or  replace  the 
PCB. 

E04  

on the screen 

Error of the 
communication line 

Check  connections  of  the  meter  and 
under  control  and  make  sure  they  are 
all  well  connected.  Otherwise,  replace 
some lines. 

E05  

on the screen 

Current overload 
protection 

Check  the  motor.  If  it’s  OK,  restart  the 
machine. 

E06  

on the screen 

Error of the motor 

Check  whether  the  motor  are  well 
connected,  Otherwise,  replace  the 
motor or PCB 

Содержание TRENDY M

Страница 1: ...0 TRENDY M MOTORIZED TREADMILL USER MANUAL Special tips Before installation and operation please read this operation manual carefully and save this manual for future reference...

Страница 2: ...2 Tips for Safety 2 3 Packing Details 3 4 Explosive View 4 5 Part List 5 6 Treadmill Structure 6 7 Installation 7 8 Use Instructions 9 9 Guides for Console Operation 10 10 Detailed Instructions 13 11...

Страница 3: ...tion to following tips We don t assume responsibility if any accident caused by improper operation According to your body condition please exercise properly Overload or improper exercise will damage y...

Страница 4: ...elt This item is only for one person to use Please use original manufacturer s spare parts and don t replace them yourself 3 Packing Details Warning Carefully install the product avoid making any dama...

Страница 5: ...lla type allen screw M8 80 1pcs Umbrella type allen screw M8 50 4pcs Umbrella type allen screw M8 35 2pcs Umbrella type allen screw M8 15 12pcs Umbrella type cross tapping screw M4 2 15 4pcs Nut 7pcs...

Страница 6: ...4 4 Explosive View These are all the components used in installation All components are listed in the following form...

Страница 7: ...ressure stick 1 41 MP3 module 1 13 Multislot belt 1 42 Upper communication line 1 14 Power switch 1 43 Under communication line 1 15 Overload protector 1 44 Green connecting line 1 16 Running belt 1 4...

Страница 8: ...Treadmill Structure Meter Keys on the handlebar Handlebar Meter pillar Motor cover Footplate Running belt Base frame Decorating cover Back cover Safety key Multifunction frame Massage head Manual inc...

Страница 9: ...to fasten meter pillars Don t tighten screws at first Step 2 Install the meter a Make sure that communication lines are connected correctly b Put the meter on the meter pillars Use 6 Screw M8 15 and...

Страница 10: ...s at first Step 4 Install multifunction frame a Use 2 Screw M8x35 2 washers and 2 nuts to fasten multifunction frame to base frame Don t tighten screws at first b Use 1 Screw M8x80 1 washer and 1 nut...

Страница 11: ...a Use 3 Screw M8 15 to fasten the massage head Step 6 Install decorative covers a Use 4 Screw M4 2 15 to fasten left and right decorative covers Step 7 Remove the screw in base frame Screw M4 2 15 Re...

Страница 12: ...u want to use the machine again put safety key back Folding instructions Folding Folding the machine will save space Before folding please switch off and pull up the plug Use hands to lift the running...

Страница 13: ...ticks from left and right manual incline 2 Put two metal sticks into the relatively same hole of left and right manual incline 3 After that adjust two metal sticks to touch the base frame 4 Before sta...

Страница 14: ...s Time 00 00 99 59 min Speed 1 0 16 0 km h Distance 0 00 99 9 km Calories 0 999 kcal Heart rate 50 200 min Program Built in program P1 P99 Count down mode Time Distance Calories User defined program U...

Страница 15: ...d programs FAT is body fit program After finish selection press Start button to start the machine MODE button In ready condition press MODE button to select from Time Distance and Calories count down...

Страница 16: ...art button the system will count down in 3 seconds which displays on the screen The machine will run at the speed of 1 0km h 3 According to your needs press SPEED or to change speed 4 When hands are o...

Страница 17: ...slowly and the screen will display End The machine will be in ready condition in 5 seconds d User defined program Besides 99 built in programs there are 3 user defined programs for you to set your own...

Страница 18: ...therwise there will be friction damage to the running belt 1 Tension a Keep the machine at the speed of 3km h b Put the multi wrench into the left adjusting screw and turn clockwise by 1 4 circle c Pu...

Страница 19: ...ole b Lift up the running belt and shoot the lubricant to the middle of the running board c Put down the running belt and put some pressure on the place where you add lubricant d Start the machine at...

Страница 20: ...afety key is connected well 4 E01 on the screen No signal Check sensor wire to see whether it is well connected or whether it is broken 5 E02 on the screen Error of PCB Open circuit of IGBT CE replace...

Страница 21: ...ne and let it cool down If this error happens when in normal temperature then replace PCB 13 E10 on the screen Overvoltage protection Check input voltage 14 E11 on the screen Undervoltage protection C...

Отзывы: