Hasler HJ500P Скачать руководство пользователя страница 15

Section 2 – Installing The HJ500P 

HJ500P


Hasler

®, Inc.                                           03/2004 

                                Page-7


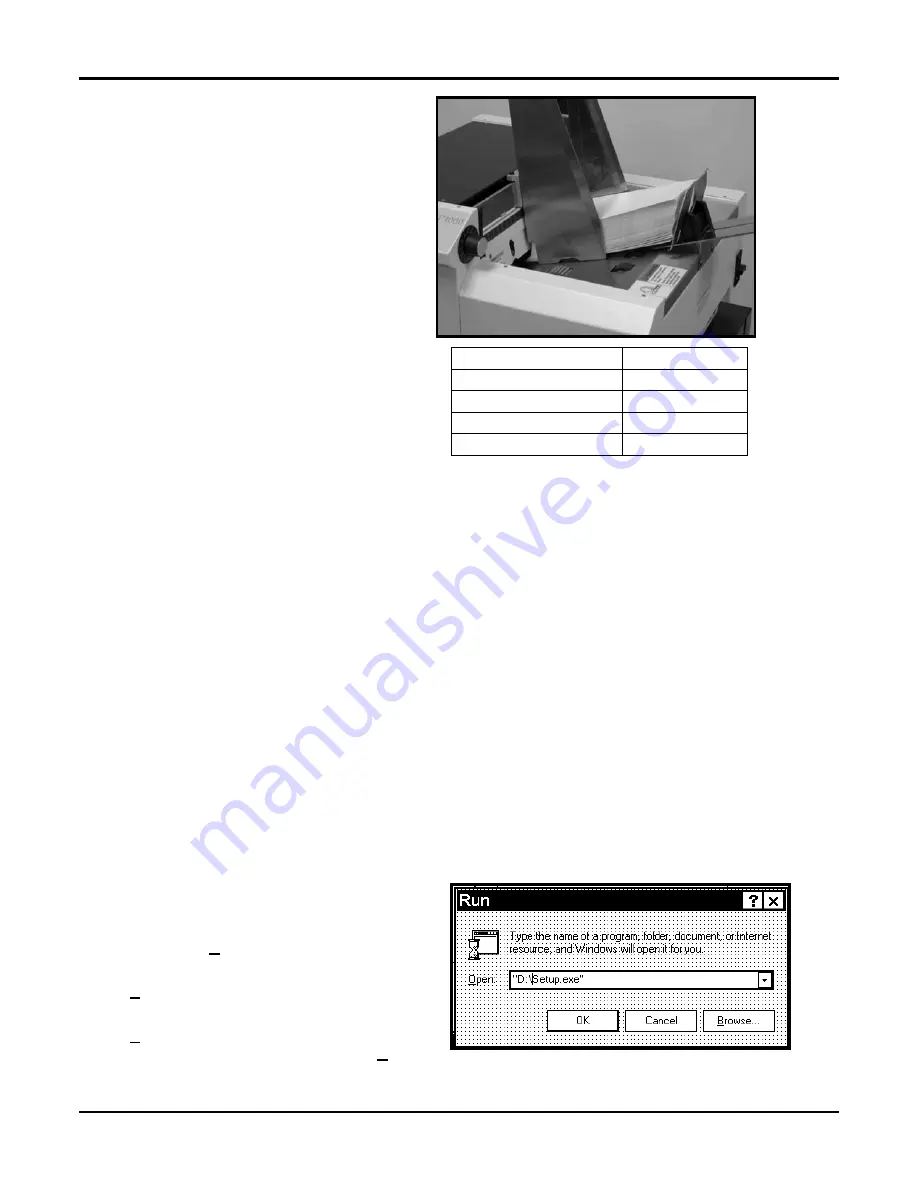
4.  Adjust the side guides to within 1/32-inch of the 

media and set the back guide so that the media 
is raised approximately 1/2-inch and rests on 
the curve of the back guide.  When running 10 
inch or longer or heavy media you may have to 
set the back guide so that it just touches the 
back of the media. 


5.  Turn the HJ500P on and then turn the media 

thickness knob to set the initial print head 
height as follows: 


NOTE:  

These are initial settings.  It may be necessary to adjust the MEDIA THICKNESS control to optimize 

the print quality 

6. Press 

the 

ON LINE

 key, and then press the 

ENTER

 key, to test feed media. 

NOTE:  

The HJ500P is supplied with two types of sheet separators.  The hard tip, which is installed on the unit 

when you receive it, is for media such as envelopes, books, and stuffed envelopes.  A soft tip 
separator is packed with the machine for use with single sheets of paper and plain envelopes.  Refer 
to Section 4

 – 

Maintenance for instructions on how to change them. 


Installing the Printer Driver 

A dedicated printer driver is included with the Printer.  It is installed on your computer and is used by your 
applications whenever you are printing from the Printer.  Follow the steps below to install the driver: 

NOTE:  The driver for the Printer should be installed using the steps below.  It is not installed as a 

standard windows driver. 

1.  If you have any applications running on your computer close them and restart the computer before 

beginning the driver installation. 

2.  Install the CD in the CD drive and click on 

START

.  Then click on 

RUN

, then type the following;  

D:\Setup.exe 

(where D is the CD drive)  Then 

click 

OK

3.  The “Add Printer Wizard (

n.nn

)” window will 

open., click 

Next>

.. 

4.  Type in your Name and Company and click 

Next>

5.  Select the printer port 

LPT1

:. Then click 

Next>

.  The “Add Printer Wizard” will appear.  

Select ASTROJET 1000P, then click 

Next>

Media Thickness 

Dial Setting 

.004” to 1/32” 

0 to 2 

1/32” to 1/16” 

2 to 3 

1/16” to 1/8” 

3 to 7 

1/8” to 1/4” 

7 to 10 

Содержание HJ500P

Страница 1: ...Mailing Systems And Solutions HASLER America s better choice An ISO 9001 Quality System Certified company Operating Guide HJ500P Inkjet Printer...

Страница 2: ...______ Serial Number ____________________ Dealer Phone ____________________ Hasler Inc 19 Forest Parkway Shelton CT 06484 6140 TEL 800 793 0180 203 926 1087 FAX 203 929 6084 E Mail info haslerinc com...

Страница 3: ...m and mail to Jim Koonz or FAX to Jim Koonz P O Box 858 203 925 2441 19 Forest Parkway Shelton CT 06484 0904 Rate The Manual Check A Box What did you like What didn t you like Are there any improvemen...

Страница 4: ......

Страница 5: ...overs Covers enclose hazardous parts that should only be accessed by a qualified service representative Report any damage of covers to your service representative This machine requires periodic mainte...

Страница 6: ......

Страница 7: ...Operating The HJ500P 9 Printer Control Panel 9 Printer Driver Properties 10 Printing From Microsoft Word 14 Printing From DeskTop Mailer 16 Print Recovery After Jam 19 Section 4 Maintenance 21 The Ink...

Страница 8: ......

Страница 9: ...ty cover encloses the printheads When raised it interrupts the feeding of the media and stops the printer 2 Media Side Guides Help guide the media to the printheads 3 Rear Media Guide Holds the media...

Страница 10: ...eed 4 USB Port Connects the printer to your computer using your USB port 5 Parallel Port Connects the printer to the parallel printer port on your computer 6 Main Power Switch This switch turns the pr...

Страница 11: ...printer to its wait state 6 key When the printer is in the menu mode this key will scroll to the next selection 7 MENU key This key causes the printer to enter the menu mode where several operator fun...

Страница 12: ...Section 1 Getting Acquainted HJ500P Page 4 04 2004 Hasler Inc Notes...

Страница 13: ...e that the main power switch of the HJ500P Printer is in the OFF position 1 Connect one end of the power cord to the rear of the HJ500P in the corresponding receptacle 2 Plug the other end into a 115...

Страница 14: ...the holder then close the latch lever to secure the cartridge in the holder Do not force the lever into place See the diagram Repeat the above for the remaining cartridges The ink in the cartridge ma...

Страница 15: ...for use with single sheets of paper and plain envelopes Refer to Section 4 Maintenance for instructions on how to change them Installing the Printer Driver A dedicated printer driver is included with...

Страница 16: ...NOTE Each printer has a specific driver Select the HJ500P driver 6 The next screen allows you to Name Your Printer Unless you have another printer of the same name on your system or network ignore thi...

Страница 17: ...ter in the test print mode The word Working appears in the lower half of the display and after a short period of time the display changes to Enter to feed Pressing the ENTER key will start the printin...

Страница 18: ...accurate There is a second set of menus available in the display To activate them press and hold the MENU key until the Setup Menu appears You can step through these items with the or key Total Count...

Страница 19: ...everal tabs in Windows 95 98 The following are standard windows printer driver functions and should be left at their defaults Graphics Fonts and Device Options The Features and Print Heads tabs are us...

Страница 20: ...s to a lower speed as follows The Feed Delay can be used to put more space between the pieces as they are being printed This will give the first piece printed more time to dry before the next piece is...

Страница 21: ...lick Apply then OK To print the next job with a different overlay Repeat the process for the first overlay NOTE Turning the printer OFF then ON will clear the overlay and the job Print Heads Tab The p...

Страница 22: ...default printer Go to Page Setup in the File menu Set all of the margins to 0 NOTE The printer must be selected before you do the setup so that the setting will be registered Next select the Page Size...

Страница 23: ...is a good idea to use the overlay feature for the fixed information The actual head layout on a 10 envelope appears at the right Click on Tools and then Mail Merge The Mail Merge Helper window will op...

Страница 24: ...nter will start Pressing the ENTER key will start the printing process If you have a graphic or fixed text to be printed with the data refer to the section on Overlays Printing from DeskTop Mailer Pre...

Страница 25: ...m Width the length of the piece you are printing on f Labels down page 1 g Height of label is equal to the number of printheads the model of HJ Printer you are using times 1 2 inch In our example we a...

Страница 26: ...hlight FIRST in the Database Fields list and click on Insert field Repeat this for the next field and press ENTER to go to the next line Once the address fields are entered on the Template the next st...

Страница 27: ...p to 10 pieces that might be lost If a jam occurs the printer control panel will display Jam Reprint Lost pieces To recover the lost pieces do the following 1 Press the MENU key and use the key to ste...

Страница 28: ...Section 3 Operating The HJ500P HJ500P Page 20 03 2004 Hasler Inc Notes...

Страница 29: ...or the gold printhead Remove the protective tape from the printhead The cartridges are held in place by a lever mounted on the inkjet cartridge holder Release the lever by raising it vertical With th...

Страница 30: ...uld be an ink spill use soap and water to clean up any problem areas Abrasive soap works well to get the ink off of hands Cleaning the Printhead To maintain good print quality it is important that the...

Страница 31: ...edia 2 Damaged media such a dog eared turn down corners 3 Media that is not stiff enough may not be usable Media that meets Postal stiffness requirements for automated feeding is acceptable in the HJ5...

Страница 32: ...te 4 Rotate the feed roller shaft so that the screws are face up and use a 3 32 inch Allen wrench to remove the two button head cap screws This will permit you to remove one half of the feed roller Ro...

Страница 33: ...oards or electrical wiring The exterior of the machine may be cleaned with any standard household cleaner which is non abrasive and does not contain plastic harming solvents CAUTION NEVER SPRAY OR POU...

Страница 34: ...Section 4 Maintenance HJ500P Page 26 03 2004 Hasler Inc Notes...

Страница 35: ...TION Black streaks in text Lint or paper dust on printhead Clean the cartridge nozzles with a clean lint free cloth moistened with distilled water Cartridge will not print Sheet is blank even after it...

Страница 36: ...oo light or missing character dots Clogged or dirty printheads Running out of ink Purge or clean cartridges Replace inkjet cartridges Blurry address Image is not sharp Printhead gap too high Adjust pr...

Страница 37: ...00 10 envelopes Memory 12 MB Print Colors Standard and Versatile Black Red Blue Green and Yellow Ink Water based may require drying assistance for coated stock Software WindowsTM Printer Drivers for W...

Страница 38: ......

Страница 39: ...e available from your Hasler Dealer Supplies Black Inkjet Cartridge HP 51645A Fast Drying Black Inkjet Cartridge HP 6195A Yellow Inkjet Cartridge HPC6173A Red Inkjet Cartridge HPC6168A Green Inkjet Ca...

Страница 40: ...Form 51019 03 2004...

Отзывы: