background image

3.3.3 Starting a Log 

 
To start logging: 
 
1. 

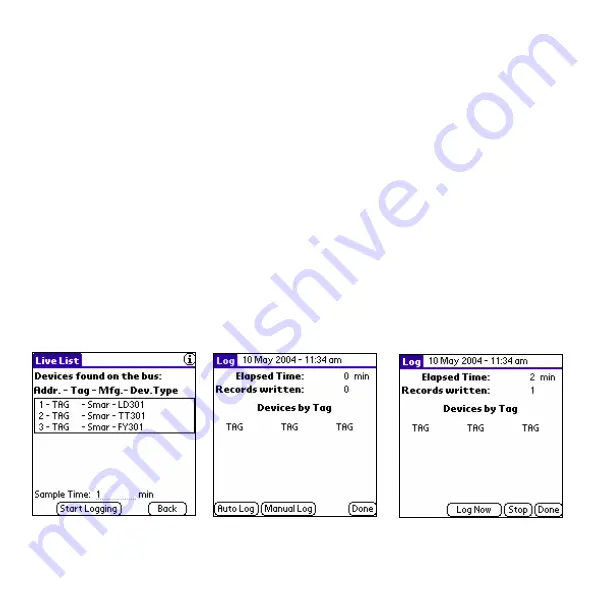
From the Live List screen, enter the desired sample time in minutes (Figure 12) . 
The default value is 1. 

2. 

Select the “Start Logging” button to go to the logging screen (Figure 13). 

3. 

From the logging screen you may select to automatically log or manually log the selected vari-
ables. Automatic logging will log the variables at the interval entered on the Live List screen, 
while manual logging requires the user to select each time the variables should be logged. 
 
To automatically log: 
  

4. 

Select the “Auto Log” button. 

5. 

Select the “Done” button when finished. 
 
To manually log: 

4. 

Select the “Manual Log” button. 

5. 

Select the “Log Now” button repeatedly as desired (Figure 14). 

6. 

Select “Done” when finished.  


Figure 12 - Live List Screen 

Figure 13 - Logging Screen 

Figure 14 - Manual Logging 

Page 15

Содержание HPC401Plus

Страница 1: ...ave purchased one of the most powerful and versatile HART con figuration packages on the market the HPC401Plus This guide will pro vide you with detailed instructions on the setup and initialization o...

Страница 2: ...Software 8 3 2 HPC401 9 3 2 1 Registering the HPC401 9 3 2 2 Polling for Devices 10 3 2 3 Navigating Device Parameters 11 3 2 4 Device Drivers 12 3 3 HPCLogger 13 3 3 1 Starting HPCLogger 13 3 3 2 Se...

Страница 3: ...the traditional Palm features for personal organization The new industrial exterior allows for durability in the most rugged of areas The HPC401 Plus is ready to go right out of the box The Palm has...

Страница 4: ...acturer HPCGraph This graphing application allows device variables to be trended over time in an easy to view graphi cal format Device parameters can be simultaneously graphed in various colors for ea...

Страница 5: ...g 2 HPC401 Plus Interface The HPC401 Plus hardware interface attaches to the bottom of the Palm and connects to the HART network See the following section on how to correctly use this interface 3 Prod...

Страница 6: ...tor of the Palm handheld as shown in Figure 2 below pushing the HPC401 Plus Interface connector into the multi connector slot until locked in Connect the pinch connectors to the HART line as shown in...

Страница 7: ...lus Interface is powered from the Palm battery and requires no additional power supply to function Figure 4 Connecting Power Supply to HPC401 Plus Interface 2 3 Software Setup Installation The entire...

Страница 8: ...oftware is contained on the included Smar Research Product CD When a complete re installation is necessary this CD can be used to re install all the HPC Suite applications onto the Palm handheld Simpl...

Страница 9: ...tion select OK or select Cancel to return to the application selection screen 3 2 1 Registering the HPC401 The HPC401 software must be registered An HPC401 Registration screen will appear each and eve...

Страница 10: ...Select the checkbox next to the Device Address option 2 Choose the address of the device by selecting it from the drop down menu located next to Device Address 3 Select the Poll button Polling for Mu...

Страница 11: ...corresponding action User editable fields are available for changing various parameters of the device Editable variables will include either a text field denoted by a dotted underline or a drop down...

Страница 12: ...ore information on polling for devices see section 3 2 2 The various device parameters menus and methods can then be accessed as designed by the manufacturer Uninstalled or Unsupported Devices Occasio...

Страница 13: ...mmddrr prc where mm HART Manufacturer Code dd Device Code rr Hardware Revision Code 3 3 HPCLogger The HPCLogger application adds the additional functionality of data logging to the HPC Suite HPCLogger...

Страница 14: ...e section 3 3 1 follow these steps to select non default variables 1 Select a device from the Live List 2 Select the desired 4 variables to log from the 4 drop down menus on the Specific Monitor scree...

Страница 15: ...d vari ables Automatic logging will log the variables at the interval entered on the Live List screen while manual logging requires the user to select each time the variables should be logged To autom...

Страница 16: ...l format for example 01 for the LD301 XXXXXX is the devices serial number in hexadecimal format 4 Open the text file in your preferred text editor 3 4 Epigraph The Epigraph application allows for the...

Страница 17: ...evice supports command 33 of the HART specification variables other than the default may be graphed by selecting the Spec Monit button From the specific monitor screen 4 variables may be selected from...

Страница 18: ...left side column the variable list provides information for each of the 4 graphed variables The variable name current value and line color is shown for each variable Graph Window This is the area wher...

Страница 19: ...corresponding fields Once you have entered the desired values select Done to return to the graph screen The graph will now reflect the scale that was entered Start Button This button will start the gr...

Страница 20: ...LD301 XXXXXX is the devices serial number in hexadecimal format Figure 20 Offline Graphics Figure 19 Offline Graphics File Selection 3 5 HPC301 The HPC301 software is a legacy piece of software which...

Страница 21: ...section of this manual Field device is not pow ered or polarity is re versed or insufficient loop current and voltage at the field device terminal Verify power supply and field device The Palm battery...

Страница 22: ...ng the MEZ100 Setup Problem Palm no longer contains HPC401 software Smar Research reserves the right to make changes to design and functionality of any product without notice Smar Research does not as...

Отзывы: