background image

16

2.7 Connecting to AC Mains 

Connect your amplifier to the AC mains power source (power outlet) with the 

supplied AC power cord. First, connect the IEC end of the cord set to the IEC 

connector on the amplifier; then, plug the other end of the cord set to the AC mains. 

When properly connected to a live power source, the power LED should illuminate 

blue. 

WARNING:

 The third prong of this connector (ground) is an important safety feature. 

Do not attempt to disable this ground connection by using an adapter or other 

methods. 

Amplifiers don’t create energy. The AC mains voltage and current must be sufficient 

to deliver the power you expect. You must operate your amplifier from an AC mains 

power source with not more than a 10% variation above or below the specified line 

voltage and within the specified frequency range indicated on the back panel of the 

amplifier. If you are unsure of the output voltage of your AC mains, please consult 

your electrician. 

2.8 Protecting Your Speakers 

It’s wise to avoid clipping the amplifier signal. Not only does clipping sound bad, but 

it can damage high-frequency drivers. The built-in clip limiter prevents clipping. 
Also, avoid sending strong subsonic signals to the amplifier. High-level, low-

frequency signals from breath pops or dropped microphones can blow out drivers. 

You can switch to the HI-Z mode which, in addition to switching in the output 

transformers for 70V and 100V speakers, activates the high-pass filter. The filter 

prevents potentially damaging subsonic signals from going to the amplifier by 

eliminating signals below 70Hz. 

2.9 Startup Procedure 

Use the following procedure when first turning on your amplifier: 
1.  Turn down the level of your audio source. 
2.  Turn down the level controls of the amplifier. 
3.  Power up the amplifier. The blue Power LED should be ON. 
4.  Turn up the level of your audio source to an optimum level. 
5.  Turn up the Level controls on the amplifier until the desired loudness or power 

level is achieved. 

If you ever need to make any wiring or installation changes, don’t forget to 

disconnect the power cord.

Содержание JBL Commercial VMA Series

Страница 1: ...MA1120 VMA1240 VMA260 VMA2120 Commercial Series 1 Channel 2 Channel Mixer Amplifier Operation Manual 1 VMA 160 1 2 3 4 MUSIC USB MASTER 1 USB 4 VMA 260 1 2 3 MUSIC 1 4 5 6 MUSIC 2 MASTER 2 MASTER 1 VM...

Страница 2: ...7 1 3 Rear Panel Controls Connectors VMA160 VMA1120 VMA1240 8 1 4 Rear Panel Controls Connectors VMA260 VMA2120 9 2 0 Setup 10 2 1 Unpacking Your Amplifier 10 2 2 Installing Your Amplifier 10 2 3 Ensu...

Страница 3: ...e risk of fire or electric shock refer servicing to qualified service personnel or equivalent If connected to 240V supply a suitable CSA UL certified power cord shall be used for this supply SAFETY IN...

Страница 4: ...e following two conditions 1 This device may not cause interference and 2 This device must accept any interference including interference that may cause undesired operation of the device This device c...

Страница 5: ...uctuations and Flicker in Low Voltage Supply systems Rated Current less than or equal to 16A EN 55022 2010 Limits and Methods of Measurement of Radio Disturbance Characteristics of ITE Radiated Conduc...

Страница 6: ...SR V control module 1 1 Features 5 or 8 inputs with 1 or 2 outputs respectively Ideal for commercial and industrial use System may be expanded by adding JBL Commercial Series Mixers or Commercial Seri...

Страница 7: ...ng i e the signal has reached the threshold of audible distortion D Power Switch E Power on LED illuminates blue when power is switched on F Input 1 Front panel audio input capability via 1 4 TRS conn...

Страница 8: ...2016DJ2941 HARMAN INTERNATIONAL 1718 W Mishawaka Rd Elkhart IN 46517 Apparatet m tilkoples jordet stikkontakt Apparaten skall anslutas till jordat uttag Laite on liitett v suojakoskettimilla varustet...

Страница 9: ...MPLIES WITH PART 15 OF THE FCC RULES OPERATION IS SUBJECT TO THE FOLLOWING CONDITIONS 1 THIS DEVICE MAY NOT CAUSE HARMFUL INTERFERENCE AND 2 THIS DEVICE MUST ACCEPT ANY INTERFERENCE RECEIVED INCLUDING...

Страница 10: ...mplifier make sure you read and observe the Important Safety Instructions found at the beginning of this manual 2 2 Installing Your Amplifier CAUTION Before you begin make sure your amplifier is disco...

Страница 11: ...0 mm 17 00 in 401 00 mm 15 79 in 1 USB VMA 260 4 1 2 3 MUSIC 1 4 5 6 MUSIC 2 MASTER 2 MASTER 1 SIDE VIEW FRONT VIEW Figure 2 2 1 Dimensions Front Angle Brackets Rear Angle Brackets Rear Flat Brackets...

Страница 12: ...d 3 Install the unit into the cabinet using the rack mount screws through the front angle brackets For details of installation in the chassis of the cabinet refer to the user guide of your cabinet 4 A...

Страница 13: ...the amplifier balanced input by using the included Euroblock connectors see Figure 2 4 1 Unbalanced lines may be used but may result in hum or RF noise if using very long cable runs You can also use...

Страница 14: ...es should be twisted cable if possible To prevent the possibility of short circuits the wires should be stripped back no greater than 6 mm 1 4 inch see Figure 2 5 1 Suggested below are guidelines to s...

Страница 15: ...ustettuun pistorasiaan CONFORMS TO UL STD 60065 CERTIFIED TO CSA STD C22 2 NO 60065 ATTENTION POUR R DUIRE LE RISQUE DE CHOCK LECTRIQUE LA FICHE CENTRALE DE LA PRISE DOIT TRE BRANCH E POUR MAINTENIR L...

Страница 16: ...electrician 2 8 Protecting Your Speakers It s wise to avoid clipping the amplifier signal Not only does clipping sound bad but it can damage high frequency drivers The built in clip limiter prevents...

Страница 17: ...hazardous and invalidates all agency listings 6 Do not operate the amplifier with the red Clip LEDs constantly flashing 7 Do not overdrive the mixer which will cause clipped signal to be sent to the a...

Страница 18: ...ve 70V or 100V speaker systems when connected to the appropriate output terminals As an added feature when driving the high impedance speakers the system automatically apply a 70Hz high pass filter 3...

Страница 19: ...d VMA1240 may use Input channel 2 as a priority channel muting all other channels when pins 4 and 5 are shorted using a switch closure The VMA260 and VMA2120 lets Input2 operate with priority over all...

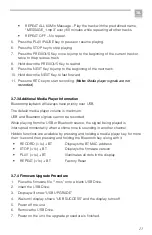
Страница 20: ...e This may not work for some Bluetooth devices 8 Press the PLAY PAUSE key to pause or resume playing 9 To disconnect either press the Bluetooth Key or disable Bluetooth at the media player source devi...

Страница 21: ...ity over USB The default media player volume is maximum USB and Bluetooth signals cannot be recorded While playing from the USB or Bluetooth source the signal being played is interrupted momentarily w...

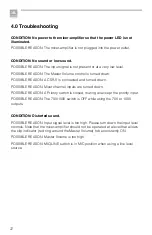
Страница 22: ...IBLE REASON Mixer channel inputs are turned down POSSIBLE REASON A Priority switch is closed muting all except the priority input POSSIBLE REASON The 70V 100V switch is OFF while using the 70V or 100V...

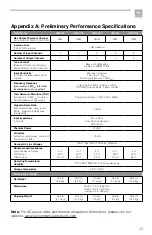
Страница 23: ...ance at any output Power Amp Output 0 5 20Hz 20kHz Signal to Noise Ratio Ref Rated Power mixer levels min master volume max A weighted 76dB Input Impedance nominal Mic 400 Line 20 k balanced RCA 50 k...

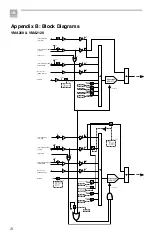
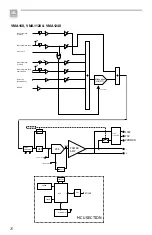
Страница 24: ...on VOX PTT Attenuation VOX PTT Input 4 Input 5 Input 6 Music 2 TO CH2 TO CH2 TO CH2 TO CH2 TO CH1 TO CH1 TO CH1 TO CH1 Control Input 1 to Ch 2 CH1_PRIORITY CH2_PRIORITY CH1_PRIORITY CH2_PRIORITY Input...

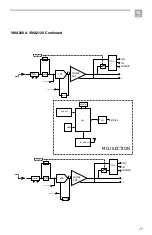
Страница 25: ...Feedback MASTER VOLUME REMOTE VOLUME OUTPUT TRANSFORMER CH 1 100V 70V COMMON SPI CLIP VCA POWER AMP HPF Feedback REMOTE VOLUME OUTPUT TRANSFORMER CH 2 100V 70V COMMON SPI CLIP MASTER VOLUME TONE CONTR...

Страница 26: ...Input 2 PTT Input 2 Mic Line Bal Music Line Summed RCA VOX Attenuation VOX PTT CH1_PRIORITY VCA POWER AMP HPF TONE CONTROL Hi Z Switch Feedback MASTER VOLUME REMOTE VOLUME OUTPUT TRANSFORMER 100V 70V...

Страница 27: ...er Service your system installer or retailer On The World Wide Web www jblcommercialproducts com Professional Contacts Outside the USA Contact the JBL Professional Distributor in your area A complete...

Страница 28: ...JBL Commercial 10653 South River Front Parkway Suite 300 South Jordan Utah 84095 Part Number 5078447 A Issue 09 16...

Отзывы: