24 PLAYING DVDs AND CDs
PLAYING DVDs and CDs
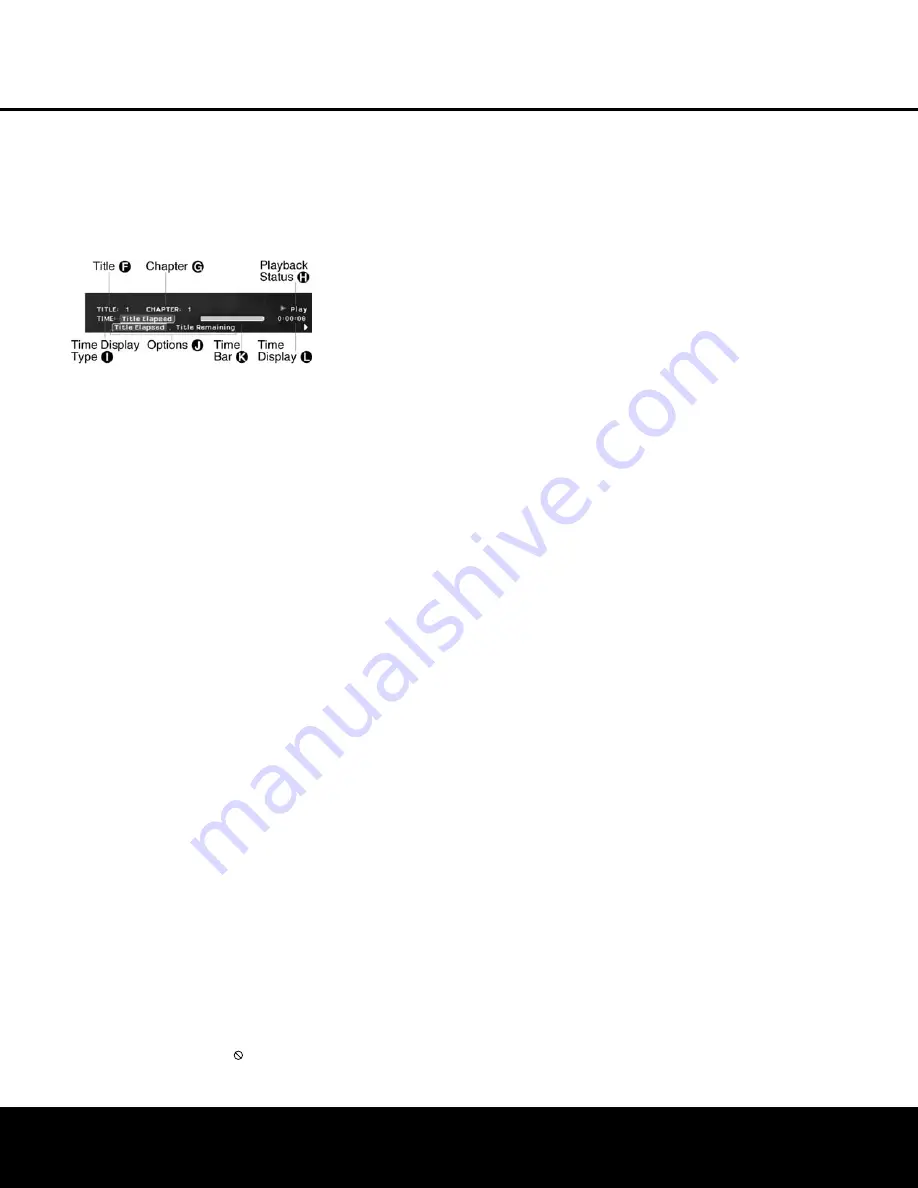
Using the On-Screen Status Display
When a DVD-Video or DVD-Audio disc is playing, you
may press the
Status Button
x
at any time to view
a quick summary of the disc’s playback status. The
Status Bar not only gives you a snapshot of the unit’s
current state; it also provides an easy way to select a
different title, chapter or time display.
For DVD-Video Discs:
•
Title
ƒ
:
This display shows the current title.
•
Chapter
©
:
This display shows the current
chapter.
•
Playback Status
˙
:
This section shows whether
the unit is in Play or Pause, or whether it is in a fast
or slow search/scan mode.
•
Time Display Type
î
:
This section identifies the
type of information in the
Time Display
¬
section
of the display.
•
Options
∆
:
This line is blank when the Status
Display is first accessed, but when it is used to
change the title, chapter or time display, the available
choices will be shown here.
•
Time Bar
˚
:
This display is a graphic representa-
tion of the time remaining for the disc being played.
As the disc plays, blue bars will appear to give a
relative indication of where the current scene is
between the beginning and end of the title.
•
Time Display
¬
:
This section of the display shows
the time corresponding to the type of display indi-
cated in the
Time Display Type
î
.
For DVD-Audio Discs:
The Status display for DVD-Audio discs is identical to
that for DVD-Video discs with the following difference:
•
Group:
Since DVD-Audio discs contain groups of
tracks organized into one or more Groups, you are
able to view or change the Group on a DVD-Audio
disc, as opposed to the Title on a DVD-Video disc.
Selecting a Title (for DVD-Video Discs)
To select a title, first press the
Status Button
N
so
that the Status Display appears. The
Current Title
ƒ
will be highlighted in a blue box. Press the
Enter
Button
P
and a list of the available titles will appear
in the
Options Line
∆
. Use the
‹
/
›
Navigation
Buttons
4
to select the desired title in a highlighted
blue box and press the
Enter Button
P
to begin
playing the new title. Note that if the
icon appears
when you attempt to select a new title, this is an indi-
cation that the disc does not allow the title to be
changed in this manner even though a list of title
numbers will appear. This is a function of the way the
disc was created and is not a flaw in the DVD 31.
Selecting a Group (for DVD-Audio Discs)
Since DVD-Audio discs are organized into Groups,
instead of Titles, you may view or change the Group
in use by following the same instructions as for chang-
ing the Title on a DVD-Video disc, as shown above.
Selecting a Chapter (for DVD-Video Discs)
To select a chapter, first press the
Status Button
N
so that the Status Display appears. Next, press the
›
Navigation Buttons
4
so that the
Current
Chapter Number
©
is highlighted in a blue box.
Press the
Enter Button
P
and a list of the available
chapters will appear in the
Options Line
∆
. Use the
‹
/
›
Navigation Buttons
4
to select the desired
chapter in a highlighted blue box and press the
Enter
Button
P
to begin playing the new chapter.
To select a specific chapter on a DVD at any time dur-
ing playback, simply press the number corresponding
to the chapter you wish to view using the
Numeric
Keys
F
. You may also move one by one through
the chapters at any time by pressing the
Previous
Step/Next Step Buttons
8M
on the remote or
the
Skip Reverse/Skip Forward Buttons
67
on
the front panel.
Selecting a Track (for DVD-Audio Discs)
DVD-Audio selections are recorded on a disc as indi-
vidual tracks, as on a CD, rather than as the Chapters
on a DVD-Video disc. The instructions for viewing or
changing the current track number for a DVD-Audio
disc are otherwise identical to those for viewing or
changing the Chapter on a DVD-Video disc, as shown
above.
Selecting a Track (for CDs)
To select a specific track on a CD during playback,
when the Player menu appears in your video display,
simply press the number corresponding to the track
you wish to listen to using the
Numeric Keys
F
.
You may also move one by one through the chapters
at any time by pressing the
Previous Step/Next Step
Buttons
8M
on the remote or the
Skip
Reverse/Skip Forward Buttons
67
on the front
panel. When you press the
Previous Step
8
or
Skip Reverse
6
button once, the player
will return to the start of the current track. Additional
presses of the buttons will step back through the
available tracks, one at a time.
Changing the Time Display
To change the Time Display, first press the
Status
Button
D
so that the Status Display appears. Next,
press the
‹
/
›
Navigation Buttons
4
so that the
current
Time Display Type
î
is highlighted in a
blue box. Press the
Enter Button
P
and a list of
the available time display options will appear in the
Options Line
∆
.
For DVD-Video Discs:
•
Title Elapsed
shows the time elapsed in the current
title. In cases where the disc has only one title, this
will be the same as the elapsed time on the disc.
•
Title Remaining
shows the time remaining in the
current title. In cases where the disc has only one
title, this will be the same as the time remaining on
the disc.
•
Chapter Elapsed
shows the time remaining in the
current chapter.
•
Chapter Remaining
shows the time remaining in
the current chapter.
For DVD-Audio Discs:
•
Track Elapsed
shows the time elapsed in the
current track.
•
Track Remaining
shows the time remaining in the
current track.
•
Group Elapsed
shows the time elapsed in the cur-
rent group.
•
Group Remaining
shows the time remaining in the
current group.
Press the
‹
/
›
Navigation Buttons
4
to highlight
the desired time display method and press the
Enter
Button
P
to change the display. Note that any
changes made here will affect the time display in both
the Status Display and the front-panel
Information
Display
@
.
NOTE:
When a CD, MP3 or Windows Media disc is
playing, the On-Screen Status Display will not be
available. Instead, the
PLAYER
Menu of the OSD
system will appear on-screen. (See page 28 for more
information on using the Player Menu.)
For JPEG discs, the File Index number and File Name
will be displayed; however, you will not be able to
change them. To navigate a JPEG disc, you must use
the Player Menu of the OSD system (see page 28).
Selecting the Audio Track (DVDs Only)
Many DVDs contain more than one audio track. On
many discs, you will find multiple languages, while
others will offer a choice of different audio formats
or mixes (e.g., Dolby Digital or DTS), while some will
also contain commentary from the director or stars or
Descriptive Video Service content. The default audio
language is set in the
AUDIO SETUP
menu
as shown on page 19.
To change the audio track, press the
Audio Select
Button
2
to show the current audio track configu-
ration. When you press the
Enter Button
P
, a
series of numbers will appear. Press the
‹
/
›
Navigation Buttons
4
to change the numeric indi-
DVD 31 (120V) OM 6/25/04 11:40 AM Page 24


