background image

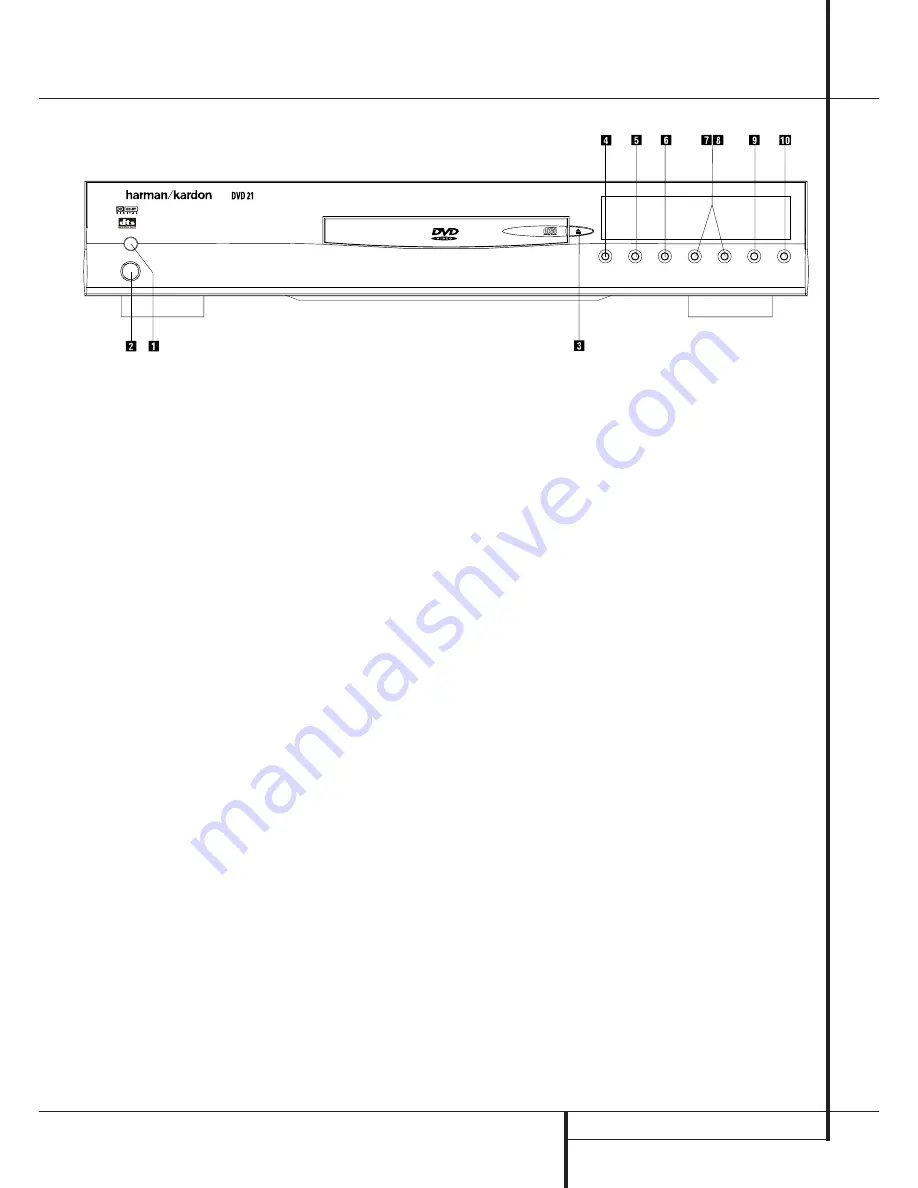
FRONT PANEL CONTROLS  

5

Front Panel Controls

Main Power On/Off:

Press this switch to

apply power to the DVD player. Once the unit
has been turned on with this switch, it may be
operated from either the front panel or remote
control. Press the switch again to turn the unit
completely off.

1

Power On/Off (Standby):

Press the button

once to turn the DVD player on, press it again to
put the unit in the Standby mode. Note that in
order for this switch to operate, the 

Main

Power Switch

must be pressed in so that it

is in the ON position.

2

Eject:

Press this button to open or close the

Disc Tray.

3

Play:

Press to initiate playback or to resume

playback after Pause has been pressed.

4

Pause:

Press this button to momentarily

pause playback. To resume playback, press the
button again. If a DVD is playing, action will
freeze and a still picture will be displayed when
the button is pressed.

5

Stop:

Press this button once to place the

disc in the Resume mode, which means that
playback will stop, but as long as the tray is not
opened or the disc changed, DVD playback will
continue from the same point on the disc when
the Play Button is pressed again. Resume will
also work if the unit was turned off. To stop a
disc and have play start from the beginning,
press the button twice.

6

Skip (Previous):

Press this button to move

backward through the music tracks on a CD disc
or the chapters on a DVD disc. Keep the button
pressed to search backwards at one of the avail-
able speeds.

7

Skip (Next):

Press to move forward through

the music tracks on a CD or the chapters on a
DVD disc. Keep the button pressed to search for-
wards at one of the available speeds.

8

Dimmer:

Press this button to reduce the

brightness of the Information Display by 50% or
to turn the display off completely in the 
following order: FULL BRIGHTNESS 

HALF

BRIGHTNESS 

OFF 

FULL BRIGHTNESS.

9

TEST:

Press this button to bring a test pic-

ture to the screen, that enables you to optimally
adjust all important parameters of color videos
like brightness, contrast, color intensity and tint.

Main Power On/Off

1

Power On/Off (Standby)

2

Eject

3

Play

4

Pause

5

Stop

6

Skip (Previous)

7

Skip (Next)

8

Dimmer

9

Test

Содержание DVD 21

Страница 1: ...DVD 21 Digital Versatile Disc Player OWNER S MANUAL DVD 21 Power for the Digital Revolution...

Страница 2: ...o Track 22 Changing Subtitle Language 22 Changing Camera Angle 23 Repeat Play 23 Zoom Playback 23 Information Menus 24 Programmed Play with DVD 25 CD Playback 25 Disc Compatibility 25 To Load and Play...

Страница 3: ...ore like the screen in a movie theater The program material on a DVD may be recorded in either format and in addi tion you may configure the DVD 21 to play back in either format depending on the featu...

Страница 4: ...software Compatible with CD as well as DVD The DVD 21 will play any conventional Audio CD or recordable CD R or erasable CD CD RW bearing the logos shown here MP3 or any VCD or DVD with the region cod...

Страница 5: ...will stop but as long as the tray is not opened or the disc changed DVD playback will continue from the same point on the disc when the Play Button is pressed again Resume will also work if the unit w...

Страница 6: ...e current track time time remaining in the current track or the total remaining time on the disc F Test Indicator This indicator lights when the TV test screen is activated G V OFF Indicator This indi...

Страница 7: ...O P Q POWER ON POWER OFF SUBTITLE TITLE ANGLE AUDIO TEST EJECT SET UP ARROWS ENTER INFO MENU PAUSE STATUS SKIP PREVIOUS SKIP NEXT PLAY SEARCH REVERSE STOP SEARCH FORWARD DIMMER SLOW FORWARD ZOOM SLOW...

Страница 8: ...to play disc closes disc tray first if it is open H SEARCH REV Allows you to search in reverse through a disc while it is in play mode Each time you press this button search speed changes as below R S...

Страница 9: ...put switching S Video Output Connect this jack to the S Video input on a television or video projector or to an S Video input on an A V receiver or processor if you are using that type of device for S...

Страница 10: ...r improved picture clarity Never connect both outputs Video and S Video to your TV or AV Receiver only one of them Most European TV s are equipped with SCART connectors rather than with a normal video...

Страница 11: ...provided with your device to the video or S video input on your device and the video S video output of this device to your TV For more details see the manual of your Audio Video amplifier receiver No...

Страница 12: ...the TV must be used and the DVD 21 s SCART Video Output in the Video Menu must be set to RGB see page 16 Note that with RGB video the color intensity cannot be adjusted with most TVs When the RGB vide...

Страница 13: ...e the remote control unit and install new batteries If leakage should come into contact with parts of your body wash it off thoroughly with water Batteries contain chemical substances and we recommend...

Страница 14: ...tempt to play DVD may cause such a high level of noise that it may be harmful to your ears and damage your speakers CD s can be played as they would normally be played Note Some first generation DTS d...

Страница 15: ...ard through the DVD or CD disc being played at fast speed press SEARCH on the remote Once one of these buttons is pressed the fast search will continue until PLAY is pressed There are four fast play s...

Страница 16: ...lumn displays the current setting highlighted and two options DVD 21 provides multiple output connectors for various video devices but to optimize video quality all of the connectors cannot work at th...

Страница 17: ...f your DVD player is connected to a widescreen TV or to a conventional 4 3 TV changeable to wide screen 16 9 mode With this set up discs recorded with 4 3 aspect ratio will appear as a boxed image in...

Страница 18: ...ut any further processing To select the Sample Frequency follow these steps 1 Press ARROW KL on the remote to select PCM LIMIT on the AUDIO Menu 2 Press ENTER or ARROW N PCM LIMIT Menu appears 3 Press...

Страница 19: ...nt Subtitle Language setting highlighted and the options With this setting you define your preferred subtitle language if the disc contains different subtitles Choosing a subtitle language with the SU...

Страница 20: ...tness of the white bar will no more increase while turning up the contrast or when the borders of the white harman kardon text letters on top will bloom overlight into the black areas what drasticly w...

Страница 21: ...creen when you press a button that doesn t have any function To make the Status Bar disappear from the screen press STATUS or CLEAR on the remote control Selecting a Title Some discs contain more than...

Страница 22: ...tive video for the sight impaired and various digital formats In normal play the unit will always look for the default setting for the audio track but you may change the audio track at any time using...

Страница 23: ...a scene as the beginning point the Repeat A Display appears 2 Press A B again to choose a scene as the end point Repeat A B setting is done A B section will be played continuously 3 Press A B on the r...

Страница 24: ...list will replace the deleted one and will be selected automatically The program can be deleted completely by moving the cursor to the top of the play list and pressing ENTER for each value programme...

Страница 25: ...is pressed see page 27 and the Status Bar shown below appearing automatically when the CD is played let you choose various playback features Track The number shown indicates the number of the track th...

Страница 26: ...remote to make the Status Bar disappear from the screen Recalling a Bookmarked Scene 1 While playing a disc press STATUS on the remote the Status Bar appears 2 Press the ARROW N on the remote until t...

Страница 27: ...ed with Program play the complete program will be repeated rather than the disc A B Repeat Play The Repeat A B function allows you to select any portion of a CD and have it repeat continually until th...

Страница 28: ...off completely by the Main Power On Off button or opening the tray see chapter Cancel Program Play below Insert Tracks Inserting tracks is possible only if tracks are already programmed on the playli...

Страница 29: ...the front panel display and the time indicator on the screen on top of the list will show the elapsed time of the track being played Other time display options are not available with MP3 playback The...

Страница 30: ...ange track numbers directly Depending on the disc s functionality some VCD discs allow the time display to be changed even when the Playback Control PBC is on as described for CD on page 26 Playback C...

Страница 31: ...ompatible Use analog audio outputs with 96 kHz PCM audio Picture is distorted or jumps during MPEG 2 decoding It is a normal artifact of DVD playback for pictures fast forward or reverse play to jump...

Страница 32: ...7185 Hausa 7265 Hebrew 7387 Hindi 7273 Hungarian 7285 Icelandic 7383 Indonesian 7378 Interlingua 7365 Interlingue 7369 Iunpiak 7375 Irish 7165 Italian 7384 Japanese 7465 Javanese 7487 Kannada 7578 Kas...

Страница 33: ...easurable Limits AC Power 110 240 V 50 60 Hz Power Consumption 12 Watts On 20 Watts Max Dimensions WxHxD 440 x 87 x 305 mm Weight 7 Kg Depth measurement includes knobs and connectors Height measuremen...

Страница 34: ...250 Crossways Park Drive Woodbury New York 11797 www harmankardon com Harman Consumer International 2 Route de Tours 72500 Ch teau du Loir France 2002 Harman Kardon Incorporated Partnumber SM109...

Отзывы: