background image

BDT 2/BDT 20

10

Connecting the Player

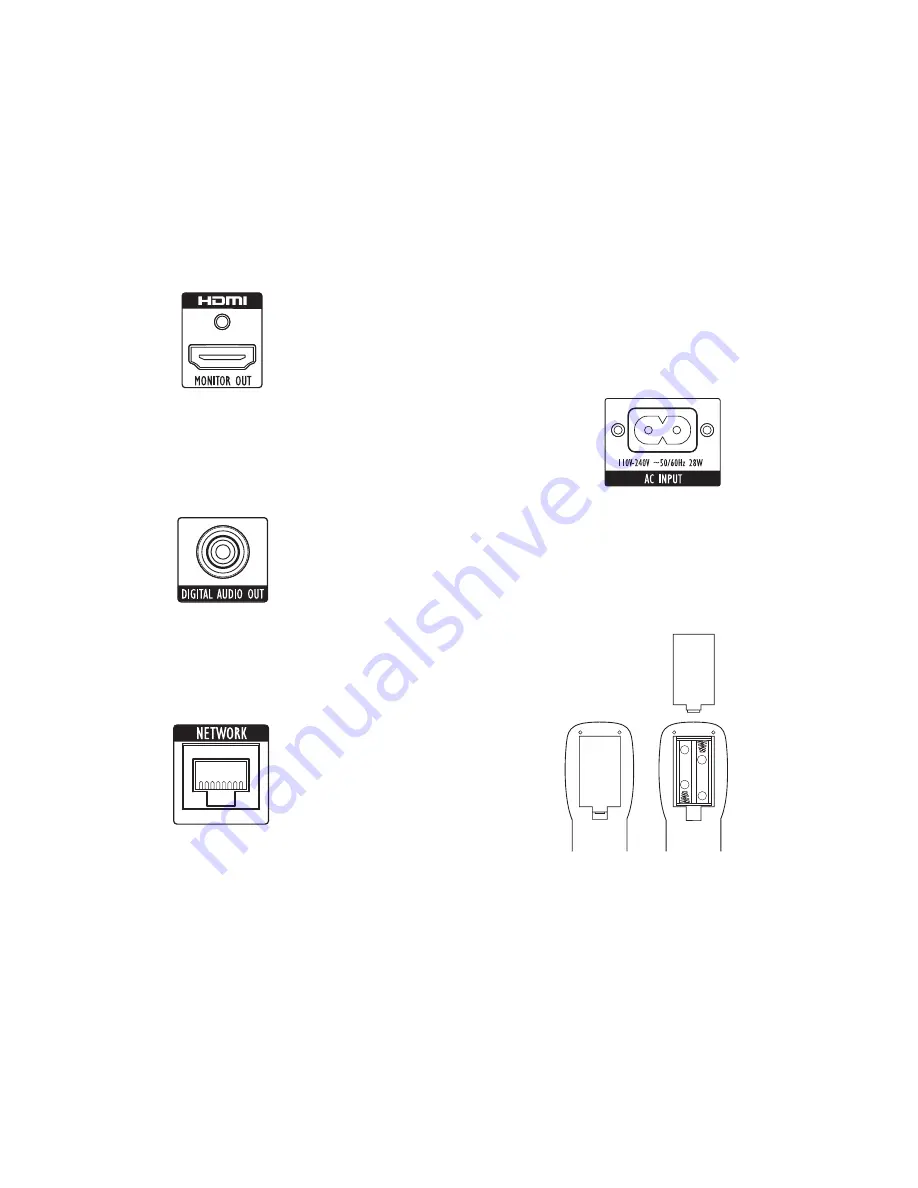
HDMI Connection

If Your Receiver/Processor Has an HDMI Connection

Use the supplied HDMI cable to connect the player’s HDMI output to your receiver/
processor’s HDMI input. Use another HDMI cable to connect your receiver/processor’s 
HDMI output to your TV’s HDMI input.

If Your Receiver/Processor Does Not Have an HDMI Connection

Use the supplied HDMI cable to connect the player’s HDMI output directly to your TV’s 
HDMI input.

Coaxial Digital Audio Output

If you did not connect the BDT 2/BDT 20’s HDMI output to your receiver/processor, connect 
the Coaxial Digital Audio Output to a coaxial digital input on your A/V receiver/processor.

Network Connection

Use a Cat. 5/RJ45 network cable (not supplied) to connect the BDT 2/BDT 20’s Network 
Connector directly to a network router, a network switch, a network modem, or 
to an Ethernet network wall jack that has Internet access. NOTE: The BDT 2/BDT 20 
cannot access content on other networked devices. The network connection enables 
the BDT 2/BDT 20’s BD-Live features. See 

BD-Live Interactivity

, on page 15, for more 

information.

IMPORTANT: 

The BDT 2/BDT 20’s network connection will not support a proxy network.

Power-Cord Connector

The BDT 2/BDT 20 comes with a detachable AC power cord. This type of cord makes it 
easier for you to install and connect all other system wiring to the player’s rear panel.

NOTES:

The power requirement for the 


BDT 2/BDT 20 is 120 – 240V AC, 50/60Hz, 25W. 

Connecting to a power source other than the one listed may damage the player or 
cause abnormal operation.
Before connecting the AC power cord to a wall outlet, confirm that all of the other 


connections have been made correctly.
Connect the female end of the 


BDT 2/BDT 20’s detachable power cord to the player’s 

Power-Cord Connector. Plug the other end into a working, 

unswitched

 AC outlet.

Set the BDT 2/BDT 20’s Main Power switch in the “On” position. The player’s Power 
indicator will turn red, indicating that the player is in the Standby mode.

Preparing the Remote Control

Installing the Batteries

Your BDT 2/BDT 20 remote control uses two AA batteries (supplied). Insert the batteries 
as shown in the illustration, making sure to observe the correct polarity.

+

+

Using the Remote Control

When using the remote, remember to aim it toward the player’s front panel. Make sure 
that no objects, such as furniture, block the remote’s view of the player. Bright lights, 
fluorescent lights, and plasma video displays may interfere with the function of the 
remote.

The remote has a range of about 20 feet (6.1m), depending on the lighting 


conditions.
You can use the remote at an angle of up to 


30° from either side of the player.

If the remote does not seem to be operating properly, make sure that the batteries are 
inserted correctly. If the remote still does not operate properly, replace both batteries 
with new ones.

Connecting the player/preparing the remote Control

Содержание BDT 2

Страница 1: ...BDT2 BDT20 Blu ray Disc player Owner s Manual...

Страница 2: ...don Products 5 BDT 2 BDT 20 Features 6 Supplied Accessories 6 Front Panel Controls 7 Rear Panel Connections 8 Remote Control Functions 8 Connecting the Player 10 Preparing the Remote Control 10 Settin...

Страница 3: ...R ELECTRIC SHOCK DO NOT EXPOSE THIS APPARATUS TO RAIN OR MOISTURE THE EXCLAMATION POINT WITHIN AN EQUILATERAL TRIANGLE IS INTENDED TO ALERT THE USER TO THE PRESENCE OF IMPORTANT OPERATING AND MAINTENA...

Страница 4: ...uct removal may not be possible for the user In this case recycling or recovery centers handle the dismantling of the product and the removal of the battery If for any reason it becomes necessary to r...

Страница 5: ...requires a broadband Internet connection for BD Live interactivity Cleaning When the unit gets dirty wipe it with a clean soft dry cloth If necessary and only after unplugging the AC power cord wipe i...

Страница 6: ...y TrueHD DTS Digital DTS HD High Resolution Audio DTS HD Master Audio PCM WMA DRM free version only WMA9 CBR 192kbps VBR 355kbps MP3 32kbps 320kbps bitrates including variable bitrate encoding Support...

Страница 7: ...ion Display Various messages appear on this display in response to commands and to provide information about the BDT player s status as described throughout this manual Previous Step Button Press this...

Страница 8: ...erformance See Audio Settings Audio Output on page 13 for more information IMPORTANT Your BDT 2 BDT 20 is in compliance with HDCP High Definition Copy Protection Your TV must also be HDCP compliant to...

Страница 9: ...Press this button to play a disc that has been loaded into the player s disc drawer or a music file that has been highlighted on the on screen menu Pressing this button when viewing photos begins a s...

Страница 10: ...ing to the player s rear panel NOTES The power requirement for the BDT 2 BDT 20 is 120 240V AC 50 60Hz 25W Connecting to a power source other than the one listed may damage the player or cause abnorma...

Страница 11: ...BDT 2 BDT 20 on for the first time the on screen menu will display the Setup Wizard Before you can use your BDT 2 BDT 20 you need to set the language and make a few basic settings so that the player s...

Страница 12: ...Playback option allows you to set the following disc playback features Show Angle Icon This option lets you select whether or not the angle icon will automatically be displayed when a disc with multi...

Страница 13: ...d Neutral control settings Vivid For video games Cinema For movies and many television broadcasts Custom This option lets you adjust the photo settings manually The Brightness Saturation color saturat...

Страница 14: ...must be HDCP compliant The BDT player incorporates copy protection technology On Blu ray Disc media and DVD discs that include a copy protection code if the contents of the disc are copied using a VC...

Страница 15: ...up to 12 locations on the disc that is currently playing Press the Bookmark button to mark the current location on the disc To play the disc from one of your selected bookmark locations hold the Bookm...

Страница 16: ...button to freeze the current photo on the screen Press the Play button to resume the slide show Stop Button Press this button to end the slide show and return to the directory Next Step and Previous S...

Страница 17: ...se buttons When the BDT 2 BDT 20 is playing music files from a USB device or CD data disc the Repeat and Options functions are slightly different from their functions when the unit is playing Blu ray...

Страница 18: ...r in shuffle order plays each video in the folder one time in random order then returns to the directory Audio Selects audio options if available Using Playlists Because USB devices and CD R data disc...

Страница 19: ...t the digital audio settings on the connected device have been properly set If you re using only the HDMI connection check that the HDMI audio settings on the connected device have been properly set I...

Страница 20: ...l DTS HD High Resolution Audio DTS HD Master Audio PCM WMA DRM free version only WMA9 CBR 192kbps VBR 355kbps MP3 32kbps 320kbps bitrates including variable bitrate encoding Still image format JPEG Vi...

Страница 21: ...BDT2 BDT20 21 ENGLISH...

Страница 22: ...menu Go to vod divx com with this code to complete the registration process and learn more about DivX VOD Manufactured under license from Dolby Laboratories Dolby Pro Logic and the double D symbol are...

Отзывы: