Harman Kardon AVR 340 Скачать руководство пользователя страница 65

INDEX  65

5-Channel Stereo  37, 40
6-Channel/8-Channel Direct Input  11, 14, 34, 35
7-Channel Stereo  23, 37, 40
A-BUS  3, 8, 15, 18, 46, 47
AC Power Connections  4, 8, 9, 16, 18, 21, 34,

63, 64

Advanced Features  46–47
Advanced Select Menu  46
Analog Bypass  25, 35, 37
Antenna Terminals  4, 8, 10, 16, 63
Audio Equipment Connections  16
Audio Setup Menu  23
Auto Mode Tuning  6, 12, 41
Auto Polling  23, 38
Auto Search Method  48
A/V Sync Delay  3, 13, 27, 30, 31
Cable Television  4, 10, 11, 16, 17, 48, 49, 51,

52, 61–62

CD  3, 8, 9, 12, 13, 15, 16, 17, 18, 22, 23,

29, 30, 38, 39, 42, 47, 48, 49, 50,
51, 58, 59

Channel Adjust Menu  31
Channel-Control Punch-Through  50
Cleaning and Maintenance  4
Coaxial Digital Audio Jacks  6, 8, 9, 16, 17, 22,

34, 35, 38, 39

Code Readout  48
Component Video  3, 8, 9, 10, 17, 21, 22, 34, 64
Composite Video  8, 10, 34
Default Surround Mode  22, 45
Delay Adjust Menu  31
Delay Settings  6, 22, 23, 27, 28, 30, 31
Description and Features  3
Digital Audio Playback  35, 38–41
Digital Source Selection  6, 12, 22, 38
Dimming Front-Panel Display  12, 42, 44
Direct Code Entry  48
DMP  6, 8, 10, 11, 13, 14, 15, 16, 23, 34, 42,

51, 52

Dolby  3, 6, 7, 9, 13, 16, 20, 22, 23, 24, 25,

28, 30, 32, 35, 36, 37, 38, 39, 40,
41, 42, 45, 52, 64

Dolby Digital  3, 6, 9, 13, 16, 20, 22, 23, 24,

25, 30, 35, 36, 37, 38, 39, 40,
41, 42, 45, 64

Dolby Headphone  3, 13, 35, 37
Dolby Pro Logic  3, 13, 22, 23, 24, 25, 30,

32, 35, 36, 38, 40, 41, 64

Dolby Virtual Speaker  3, 7, 13, 24, 28, 37, 40
DSP Surround Modes  6, 12, 13, 24, 25, 30,

35, 39, 40, 51

DTS  3, 6, 9, 11, 13, 20, 22, 23, 24, 25, 30,

35–36, 37, 38, 39, 40, 41, 42, 45, 52, 64 

DTS Neo:6  3, 6, 11, 13, 23, 25,

35–36, 39, 52, 64

DTS-ES  3, 13, 20, 24, 25, 32, 33, 35–36,

40, 64

DVD  3, 6, 8, 9, 10, 12, 13, 14, 15, 16, 17, 18,

22, 23, 29, 31, 35, 36, 38, 39, 41,
45, 47, 48, 49, 50, 51, 52, 59, 63

DVD-Audio  10, 14, 16, 17, 22, 34, 35
EzSet/EQ  3, 5, 12, 13, 21, 22, 24, 26–27, 28,

29, 30, 31, 42, 46, 64

Front-Panel Controls  5–7
Front-Panel Jacks  6, 16, 17, 31, 32, 34, 51
Front-Panel-Display Fade  44
Full OSD  21, 22, 23, 27, 31, 42, 44, 45
Full-OSD Time-Out  21, 44
Hall  3, 12, 25, 31, 35, 37, 40, 41
Headphones  3, 5, 13, 35, 37
HDTV Tuner  10, 16,
iPod

®

3, 10, 13, 14, 15, 16, 23, 34, 42, 48, 64

Input-Independent Speaker Setup  22, 29, 34
Input Setup Menu  22
Input Titling  3, 6, 22
Installation  16–18
Installation Location  4
IR Receiver (Remote Sensor)  5, 7, 9, 18, 63
Logic 7  3, 6, 11, 13, 20, 22, 23, 24, 25, 28,

30, 35, 36, 38, 40, 41, 52, 64 

Macros  13, 48–49, 52
Manual Mode Tuning  6, 12, 32, 41
Manual Setup Menu  28
Master Menu  21
Memory Backup  43
Multiroom  3, 7, 8, 9, 11, 13, 15, 16, 17, 18,

21, 28, 29, 40, 46–47

Multiroom Installation  18, 46 
Multiroom Operation  9, 29, 46–47,
Multiroom Setup Menu  46
Mute  6, 11, 14, 15, 35, 46, 48, 49, 50, 51, 63
Night Mode  12, 24, 32, 34, 41, 51
On-Screen Display  5, 6, 13, 21, 22, 23, 24,

30, 31, 32, 34, 35, 38, 47

Operation  34–42
Optical Digital Audio Jacks  3, 5, 6, 8, 9, 16, 17,

22, 34, 38, 39

Output Level Adjustments  12, 25, 26, 27, 28,

31, 32, 63

Output Level Trim Adjustment  6, 42
PCM  9, 16, 36, 38, 39, 40, 42, 45
Polarity  9, 16, 21
Post Processing  35, 36, 39
Power Switches  5, 12, 18, 21, 31, 32, 63
Preset Stations  5, 6, 7, 11, 12, 13, 15, 34,

41, 42, 46, 47, 52

Processor Reset  63
Programmed Device Functions  49–52
Programming Product Codes  48, 53–62
Punch-Through Programming  13, 50
Quadruple Crossover  3, 29
Rear-Panel Connections  8–10
Recalling Preset Stations  6, 13, 41
Recording  42
Remote Control  3, 4, 5, 7, 11–14, 17, 18, 21,

23, 31, 32, 34, 42, 46, 47, 48–62

Remote Control Batteries  21
Remote Control Function List  51–52
Remote Control Functions  49–52
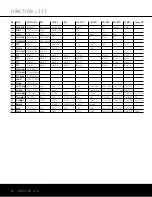
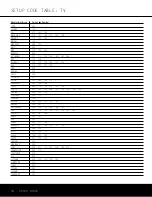
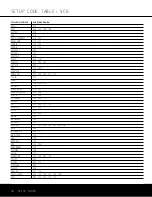
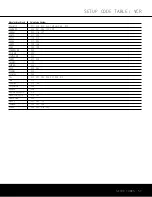
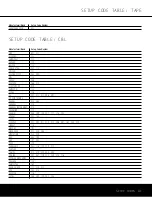
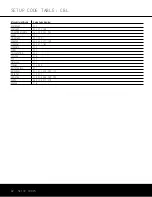
Remote Control Setup Code Tables  53–62

Resetting the Remote  50
SACD  10, 16, 17, 34, 35, 64
Safety Information  3, 4
Satellite Television  9, 10, 13, 16, 17, 28, 29, 30,

35, 38, 41, 48, 49, 50, 60

Semi-OSD  21, 23, 32, 34, 35, 42, 44
Setting Preset Stations  41
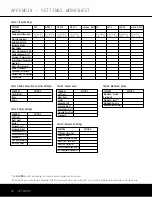
Settings Worksheet  66
Sleep Mode  12, 34, 49, 51, 52
Source Selection  6, 12, 22–23, 34 
Speaker Crossover Menu  30
Speaker Placement  19–21
Speaker Selection  19
Speaker Setup  28–30
Speaker Size Menu  28
Speaker Terminals  9, 16
Speaker Wire 16
Speaker/Channel Input Indicators  5, 6, 32, 39, 41
Subwoofer  6, 8, 9, 10, 16, 18, 20, 22, 26, 27,

28, 29, 30, 31, 32, 35, 36, 37, 38, 42

Surround Mode Charts  36–37, 40
Surround Mode Selection  6, 12–13, 23–25,

35–41

Surround Off  12, 13, 23, 25, 30, 32, 35, 37, 40
Surround Select Menu  23
Surround Setup  23–25
S-Video  3, 6, 8, 9, 10, 16, 17, 21, 34, 64
System Configuration  19–33
System Setup  21–22
Tape  8, 10, 13, 15, 16, 17, 22, 23, 37,

41, 42, 48, 50, 51, 52, 54, 61

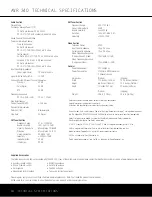
Technical Specifications  65
Theater  3, 12, 25, 35, 37, 40, 41
The Bridge  3, 6, 8, 10, 11, 13, 14, 15, 16, 23,

34, 42, 44, 51, 52, 64

Tone Controls  5, 23, 25, 34, 35, 40
Trademark Acknowledgements  64
Transport Controls  10, 11, 13, 14, 37–38, 42,

47, 48, 50

Transport-Control Punch-Through  50
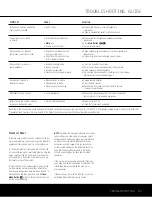
Troubleshooting Guide  63
Tuner Mode  5, 6, 11, 12, 13, 41
Tuner Operation  41
Turn-On Volume Level (Volume Default)  44
TV  3, 4, 10, 11, 12, 13, 14, 16, 17, 21, 22, 29,

35, 48, 49, 50, 51, 53–54

Typographical Conventions  2
Unpacking  4
Upsampling  24, 25
VCR  3, 10, 13, 16, 22, 29, 43–45, 48, 49, 50,

51, 52, 56–57

Video Connections  8–10, 16–17, 34
Video Equipment Connections  8-10, 16–17, 34
Video Monitor  8, 9, 10, 14, 17, 21, 34
VMAx  3, 12, 24, 25, 28, 32, 35, 37, 40, 64
Volume Control  3, 6, 9, 11, 12, 13, 15, 18, 21,

25, 26, 31, 32, 34, 35, 37, 42, 43,
44, 46, 47, 48, 49, 50, 51, 56, 63

Volume Punch-Through  50
Zone II Remote  3, 15, 46, 47

INDEX

AVR 340 OM  3/22/06  9:09 AM  Page 65

Содержание AVR 340

Страница 1: ...VID 1 DVD CD FMAM TAPE 6 8 CH VID 2 VID 3 VID 4 PRO LOGIC 3 STEREO HEADPHONE DSP 5 7 CH STEREO SURR OFF AVR 340 Optical 4 Coaxial 4 Video 4 AVR 340 AUDIO VIDEO RECEIVER OWNER S MANUAL Power for the Di...

Страница 2: ...ventions In order to help you use this manual with the remote control front panel controls and rear panel connections certain conventions have been used EXAMPLE bold type indicates a specific remote c...

Страница 3: ...video recording outputs a preamp out and a color coded eight channel input make the AVR 340 virtually future proof with everything needed to accommodate tomor row s new formats right onboard Until no...

Страница 4: ...aterials that may be damaged by heat or heavy objects Some surface finishes may be particularly sensitive to absorbing such marks due to a variety of factors beyond Harman Kardon s control including t...

Страница 5: ...Buttons until it does Press the Tone Mode Button 5 until the desired option of TREBLE MODE or BASS MODE appears in the Lower Display Line and in the on screen display and then press either of the Butt...

Страница 6: ...ist of Input Indicators Tuner Mode Selector Press this button to select Auto or Manual tuning When the button is pressed so that the AUTO appears in the Lower Display Line the tuner will search for th...

Страница 7: ...this line will identify the station as AM or FM and show the frequency and preset number if any Lower Display Line Depending on the unit s sta tus a variety of messages will appear here In normal ope...

Страница 8: ...OTE To assist in making the correct connections for multichannel input output and speaker connec tions all connection jacks and terminals are color coded in conformance with the CEA standards as follo...

Страница 9: ...or code specification the green terminal is the positive or terminal that should be connected to the red terminal on speakers with the older color coding Connect the black terminal on the AVR to the b...

Страница 10: ...conversion capability if your video display device is equipped with component Y Pb Pr video inputs you need only to connect the Component Video Monitor Outputs fl to your display device and the AVR 3...

Страница 11: ...ume Up Down c TV Video Selector d DMP Selector e 6 Channel 8 Channel Direct Input f Mute The BridgeTM s a b c d e f g h j n n p o o q r t v 32 30 29 28 36 37 38 39 z x 35 POWER MUTE AVR DVD AM FM CD T...

Страница 12: ...he AVR 340 s output levels See pages 25 31 and 42 for more information on calibrating the AVR 340 j Sleep Button Press this button to place the unit in the Sleep mode After the time shown in the displ...

Страница 13: ...ect Press this button to select a DTS Neo 6 mode These modes take a two channel stereo or matrix surround encoded source and create a full five six or seven channel sound field See pages 36 and 40 for...

Страница 14: ...annel 8 Channel Direct Input Press this button to select the device connected to the 6 8 Channel Direct Inputs X See page 34 for more information When the device connected to the 6 8 Channel Direct In...

Страница 15: ...od when DMP has been selected Play Button Press this button to activate the Play function on compatible Harman Kardon CD DVD or cassette players or on your iPod when DMP has been selected Tuning Up Do...

Страница 16: ...n we sug gest that you use high quality speaker cable Many brands of cable are available and the choice of cable may be influenced by the distance between your speakers and the receiver the type of sp...

Страница 17: ...y view the component video output of the device connected to the Component Video 1 Inputs enabling you to view and listen to different sources 8 Similarly it is recommended that you connect any other...

Страница 18: ...eed to configure the amplifiers for surround operation by changing a setting in the MULTI ROOM SETUP menu following the instructions shown on page 46 NOTE The AVR 340 s multiroom system is only capa b...

Страница 19: ...eir loca tions so that audio moves across the front of the room smoothly without seeming to jump from one speaker to another Center Channel Speaker The ideal location for the center channel speaker is...

Страница 20: ...aker as soon as possible Surround Speakers for 7 1 Systems For the ultimate home theater experience a 7 1 sur round system uses both traditional surround left right channels and a surround back left r...

Страница 21: ...R 340 on either by pressing the Standby On Switch 2 on the front panel or via the remote by pressing the Power On Button d the AVR Selector f or any of the Input Selectors degde When the unit is turne...

Страница 22: ...video inputs and the sur round mode specifics of your home theater system Remember that since the AVR 340 memorizes these settings for each input independently you will need to make some of these adju...

Страница 23: ...wish to change those settings at this time proceed to the next menu screen However to make configuration changes to those parameters make cer tain that the MASTER MENU Figure 1 is on screen with the...

Страница 24: ...hannels from a 2 0 or 5 1 source This will appear in the MODE line by show ing both the Dolby Digital mode and the second mode separated by a plus sign e g DOLBY D DOLBY PRO LOGIC II MUSIC Keep in min...

Страница 25: ...whether the 5 1 or 6 1 7 1 channel configuration is in use In either case the selection of a Logic 7 mode enables Harman Kardon s exclusive Logic 7 processing to create fully enveloping multichannel...

Страница 26: ...n to the MASTER MENU Note that if you attempt to move to the next menu without plugging in the microphone a reminder message will flash at the bottom of the screen Figure 7 Figure 8 Step 6 After enter...

Страница 27: ...If desired you may use the results of the automated testing as a baseline and then make manual adjust ments to the crossover settings following the instructions shown on page 30 When this test is com...

Страница 28: ...press the Buttons o so that either LARGE or SMALL appears matching the appropriate description from the definitions shown above When SMALL is selected low frequency sounds will be sent only to the sub...

Страница 29: ...oofer output NOTE Although Harman Kardon strongly recom mends using two surround back speakers we recog nize that some users may only have a single surround back speaker It is possible to set up a 6 1...

Страница 30: ...er s low frequency limit or crossover point to avoid the creation of a low fre quency hole where your system will have no bass information NOTE In cases where LARGE is selected as the front channel sp...

Страница 31: ...nc Delay If you have a digital video source or a digital video dis play that causes lack of lip sync you may use the A V Sync adjust feature to delay the audio signal as it is sent to all channels as...

Страница 32: ...t the test noise circulate again and listen to see which channels sound louder than the others Using the front left speaker as a reference press the Buttons o on the remote to bring all speakers to th...

Страница 33: ...s After one input has been adjusted for Surround mode digital input if any and speaker type go back to the INPUT SETUP line on the MASTER MENU Figure 1 and enter the settings for each input that you w...

Страница 34: ...available inputs As the input is changed the AVR 340 will auto matically switch to the digital input if selected component video input surround mode output levels and night mode status as well as any...

Страница 35: ...m the front panel first press the Surround Mode Group Selector Button 7 until the desired major surround mode group such as Dolby DTS or Logic 7 is select ed Next press the Surround Mode Selector Butt...

Страница 36: ...that extracts the maximum surround information Logic 7 Music from either surround encoded programs or conventional stereo material Depending on the number of speakers in use Logic 7 Enhance and the se...

Страница 37: ...ode should be selected when your listening position is greater than five feet from the speakers 5 Channel Stereo This mode takes advantage of multiple speakers to place a stereo signal at both the fro...

Страница 38: ...tereo audio output from a DVD to the DVD Audio Inputs Z on the rear panel when you connect the source s digital outputs If you have not already configured an input for a digital source using the on sc...

Страница 39: ...may be connected directly to the digital audio output of your CD player Connections may be made to either the rear panel Optical or Coaxial Inputs fif or the front panel Digital Inputs To listen to a...

Страница 40: ...ro Logic IIx Movie DTS Pro Logic IIx Music DTS ES Discrete DTS ES Discrete DTS DTS Stereo DTS Pro Logic IIx Movie DTS Pro Logic IIx Music For incoming Dolby Digital signals the following modes are ava...

Страница 41: ...l sources are playing you may not be able to select some of the analog surround modes such as Dolby Pro Logic II or IIx Dolby 3 Stereo Hall Theater or Logic 7 Refer to the tables on page 40 for more i...

Страница 42: ...the C Weighting Slow scale and adjust the volume until the meter reads 75dB Once the reference level has been set press the Channel Select Button m and FRONT L LEVEL will appear in the Lower Display...

Страница 43: ...ightness without turning the unit off press the Dim Button h as needed until the displays are on In addition to lowering the brightness of the displays or turning them off completely you may wish to h...

Страница 44: ...ls b When the desired volume level to be used at turn on is reached make a note of the setting as it appears in the lower third of the video screen or in the Lower Display Line A typical volume level...

Страница 45: ...CED SELECT menu on screen press the Buttons n so that the cursor is pointing to the DEFAULT SURR MODE line Press the Buttons o so that OFF appears The unit will now switch to the last selected mode in...

Страница 46: ...ton o so that ON appears If you do not wish to turn the system on at this time or to proceed to the next step press the Button n once so that the on screen cursor is next to the MULTI IN line At the M...

Страница 47: ...all of the remote rooms do not have an IR sensor or to take control over the remote room without actu ally being in that room In addition to using the MULTI ROOM menu as shown on the previous page you...

Страница 48: ...emote 2 Press the Input Selector e for the type of product to be entered e g VCR TV and the Mute Button f at the same time Hold both buttons until the red light under the Input Selector e stays lit an...

Страница 49: ...ns Once the AVR 340 s remote has been programmed for the codes of other devices press the appropriate Input Selector e to change the remote from controlling the AVR 340 to controlling the additional p...

Страница 50: ...ellite receiver while the remote is set to control the VCR first press the VID 1 VCR Input Selector Button e and the Mute Button f at the same time Next release them and press the Volume Down Button b...

Страница 51: ...InputSelect 6 8Ch InputSelect 6 8Ch InputSelect 6 8Ch InputSelect 6 8Ch InputSelect 6 8Ch InputSelect 6 8Ch InputSelect 6 8Ch InputSelect 15 DMP The Bridge DMP TheBridge DMP Select TheBridge DMP Selec...

Страница 52: ...6 M4 Macro 4 Macro 4 Macro 4 Macro 4 Macro 4 Macro 4 Macro 4 Macro 4 57 Dolby Surround Dolby Modes 58 DTS Surround DTS Digital Modes 59 DTS Neo 6 DTS Neo 6 Select 60 Logic 7 Logic 7 Select 61 Stereo S...

Страница 53: ...N 045 132 CURTIS MATHES 123 128 132 CXC 045 DAEWOO 045 087 102 105 106 108 111 114 116 119 127 128 132 DAYTRON 128 132 DIGI LINK 200 DYNASTY 045 DYNATECH 063 ELECTROHOME 115 132 EMERSON 045 123 128 13...

Страница 54: ...28 132 148 PHILIPS 033 034 035 036 123 128 132 145 148 PIONEER 024 123 128 PORTLAND 128 132 PROSCAN 133 PROTON 059 122 128 132 165 QUASAR 032 087 RADIO SHACK 045 128 132 180 196 197 RCA 021 115 123 12...

Страница 55: ...and Setup Code Number TEKNIKA 045 069 115 123 128 132 TELERENT 069 TERA 156 THOMSON 190 191 TMK 128 TOSHIBA 063 129 202 TOTEVISION 132 VIDEO CONCEPTS 160 VIDTECH 128 WARDS 069 128 132 148 YAMAHA 123 1...

Страница 56: ...GO VIDEO 113 GOLDSTAR LG 018 107 HARMAN KARDON 018 049 HITACHI 040 048 JC PENNEY 018 045 JENSEN 048 JVC 018 048 111 132 KENWOOD 020 048 LLOYD 040 LXI 020 040 MAGIN 045 MAGNAVOX 040 MARANTZ 018 MEMOREX...

Страница 57: ...0 SCOTT 110 112 SEARS 017 020 SHARP 129 156 SONY 080 129 SOUNDESIGN 040 SYLVANIA 040 SYMPHONIC 040 TANDY 017 040 TASHICO 134 TATUNG 048 TEAC 040 048 TEKNIKA 040 THOMAS 040 TiVo 002 003 004 005 007 008...

Страница 58: ...ON 001 002 025 054 190 HITACHI 093 INKEL 216 JC PENNEY 098 147 JENSEN 153 JVC 176 195 196 KENWOOD 030 062 078 079 148 151 176 178 181 LOTTE 108 LUXMAN 077 102 LXI 164 MAGNAVOX 039 113 MARANTZ 058 084...

Страница 59: ...11 058 085 086 106 107 110 121 137 146 154 THETA DIGITAL 039 TOSHIBA 013 074 097 151 155 173 VECTOR RESEARCH 087 VICTOR 120 130 WARDS 095 YAMAHA 019 031 053 061 135 169 YORK 166 Manufacturer Brand Set...

Страница 60: ...JERROLD 454 468 484 KATHREIN 410 LEGEND 453 MACOM 317 365 369 370 371 MAGNAVOX 461 473 MEMOREX 453 NEXTWAVE 423 NORSAT 373 OPTIMUS 466 PACE DSS 487 PANASONIC 366 469 PANASONIC DBS 457 PANSAT 420 PERS...

Страница 61: ...I 001 011 017 096 097 GC ELECTRONICS 113 GEMINI 032 060 GENERAL 210 GENERAL INSTRUMENT 210 GOODMIND 112 HAMLIN 056 099 100 101 117 175 208 HITACHI 001 188 JASCO 111 JERROLD 001 002 011 017 073 096 09...

Страница 62: ...203 221 222 SEAM 121 SIGNATURE 001 188 SPRUCER 053 081 177 189 STARCOM 002 011 163 STARGATE 120 TANDY 024 TELECAPATION 028 TEXSCAN 036 TFC 122 TIMELESS 123 TOCOM 170 205 UNITED CABLE 011 UNIVERSAL 03...

Страница 63: ...e play for DVD display and digital audio stops Check that Digital Input is selected In addition to the items shown above additional information on troubleshooting possible problems with your AVR 340 o...

Страница 64: ...iven Dimensions Product Shipping Width 17 3 inches 440mm 18 25 inches 464mm Height 6 6 inches 168mm 10 5 inches 267mm Depth 15 inches 381mm 22 inches 559mm Product Shipping Weight 30 6 lb 13 9kg 35 6...

Страница 65: ...m Operation 9 29 46 47 Multiroom Setup Menu 46 Mute 6 11 14 15 35 46 48 49 50 51 63 Night Mode 12 24 32 34 41 51 On Screen Display 5 6 13 21 22 23 24 30 31 32 34 35 38 47 Operation 34 42 Optical Digit...

Страница 66: ...e In Out Bass Treble If the GLOBAL setting was selected you need only indicate speaker sizes for one input Make sure the input source device is connected to the AVR using analog audio inputs as the AV...

Страница 67: ......

Страница 68: ...250 Crossways Park Drive Woodbury New York 11797 www harmankardon com 2006 Harman International Industries Incorporated All rights reserved Part No CQX1A1026Z 3 06...

Отзывы: