background image

3

Performa

 Winch 

80.3 STP

Installation and Maintenance Manual - Mod.A

Introduction

This manual gives technical information on winch installation and maintenance, including
disassembling and reassembling.
This information is DESTINED EXCLUSIVELY for specialised personnel or expert users.  
Installation, disassembling and reassembling of the winch by personnel who are not experts may 
cause serious damage to users and those in the vicinity of the winch.
Harken

®

 accepts no responsibility for defective installation or reassembly of its winches.

In case of doubt the Harken

®

 Tech Service is at your disposal at [email protected]

This Manual is available only in English. If you do not fully understand the English language, do 
not carry out the operations described in this Manual.

Technical characteristics

Power ratio 

Gear ratio

1st speed

8,01 : 1

2,76 : 1

2nd speed

28,85 : 1

9,94 : 1

3rd speed

93,24 : 1

32,12 : 1

The theoretical power ratio does not take friction into account.

Weights

ST version

Weight (Kg)

22,7


Maximum working load

WARNING!

The maximum working load (MWL) for the 80.3 ST Performa™ Winch is 4500 Kg (9921 lb)
Subjecting the winch to loads above the maximum working load can cause the winch to fail or 
pull off the deck suddenly and unexpectedly during high loads causing severe injury or death.

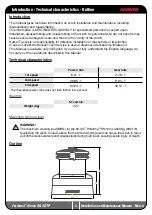
Outline

Introduction - Technical characteristics - Outline

Li

ne

 e

nt

ry

 h

ei

g

ht

Содержание Performa Winch 80.3 STP

Страница 1: ...Performa Winch 80 3 STP Installation and Maintenance Manual MRPW A...

Страница 2: ...3 Maximum working load 3 Outline 3 Installation 4 Installation Procedure 5 Positioning the self tailing arm 8 Maintenance 9 Washing 9 Maintenance table 9 Disassembly procedure 9 Exploded view with mai...

Страница 3: ...at your disposal at techservice harken it This Manual is available only in English If you do not fully understand the English language do not carry out the operations described in this Manual Technica...

Страница 4: ...se severe injury or death Consult the yard that built the boat in the case of doubt over the correct positioning of the winch WARNING Failure to use the correct number and type of mounting fasteners o...

Страница 5: ...Hexagon Head HH cap screws Tools needed One medium flat bladed screwdriver A number six hex key Rags To identify the various parts refer to the exploded view at the end of this Manual Torque to apply...

Страница 6: ...Mod A 6 Unscrew the three screws n 43 20 Nm 177 lb in 9 Slide out the assy flange n 19 8 Unscrew the six screws n 23 7 Slide out the drum n 41 and the roller bearing n 17 5 Remove the stripper arm n 4...

Страница 7: ...7 Performa Winch 80 3 STP Installation and Maintenance Manual Mod A 12 Unscrew the six screws n 22 20 Nm 177 lb in 13 Slide out the drum support n 15 11 Slide out the roller bearing n 18...

Страница 8: ...holes with a suitable marine sealant E Remove the excess adhesive sealant from the holes and base drainage channels F Reassemble the winch following the steps in Installation procedure page 5 in the r...

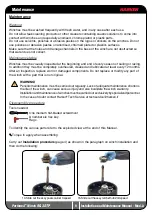
Страница 9: ...mpletely overhauled cleaned and lubricated at least every 12 months After an inspection replace worn or damaged components Do not replace or modify any part of the winch with a part that is not origin...

Страница 10: ...enance Manual Mod A 16 Remove the washer n 10 17 Slide out roller bearings n 2 and gear n 13 18 Remove the roller bearing n 2 and the washer n 14 19 Remove the roller bearing n 2 and the washer n 10 2...

Страница 11: ...lide out the assy pinion n 9 23 Remove the gear n 4 24 Remove the washer n 3 25 Remove the roller bearing n 2 26 Remove the central shaft n 24 and the spacer n 27 27 Remove washers n 25 and n 26 Impor...

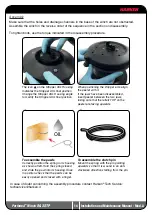
Страница 12: ...c parts in fresh water Once you have done this dry the parts with cloths that do not leave residue Inspect gears bearings pins and pawls for any signs of wear or corrosion Carefully check the teeth of...

Страница 13: ...n grease where indicated above Apply Harken grease 1 on assy socket screw 2 on drum gear NOTICE On every gear and every component that must be greased apply Harken grease with a brush in a proper quan...

Страница 14: ...ition When positioning the stripper arm align the peeler with it If the jaws have been disassembled insert peeler between the two jaws taking care that the letters TOP on the peeler are facing upwards...

Страница 15: ...for which the parts are required The serial number of the winch is printed on a plate on the drum support of the winch Headquarters Harken Inc 1251 East Wisconsin Avenue Pewaukee Wisconsin 53072 3755...

Страница 16: ...16 Performa Winch 80 3 STP Installation and Maintenance Manual Mod A 41 46 44 17 40 31 19 43 30 42 16 15 23 22 18 45 47 47 Exploded view 1 2...

Страница 17: ...17 Performa Winch 80 3 STP Installation and Maintenance Manual Mod A 47 47 1 25 26 24 10 3 8 11 7 4 14 2 27 5 28 9 32 29 37 20 38 36 39 21 10 2 6 7 12 7 6 8 13 2 10 6 35 34 33 2 Exploded view 2 2...

Страница 18: ...x 26x1 5 26 1 S402050004 Washer 25 2x 61x2 4 27 1 S405860080 Spacer 28 1 1 A94055700 S455420081 Assembly Pinion Z14 Pinion Z14 Bushing 24 5x 28 5x27 29 1 S405620004 Hub 2nd ratchet Pos Q ty Code Descr...

Отзывы: