background image

11

HARDI

®


FOAM MARKER STANDARD VERSION

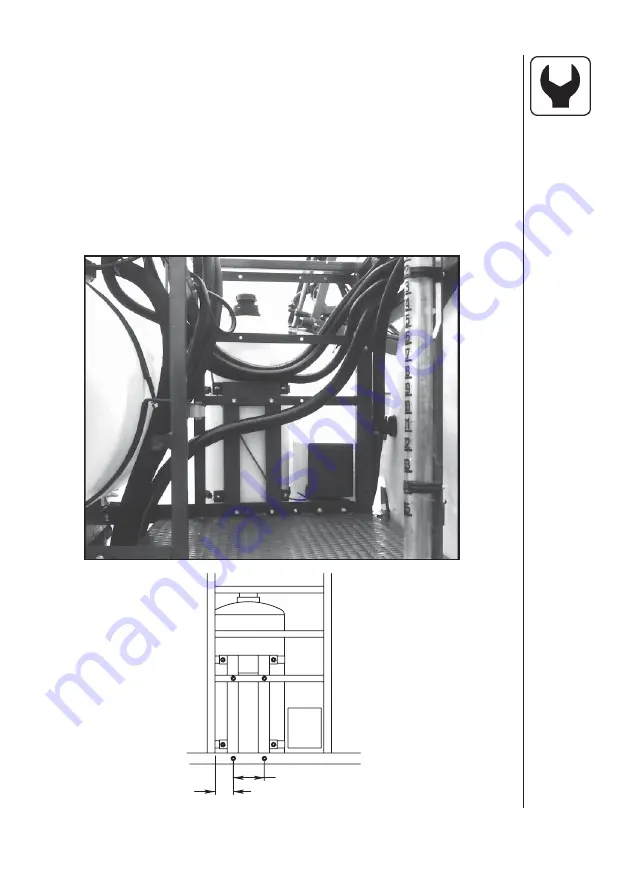
1. Locate and drill (2) 11/32” holes for tank mounting bracket by using the  
  measurements shown in (

Fig. 6

).


2. Position tank mounting bracket with bottom edge fl ush with the lower    
  edge of platform. Clamp into position and mark hole location for top
   bolts using previously drilled holes in bracket as a template. 
  Drill (2) 11/32” holes.


3. Install and tighten all bolts.

6.1 HC 650M, 950, 950M, and Twin 650, 950

Fig. 6

6.0 MOUNTING THE TANK BRACKET

2’’ (50mm)

7-7/8“ (200mm) - 20 Gallon
5-1/2" (140mm) - 10/15 Gallon

Содержание FOAM MARKER Standard

Страница 1: ...ARDI reserves the right to make changes in design material or specification without notice thereof HARDI and other product names are trademarks of HARDI Inc in the U S and in other countries FOAM MARKER Standard Version Operator s Manual ...

Страница 2: ...Navigator 575 1100 16 6 6 Delta 3 PT 16 7 0 MOUNTING THE TANK 17 7 1 All Tanks except New Navigator 17 7 2 New Navigator 18 8 0 MOUNTING THE COMPRESSOR 20 8 1 HC 650M 950 950M and Twin 650 950 20 8 2 Navigator 550 800 1000 550M 800M 1000M 21 8 3 Commander 750 875 1200 Twin Force 21 8 4 Commander plus 750 1200 Twin Force 22 8 5 New Navigator 575 1100 23 8 6 Delta 3 PT 24 9 0 INSTALLATION OF HOSES 2...

Страница 3: ... s Manual before using your equipment You will find many helpful hints as well as important safety and operation information Some of the features on your HARDI Foam Marker were suggested by growers There is no substitute for on farm experience and we invite your comments and suggestions Please address your correspondence to the Service Manager at one of these branches Sincerely Tom L Kinzenbaw Pre...

Страница 4: ...4 HARDI FOAM MARKER STANDARD VERSION Foam Marker Schematic Fig 1 Control Box Compressor Box 12V Foam Solution Tank Foam Dropper Foam Generators 12V Fuse Foam Dropper ...

Страница 5: ...tion Valve C White Gray Pair w Green Tie To Right Solution Valve D Black Gray Pair w Yellow Tie To Right Air Valve E Wire Bundle w Blue Tie To 26004103 Cable F 26004103 Cable Orange wire to White Terminal of Compressor Motor Red wire not used All other wires to same colored wires of Wire Bundle E G Single Blue Wire To Black Terminal of Compressor Motor STANDARD FOAMER MODULE 26004003 26004103 CABL...

Страница 6: ...s air to the foam generator and also pressur izes the solution tank to force foam solution out to the foam generator The Control Box has one switch and one adjustable knob The adjust able knob is for controlling the frequency of foam drops The switch is for on off and alternating foam drops between left and right hand sides of the sprayer The standard version of the HARDI Foam Marker is designed t...

Страница 7: ...working on or near the PTO shaft or servicing or cleaning the driven machine put the PTO lever in the DISENGAGE position and STOP the engine CAUTION Foam Marker tank contents are under pressure Open fill caps slowly and allow air pressure to be released before removing the cap Fig 3 NOTE Replace only with vented HARDI replacement cap 10453603 Tank Decal Fig 3 CAUTION CONTENTS UNDER PRESSURE OPEN C...

Страница 8: ...ad of the power supply cable and plug into the male plug Fig 4 Extension harnesses are available 3 Route wire harness from Control Box down to the double lead of the power supply cable and plug into the female plug Note Make sure that the wire harness will not interfere with any operations of the tractor or sprayer 4 Route power cable to power supply Section 3 2 FOAM MARKER SCHEMATIC Fig 4 3 0 INI...

Страница 9: ...n to assure that the power supply connection is clean of dirt or corrosion and that the terminal connections are tight and secure for optimum Foam marker operation ORANGE WIRE POSITIVE BATTERY TERMINAL BLACK WIRE NEGATIVE BATTERY TERMINAL CAUTION Reversed polarity will blow fuse and may cause damage to the internal circuitry If the power supply cable needs to be lengthened the cable size should no...

Страница 10: ...AM CONCENTRATE Note Foam concentrate needs to be stored in a frost free place and shaken well before using If frozen raise to room temperature thaw completely and thoroughly mix prior to use CAUTION FOAM MARKER TANK CONTENTS ARE UNDER PRESSURE 1 Remove fill cap on Foam Marker tank Open fill cap slowly and allow air pressure to be released before removing the cap completely 2 Fill tank 1 2 full of ...

Страница 11: ...ting bracket with bottom edge flush with the lower edge of platform Clamp into position and mark hole location for top bolts using previously drilled holes in bracket as a template Drill 2 11 32 holes 3 Install and tighten all bolts 6 1 HC 650M 950 950M and Twin 650 950 Fig 6 6 0 MOUNTING THE TANK BRACKET 2 50mm 7 7 8 200mm 20 Gallon 5 1 2 140mm 10 15 Gallon ...

Страница 12: ...50 800 1000 550M 800M 1000M 1 Locate 4 mounting holes on side rail Fig 7 2 Position tank mounting bracket so that the mounting holes line up with holes in side rail 3 Install and tighten all bolts Fig 7 20 Gallon Mounting holes 10 15 Gallon Mounting holes ...

Страница 13: ... according to Fig 9 for 20 Gallon tanks Fig 11 for 10 15 Gallon tanks Clamp into position and mark hole location for the remaining bolts using previ ously drilled holes in bracket as a template Drill 2 11 32 holes 3 Install and tighten all bolts Fig 8 20 gallon Tank Mounting Bracket Note Twin Force only If the Hydraulic Flow Valve mounted underneath the platform needs to be moved a bracket 161379 ...

Страница 14: ...RKER STANDARD VERSION 2 X 11 32 5 1 2 140 8 1 4 210 5 1 2 140 1 3 16 30 1 3 8 35 Fig 10 10 15 gallon Tank Mounting Bracket Fig 11 10 15 gallon Tank Mount Bracket Installation 6 3 Commander 750 875 1200 Twin Force cont ...

Страница 15: ...ft edge of the tank mounting bracket with the left edge of the platform and drill three 7 16 dia holes as shown in Fig 12 2 Drill middle hole first and then use the tank mounting bracket as a template for the remaining two holes 3 Install and tighten all bolts Fig 12 3 3 4 95mm TANK FRAME HOLES ...

Страница 16: ...to the Delta frame using two M16x110mm bolts and locknuts A as shown in Fig 13 3 Mount the tank bracket to the bottom bracket using three M10x35mm bolts and locknuts B as shown in Fig 13 A B Fig 13 6 5 New Navigator 575 1100 1 The Foam Marker Tank on the New Navigator sprayers is mounted directly to the frame with tank straps See Section 7 2 for detailed instructions ...

Страница 17: ...Strap tank into bracket using black nylon straps and nuts supplied and tighten nuts at this time 3 Clean the area where the HARDI logo is to be placed and attach it to the tank in the location shown Fig 14 Note Make sure no air bubbles are present under decal Fig 14 TOP VIEW TANK BRACKET TANK BULKHEAD FITTING 7 1 All Tanks except New Navigator ...

Страница 18: ...1 2 hose barb and clear sight gauge hose to the Filler Neck until after the tank is secured to the frame 4 Locate the slots for the tank straps underneath the frame Fig 16 Slide the folded end of the metal tank straps through the slots and se cure with the bolts washers and nuts supplied in the kit Fig 15 METAL TANK STRAP FILLER NECK O RING CLEAR SIGHT GAUGE HOSE M8X20mm BOLTS 4 FOAM MARKER TANK M...

Страница 19: ...een the tank and metal tank straps before tightening Note The metal tank straps have Break Off sections to allow for differ ent lengths Break off any sections not needed by bending back and forth Grind the sharp edges smooth and apply paint to the bare metal before securing with T Bolts 6 Install the 1 2 hose barb into the bottom of the Filler Neck using a thread sealant to prevent leakage Fig 15 ...

Страница 20: ...les as shown in Fig 17 2 With supplied hardware install the compressor mounting bracket using the holes previously drilled in step 1 3 Place the Compressor Box on the mounting bracket with hose fittings facing away from the sprayer platform 8 1 HC 650M 950 950M and Twin 650 950 1 1 2 38 mm 3 1 8 79 mm ...

Страница 21: ... 1000 550M 800M 1000M 1 Locate the compressor mounting holes on the front face of the sprayer platform Fig 19 If necessary drill holes as shown Fig 19 2 Install the mounting bracket using the supplied hardware 3 Place the Compressor Box on the mounting bracket with hose fittings facing away from the sprayer s center line Fig 19 8 3 Commander 750 875 1200 Twin Force Fig 19 Note TWIN FORCE ONLY To c...

Страница 22: ...rill two 7 16 dia holes for mounting the Compressor Box to the inside of the platform 2 Place the Compressor Box on the mounting bracket with hose fittings facing the rear of the sprayer 8 4 Commander plus 750 1200 Twin Force 1 25mm 3 1 2 90mm 5 3 8 135mm COMPRESSOR BRACKET HOLES Fig 20 ...

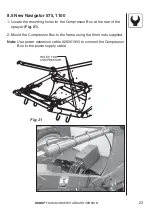
Страница 23: ...the Compressor Box at the rear of the sprayer Fig 21 2 Mount the Compressor Box to the frame using the 6mm nuts supplied Note Use power extension cable 26001903 to connect the Compressor Box to the power supply cable 8 5 New Navigator 575 1100 HOLES FOR COMPRESSOR Fig 21 ...

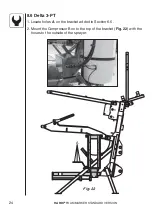
Страница 24: ...FOAM MARKER STANDARD VERSION 1 Locate holes A on the bracket added in Section 6 5 2 Mount the Compressor Box to the top of the bracket Fig 22 with the hoses to the outside of the sprayer 8 6 Delta 3 PT A Fig 22 ...

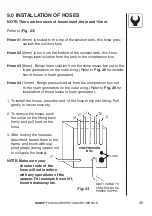
Страница 25: ...tor Hose 4 10mm Brings pressurized air from the compressor box out to the foam generators on the outer wing Refer to Fig 26 for installation of these hoses in foam generator 1 To install the hoses press the end of the hose firmly into fitting Pull gently to insure security 2 To remove the hoses push the collar on the fitting back firmly and pull hard on the hose 3 After routing the hoses as descri...

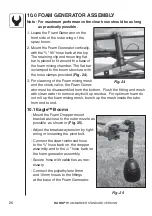
Страница 26: ...mesh and the check valve the Foam Gener ator must be disassembled from the bottom Flush the fitting and mesh with clean water to remove any built up residue For optimum foam do not roll up the foam mixing mesh bunch up the mesh inside the tube from end to end 10 1 Eagle Booms Mount the Foam Dropper mount bracket as close to the outer nozzle as possible as shown in Fig 25 Adjust the breakaway tensi...

Страница 27: ...27 HARDI FOAM MARKER STANDARD VERSION SPL MB SB BOOMS TWIN FORCE BOOMS FORCE BOOMS EAGLE BOOMS FOAM MIXING TUBE PRESSURIZED AIR SUPPLY FOAM SOLUTION HOSE FOAM MIXING MESH FOAM GENERATOR ASSEMBLY Fig 26 ...

Страница 28: ...0 hose barb on the Foam Dropper assembly and to the 3 4 hose barb on the Foam Genera tor assembly Secure the hose with cable ties as necessary Connect the polyethylene 8mm and 10mm hoses to the fittings at the base of the Foam Generator 10 3 Force or Twin Force Booms A mount tab A for the Foam Dropper as sembly is fixed to the outer edge of the breakaway frame The Foam Dropper assembly is to be re...

Страница 29: ...r system to keep components from freezing The system will have to be flushed thor oughly with clean water to restore maximum performance to the Foam Marker 6 Clean the tank filter every 50 hours of operation See instructions and diagram below Fig 29 A Remove the U clip from the bottom tank fitting and pull the foam line fitting out B Using a needle nose pliers reach into the tank fitting grabbing ...

Страница 30: ...Solution tank lid not sealing i Check valve in tank air inlet plugged or fitted in backwards j Foam generators plugged k Foam Marker lines assembled incorrectly Foam to one boom a Poor wiring connections tip only b Faulty control module c Defective control box d Foam generator plugged e Kinked hoses Will not make a Air leak in pressure line enough foam b Tank filter partially plugged c Not enough ...

Страница 31: ... Dropper screen missing Foam too wet a Air leak in pressure line b Not enough foam concentrate c Control box adjusted all the way down d Solenoid valve not working e Faulty control module f Kinked hoses Keeps blowing fuses a Reversed polarity b Short in electrical wire c Faulty compressor d Faulty control module e Poor wiring connections f Incorrect fuse PROBLEM CAUSE 12 0 TROUBLE SHOOTING cont ...

Страница 32: ...mmon carrier and under no circumstances within or without the warranty period will HARDI be liable for damages of loss of use or damages resulting from delay or any consequential damage 2 We cannot be held responsible for loss of livestock loss of crops loss because of delays in harvesting or any expense or loss incurred for labor supplies substitute machinery rental for any other reason or for in...

Страница 33: ...actured 10 The judgement of HARDI in all cases of claims under this warranty shall be final and conclusive and the purchaser agrees to accept its decisions on all questions as to defect and to the exchange of any part or parts 11 No employee or representative is authorized to change this warranty in any way or grant any other warranty unless such change is made in writing and signed by an officer ...

Страница 34: ...34 HARDI FOAM MARKER STANDARD VERSION 14 0 NOTES ...

Страница 35: ...35 HARDI FOAM MARKER STANDARD VERSION NOTES ...

Страница 36: ...36 HARDI FOAM MARKER STANDARD VERSION NOTES ...

Отзывы: