


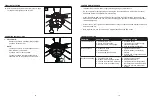


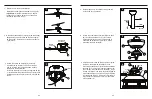


6. Instale el tornillo que retiró anteriormente (paso 4,
página 26) y apriete firmemente todos los tornillos.
6
Tornillo
I
H
B
EE
H
B
EE
4
26
27
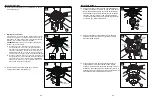
INSTALACIÓN FINAL
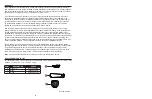
7. Afloje dos tornillos preensamblados en la
bandeja del kit de iluminación (I). Retire y guarde
el tornillo preensamblado restante.
8. Conecte el enchufe macho del ventilador al enchufe
hembra del kit de iluminación (J). Alinee los dos
orificios principales del kit (J) con dos tornillos en
la bandeja del kit de iluminación (I). Gire el kit de
iluminación (I) hasta fijarlo en su lugar.
INSTALACIÓN FINAL
5. Jale el conector de 9 clavijas desde el ensamble del
motor del ventilador (H) a través del orificio central
de la bandeja del kit de iluminación (I). Alinee los
dos chaveteros en la placa de soporte (I) con dos
tornillos en el soporte negro debajo del ensamble
del motor del ventilador (H). Gire la bandeja del kit
de iluminación (I) en dirección de las manecillas del
reloj hasta fijarla en su lugar.
4. Afloje dos tornillos preensamblados de la placa de
soporte. Retire y guarde el tornillo preensamblado
restante.
7
8
Ranuras
Soporte
negro
H
I
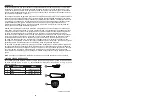
9
9. Instale el tornillo que retiró anteriormente (paso 7,
página 27) y apriete firmemente todos los tornillos.
J
I
Tornillo
5
Tornillo
(retire)
I
Tornillos
(afloje)
Tornillo
(retire)
Placa de
soporte
Tornillos
(afloje)
Página 12


