12
FINAL INSTALLATION
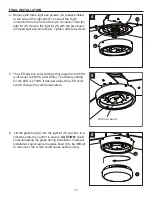
7. Remove the battery cover from the back of the remote
found in remote pack (L). Insert the battery from
remote pack (L) into the remote; ensure polarity of
battery matches the polarity indicated in the battery
compartment -- positive (+) to positive (+) and
negative (-) to negative (-). Replace the battery cover
and press the high fan speed button on the remote to
ensure the remote turns on the fan.
Note:
If remote does not turn on fan, see
TROUBLESHOOTING (page 15).
8. If desired, the wall bracket in remote pack (L) can
be installed to a wall using the provided mounting
screws. Store the remote on the wall bracket when
not in use.
9. Turn on power supply to the fan.
Assembly is complete.
7
8
Mounting Bracket
Mounting
Bracket
Mounting
Screw
9
Battery
Battery
Compartment
LED Indicator
Fan Power

