20
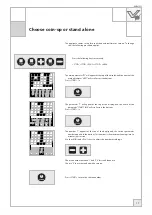
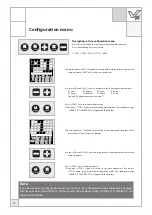
Navigating in the confi guration menu
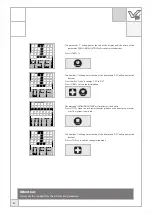
You must enter a code in order to enter the confi guration menu.
Press the following keys successively:
<STOP> <STOP> <PLUS> <STOP> <MIN>
Note:
If you do not press any key for 60 seconds, you will exit the confi guration mode automatically. Changes
that have not been saved (“SAVED”) will be ignored. The standby message “LUXURA, IT’S YOUR BODY” will
appear on the display.
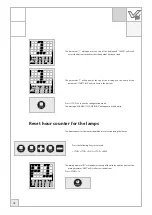
The main parameter “P1” will appear at the top of the display, and the name of the
main parameter “UNIT” will scroll across the bottom.
The fi rst parameter “1” will appear at the top of the display and the name of the
parameter will scroll across the bottom.
Use the <MIN> and <PLUS> keys to navigate to the following main parameters:
P1. Unit
P2. Display
P3. Qsens
P4. Xsens
P5. Facial
P6. Body fan
P7. Audio
P8. Coin
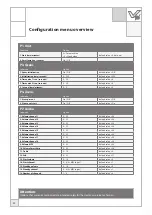
(see also “Confi guration menu overview” )
Use the <MIN> and <PLUS> keys to navigate to the various parameters within the
main parameter.
Press <START> 1x to select a main parameter.
(If you press <STOP> 1x you will exit the confi guration mode. The standby message
“LUXURA, IT’S YOUR BODY” will appear on the display.)
Press <START> to select the parameter.
(If you press <STOP> 1x you will return to the main parameters. If you press
<STOP> again, you will exit the confi guration mode. The standby message
“LUXURA, IT’S YOUR BODY” will appear on the display.)
Configuration menu
Note:
If you do not press any key for 60 seconds, you will exit the confi guration mode automatically. Changes
that have not been saved (“SAVED”) will be ignored. The standby message “LUXURA, IT’S YOUR BODY” will
appear on the display.
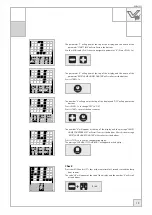
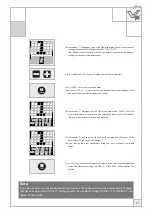
The parameter “1” will appear at the top of the display and the current parameter
setting will appear at the bottom (number / “ON” / “OFF”).
(see “Confi guration menu overview” for the default, minimum and maximum
settings for the adjustable parameters)
Use the <MIN> and <PLUS> keys to adjust the number accordingly.
Press <START> to save the chosen number.
(If you press <STOP> 1x, you will delete any changes that may have been made
and you will return to the parameter selection.)
The parameter “1” will appear at the top of the display and “SAVED” will scroll
across the bottom to confi rm that the setting has been saved. You will now
return to the parameter selection automatically.
The parameter “1” will appear at the top of the display and the name of the
parameter will scroll across the bottom.
You can change the other parameters using the same procedure described
above.
Press <STOP> 2x to cancel the parameter selection and to exit the confi guration
mode. The standby message “LUXURA, IT’S YOUR BODY” will appear on the
display.
Содержание Luxura V10
Страница 10: ...10 Decorative lighting ...
Страница 35: ...35 DEUTSCH Dekorative Beleuchtung ...
Страница 53: ...53 DEUTSCH ...
Страница 61: ...61 NEDERLANDS Sierverlichting ...
Страница 79: ...79 NEDERLANDS ...
Страница 87: ...87 FRANÇAIS Eclairage décoratif ...
Страница 105: ...105 FRANÇAIS ...
Страница 109: ...109 3 4 ...
Страница 110: ...110 5 6 8x 5 mm ...
Страница 111: ...111 7 11 8 8 11 12 ...
Страница 112: ...112 8 ...
Страница 113: ...113 9 ...
Страница 114: ...114 10 ...
Страница 115: ...115 11 ...
Страница 116: ...116 12 5 mm ...
Страница 118: ...118 14 ...
Страница 119: ...119 15 ...
Страница 123: ...123 19 15 2 x 19 x 15 ...
Страница 124: ...124 20 ...
Страница 126: ...126 22 ...
Страница 127: ...127 23 SENS SENS SENS SENS SENS SENS SENS SENS SENS SENS SENS SENS SENS SENS SENS SENS SENS SENS SENS SENS SENS SENS ...
Страница 128: ...128 24 A B C SENS SENS SENS SENS SENS SENS SENS SENS SENS SENS SENS SENS SENS SENS SENS SENS ...
Страница 130: ...130 26 ...
Страница 132: ...132 28 29 4x 12 x 12 ...
Страница 133: ...133 30 A A 4x 4x 4x A ...
Страница 135: ...135 32 7x 4x ...
Страница 136: ...136 33 34 ...
Страница 137: ...137 34 35 11x 4x 35 ...
Страница 138: ...138 36 37 2x 98 x 110 α β α β α β α β α β α β α β α β ...
Страница 139: ...139 38 Royal Red Pearl White 38 39 42 ...
Страница 140: ...140 39 2 x ...
Страница 141: ...141 40 ...
Страница 143: ...143 42 3x ...
Страница 144: ...144 43 44 45 44 52 ...
Страница 145: ...145 45 46 ...
Страница 146: ...146 47 48 ...
Страница 147: ...147 49 ...
Страница 148: ...148 50 4x 4 0 x 12 ...
Страница 149: ...149 51 ...
Страница 150: ...150 52 ...
Страница 151: ...151 53 ...
Страница 152: ...152 Dimensions Abmessungen Afmetingen Dimensions ...
Страница 154: ...154 ...
Страница 155: ...155 Electrical diagrams Schaltpläne Elektrische schema s Schéma électrique ...
Страница 160: ...www hapro com 2008 Hapro International 18365 rev 06 ...


