background image


11 - 20


Hanskamp AgroTech B.V. (the Netherlands) 

www.hanskamp.nl/en


Pipefeeder 

EN 

24VAC & 12

-

24VDC 

Calibration 

10. 

The PipeFeeder is calibrated by allowing the feeding computer to emit a pulse ten 
times. You then weigh the issued feed, divide this by 10 and enter this value into 
the feeding computer. Repeat this procedure every month and also after changing 
the feed type.  


Important!    

 

The PipeFeeder is only intended for cylindrical concentrate with a 


diameter of Ø4 to Ø6 mm. The manufacturer cannot guarantee 


proper functioning for other shapes or dimensions.  

 

During the installation of the PipeFeeder ensure the pressure of 


the concentrate on the dosing unit is greater than 50kg.  

 

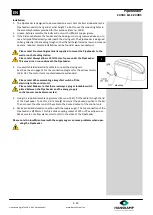
Never insert your hand into the bottom of the PipeFeeder when it 
is still in operation or is connected to the electrical  


     power supply (pic. 5).The size of the exit point is limited by a  

                           bar to prevent cuts. 


Maintenance


1. 

Check the PipeFeeder installation daily for faults and wear. Do this by means of a 


control test on the feed motors. Make sure that the vibrations and noise caused by 


the PipeFeeder are reduced as much as possible 

2. 

If the PipeFeeder needs maintenance and is connected to the controls ensure that 


the PipeFeeder cannot start unexpectedly. Make sure there is no voltage on the 


installation! To do this plug the power supply off at the control unit of the dosing 


motor. 

3. 

It is recommended to have repairs and maintenance carried out by a specialist. 

4. 

To avoid electric shocks or getting trapped in the feed auger never open the hous


ing when the PipeFeeder is still running. 

5. 

For the safety of all concerned the user/owner of the PipeFeeder should follow the 


advice and directions given in the installation instructions. If it is not possible to 


follow this it is the responsibility of the user and the manufacturer cannot be held 


responsible/liable for any injury or damage to or by the product. 

 
Please note! In case of maintenance make sure to always first switch off the electricity 
of the installation.  
  
Cleaning 

Clean the PipeFeeder regularly with a moist cloth. Do not spray water under the hood or 
in the stock pipe. To guarantee the equipment functions correctly make sure the exit 
point is clean and stays clean.    
 

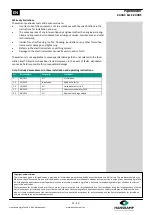
Please note! Do not spray with high pressure in or on the PipeFeeder. This can cause 
blockage.  
 
Disassembly 

In case of disassembly all parts must be separated by material type for processing 
through a suitable waste management system.  
 

Please note! In case of disassembly always switch off the electrical voltage of the instal-
lation.  


1976 Ban sticker: 

It is prohibited to spray with water. 

Содержание PipeFeeder

Страница 1: ...truction Article number 1847 Datum August 2014 Version 2 2 Translation of Original Instructions for use According to Annex 1 Chapter 1 7 4 Machine guideline 2006 42 EG Zelhem The Netherlands www hansk...

Страница 2: ...faults in this manual The recommendations are meant to serve as guidelines All instructions pictures and specifications in this manual are based on the latest information that was available at the tim...

Страница 3: ...vative PipeFeeder concentrate feeding system from Hanskamp which ensures pellets are fed precisely and silently The PipeFeeder features an ingenious anti spill system also developed by Hanskamp On ce...

Страница 4: ...of your PipeFeeder YOU must make sure that you and anyone else who is going to operate maintain or work in the vicinity of the PipeFeeder knows all the related SAFETY information in this manual YOU a...

Страница 5: ...of the electrical system and all parts of the PipeFeeder meet the local rules and regulations Replace any damaged electrical lines conduits switches and components imme diately Isolate the electrical...

Страница 6: ...electrical power supply by taking plug out of the power point and secure the plug before you clean or do maintenance on the PipeFeeder Wear protective clothing and safety goggles when you do work on t...

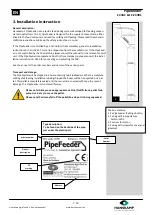
Страница 7: ...nskamp please consult the instal lation instruction no 1840 for connecting and adjusting the PCB See the annex for the order numbers and names of the various parts Transport and storage The PipeFeeder...

Страница 8: ...ht position for the sticker Remove a small portion of the foil on the back Place the sticker on the surface and press a small portion of the self adhesive layer onto the surface Carefully remove the f...

Страница 9: ...PipeFeeder This way air can run underneath the PipeFeeder 4 Use a well shielded electricity cable to connect the dosing unit See the annex on page 15 for the connection diagram for the various motors...

Страница 10: ...milking stall feeding installation in parlour and in the feeding box out of parlour 8 When installation is not completely correct the plastic part will be able to rotate freely with respect to the sta...

Страница 11: ...eeder cannot start unexpectedly Make sure there is no voltage on the installation To do this plug the power supply off at the control unit of the dosing motor 3 It is recommended to have repairs and m...

Страница 12: ...nformation given in this publication is provided for information purposes only and does not constitute an offer for sale The products supplied may differ from those illustrated No part of this publica...

Страница 13: ...fully complies with the provisions of the following di rective s Machine Directive 2006 42 EC and completely or partially meets the following essential requirements and that the rele vant technical do...

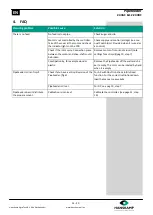
Страница 14: ...ece between the motor and drive shaft could be broken Remove motor of rotor and reinsert note settings for anti spill pag 10 step 7 Constipation by for example wood or plastic Remove the PipeFeeder of...

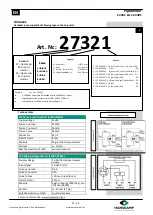
Страница 15: ...24VDC 28 rpm Anti spill Solid State 5 DV 7 1663 24VDC 28 rpm OV 8 1001 24VDC 41 rpm Anti spill DV Example Art No 27321 A 1500mm normal blue PipeFeeder with SolidState motor HighSpeed version always m...

Страница 16: ...anskamp nl en Pipefeeder EN 24VAC 12 24VDC Loose components It is possible to reorder loose components from your supplier for maintenance or for any other reason Please use the item numbers shown belo...

Страница 17: ...94 Bottom plate AC 1 1895 Angled safety plate 1 1896 Bottom plate DC HighSpeed 1 1899 Sheet section of sealed compartment 1 1902 Wall mounting bracket 129 complete 2 1903 MDPE plastic T piece 45 with...

Страница 18: ...18 20 Hanskamp AgroTech B V the Netherlands www hanskamp nl en Pipefeeder EN 24VAC 12 24VDC Installation dimensions Visit us on 10...

Страница 19: ...19 20 Hanskamp AgroTech B V the Netherlands www hanskamp nl en Pipefeeder EN 24VAC 12 24VDC...

Страница 20: ...20 Hanskamp AgroTech B V the Netherlands www hanskamp nl en Pipefeeder EN 24VAC 12 24VDC Hanskamp Arendsenweg 7 7021 PC Zelhem The Netherlands Tel 31 0 314 393 797 Fax 31 0 314 393 826 www hanskamp n...

Отзывы: