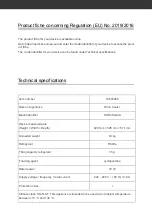
background image

Start-up

Page EN-21

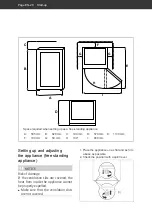
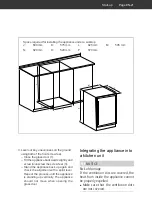
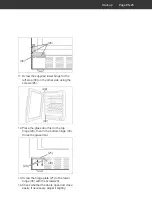
 Space required for installing the appliance under a worktop

L

M

N

O P

K

J

J: 

600 mm 

K: 

575 mm 

L: 

825 mm 

M: 

595 mm

N: 

820 mm 

O: 

520 mm 

P: 

570 mm 


3. Level out any unevenness on the ground 

using both of the front screw feet.
– Close the glass door (1).
– Tilt the appliance backwards slightly and 

screw in/unscrew the screw feet (3).

– Stand the appliance back up again and 

check the alignment with a spirit level. 
Repeat the process until the appliance 
is standing up vertically. The appliance 
should not move when opening the 
glass door.

Integrating the appliance into 
a kitchen unit

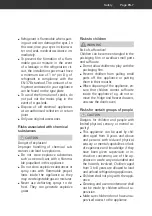
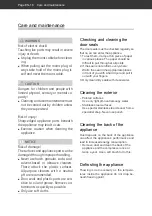
 NOTICE

Risk of damage
If the ventilation slits are covered, the 
heat from inside the appliance cannot 
be properly expelled.

Make sure that the ventilation slots 
are not covered.

Содержание HWC46GCIA

Страница 1: ...Weink hlschrank Gebrauchsanleitung Anleitung Version 2001 01313_DE_20201019 Bestell Nr 18604956 Nachdruck auch auszugsweise nicht gestattet HWC46GCIA...

Страница 2: ...uspacken DE 18 ber Klimaklassen DE 18 Geeigneten Standort w hlen DE 18 Ger t aufstellen und ausrichten Standger t DE 20 Ger t in eine K chenzeile integrieren DE 21 Grundreinigung DE 22 Ger t anschlie...

Страница 3: ...t 4 Kontrollieren Sie ob das Ger t Transport sch den aufweist 5 Sollte die Lieferung unvollst ndig sein oder das Ger t einen Transportschaden aufweisen nehmen Sie bitte Kontakt mit unserem Service auf...

Страница 4: ...stigen F higkeiten oder Un kenntnis nicht in der Lage sind das Ger t si cher zu bedienen m ssen bei der Benutzung beaufsichtigt werden Nehmen Sie keine technischen Ver nderun gen am Ger t vor Verwende...

Страница 5: ...Netzsteckers Ger t daher nur an eine gut zug ngliche Steckdo se anschlie en damit es im St rfall schnell vom Stromnetz getrennt wer den kann Falls der Netzstecker nach dem Auf stellen nicht mehr zug n...

Страница 6: ...nd zu Verlet zungen und zu Sachsch den f hren Der Anschluss an eine Zeitschaltuhr oder ein separates Fernwirksystem zur Fern berwachung und steuerung ist unzul ssig Ortsver nderliche Mehrfachsteckdo s...

Страница 7: ...r t lagern da sie z ndf hige Gas Luft Gemische bilden k nnen Zum Abtauen auf keinen Fall Abtau sprays verwenden Sie k nnen explo sive Gase bilden Risiken f r Kinder WARNUNG Erstickungsgefahr Kinder k...

Страница 8: ...nd die T r offen lassen um Schimmelbildung zu ver meiden Durch falsche Handhabung unzurei chende K hlung oder berlagerung k nnen die eingelagerten Lebensmittel verderben Bei Verzehr besteht die Ge fah...

Страница 9: ...s wird Darauf achten dass die L ftungs schlitze nicht verdeckt werden Die maximale Belastung von 16 Fla schen pro Flaschenbord nicht ber schreiten Beim Auspacken keine scharfen oder spitzen Gegenst nd...

Страница 10: ...Ger teteile Seite DE 10 Ger teteile 1 Glast r 2 Kontaktplatte 3 Schraubf e 4 L ftungsschlitze 1 3 6 5 4 2 6 7 8 5 Lichtschalter 6 Flaschenborde 7 Bedienfeld 8 LED Beleuchtung...

Страница 11: ...reich rechts f r den unteren Bereich Der Kompressor beginnt h rbar zu arbei ten und das Ger t k hlt Das Ger t ist eingeschaltet Einschalten Dr cken Sie auf die Taste 9 Ein Signalton ert nt Die Tempera...

Страница 12: ...n unteren Bereich kann nur gleich oder h her als die Temperatur im oberen Bereich eingestellt werden 1 W hlen Sie den gew nschten Innenbe reich mit der Taste 11 1 mal f r den oberen Bereich Die linke...

Страница 13: ...ie es heraus Achten Sie dabei darauf dass die Stop per 18 durch die Aussparungen 19 ge hen Einsetzen 1 Drehen Sie das Flaschenbord 6 so dass die vordere Leiste 17 und die hintere Leiste 16 nach oben z...

Страница 14: ...T r offen lassen um Schimmelbildung zu ver meiden Ger t bef llen Folgende Tipps zeigen Ihnen wie Sie Le bensmittel in Ihrem Ger t lagern k nnen um sie ber den l ngstm glichen Zeitraum best m glich auf...

Страница 15: ...tarke Temperaturschwankungen Sorgen Sie f r ausreichend Freiraum zwischen den Flaschen damit die Luft zirkulation innerhalb des Ger ts nicht be hindert wird Die Temperaturen im Ger t k nnen ansteigen...

Страница 16: ...ralen pH Wert T rdichtungen und Ger teteile aus Kunststoff sind emp ndlich gegen l und Fett Verunreinigungen m g lichst schnell entfernen Nur weiche T cher verwenden T rdichtungen kontrollieren und re...

Страница 17: ...mem Wasser und etwas Sp lmittel aus Geben Sie beim Nachwischen einige Tropfen Essig ins Wasser um Schimmel bildung vorzubeugen 7 Wischen Sie den Innenraum trocken und lassen Sie die Glast r 1 zum L ft...

Страница 18: ...en Sie das Ger t mithilfe einer Transportkarre oder einer zweiten Person 2 Packen Sie das Ger t aus und entfer nen Sie vorsichtig alle Verpackungsteile Kunststoffprofile Klebestreifen Schutzfo lien un...

Страница 19: ...d Standorte mit direkter Sonneneinstrahlung oder unmittelbar ne ben einem Ofen Herd oder Heizk rper Diese Mindestabst nde m ssen eingehal ten werden zu Elektroherden 20 cm zu l und Kohleherden 100 cm...

Страница 20: ...des Ger ts nicht richtig abgef hrt werden Darauf achten dass die L ftungs schlitze nicht verdeckt werden D E F G G I H C A B Raumbedarf bei Aufstellung als Standger t A 595 mm B 820 mm C 100 mm D 570...

Страница 21: ...Sie das Ger t wieder auf und berpr fen Sie die Ausrichtung mit einer Wasserwaage Wiederholen Sie den Vorgang bis das Ger t senkrecht ausge richtet ist Beim ffnen der Glast r darf sich das Ger t nicht...

Страница 22: ...er ein separates Fernwirksystem zur Fern berwachung und steuerung ist unzul ssig Netzkabel nicht knicken oder klem men und nicht ber scharfe Kanten legen Die Folge kann ein Kabelbruch sein VORSICHT Br...

Страница 23: ...lerdings etwas handwerkliches Geschick Bitte lesen Sie die nachfolgenden Arbeits schritte vollst ndig durch bevor Sie mit der Arbeit beginnen F r den T ranschlagwechsel ben tigen Sie folgendes Werkzeu...

Страница 24: ...die T r dann beiseite 26 25 7 L sen Sie die drei Schrauben 26 des oberen Scharniers 25 und nehmen Sie es ab 26 27 8 L sen Sie die drei Schrauben 26 des unteren Scharniers 27 und nehmen Sie es ab 28 28...

Страница 25: ...Schrau ben 26 fest 29 30 12 Setzen Sie die Glast r zun chst in das obere Scharnier 29 ein dann auf das untere Scharnier 30 Schlie en Sie die Glast r danach 21 30 20 13 Schrauben Sie die Scharnierplat...

Страница 26: ...k hlt nicht ausreichend Temperatur zu hoch einge stellt Niedrigere Einstellung w hlen siehe Tem peratur einstellen auf Seite DE 12 T r nicht fest verschlossen oder T rdichtung liegt nicht voll auf Si...

Страница 27: ...n in Deutschland Wenden Sie sich bitte an unseren Technik Service Telefon 040 36 03 31 50 Kunden in sterreich Wenden Sie sich bitte an das Kundencen ter oder die Produktberatung Ihres Ver sandhauses B...

Страница 28: ...f Recyclinghof abgeben F r weitere Informationen zu diesem Thema wenden Sie sich direkt an Ihren H ndler VORSICHT Brandgefahr K hlger te enthalten in den K hl systemen und Isolierungen K ltemit tel un...

Страница 29: ...fen Die Modellkennung Ihres Ger ts finden Sie unter Technische Daten Bestellnummer 18604956 Ger tebezeichnung Weink hlschrank Modellkennung HWC46GCIA Ger tema e H he Breite Tiefe 820 mm 595 mm 570 mm...

Страница 30: ......
Страница 31: ...Wine refrigerator User manual Manual version 2001 01313_EN_20201019 Article no 18604956 Reproduction even of excerpts is not permitted HWC46GCIA...

Страница 32: ...N 18 Choosing a suitable location EN 18 Setting up and adjusting the appliance free standing appliance EN 20 Integrating the appliance into a kitchen unit EN 21 Cleaning before use EN 22 Connecting th...

Страница 33: ...ther the appliance was dam aged during transit 5 If the delivery is incomplete or the appli ance has been damaged during transport please contact our service department see page EN 28 WARNING Risk of...

Страница 34: ...k of knowledge must be supervised during use Do not make any technical changes to the appliance Use the appliance exclusively as described in this user manual Any other use is deemed improper and may...

Страница 35: ...tage category III must be con nected into the house wiring with a contact gap of at least 3 mm consult a quali ed professional if necessary see Service on page EN 28 Do not kink or pinch the mains cor...

Страница 36: ...refrigerants WARNING Risk of re and explosion Your appliance s refrigeration circuit contains the environmentally friend ly but ammable refrigerant R600a isobutane Do not use mechanical devices or ot...

Страница 37: ...gas air mixtures Never use defrosting sprays to de frost They can generate explosive gases Risks to children WARNING Risk of suffocation Children can become entangled in the packaging lm or swallow s...

Страница 38: ...handling insuf cient cool ing or overlapping items can spoil the stored food This could lead to a risk of food poisoning when consumed Abidebythestoragetimesrecommend ed by food manufacturers The appl...

Страница 39: ...c Make sure that the appliance does not get wet Make sure that the ventilation slots are not covered The maximum load of 16 bottles per bottle shelf must not be exceeded Do not use sharp or pointed ob...

Страница 40: ...Appliance parts Page EN 10 Appliance parts 1 Glass door 2 Contact plate 3 Screw feet 4 Ventilation slits 1 3 6 5 4 2 6 7 8 5 Light switch 6 Bottle shelves 7 Control panel 8 LED light...

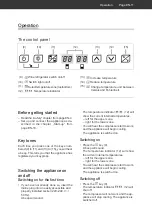
Страница 41: ...the lower zone You will hear the compressor start to work and the appliance will begin cooling The appliance is switched on Switching on Press the key 9 A beep will sound The temperature indicator 12...

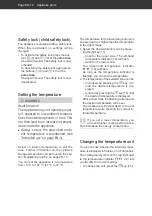
Страница 42: ...perature for the lower range can only be set equal to or higher than the temperature in the upper range 1 Select the desired interior zone by press ing the key 11 once for the upper zone The left hand...

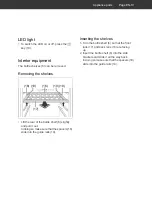
Страница 43: ...ft the rear of the bottle shelf 6 slightly and pull it out In doing so make sure that the spacers 18 slide into the guide rails 19 Inserting the shelves 1 Turn the bottle shelf 6 so that the front rai...

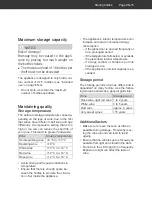
Страница 44: ...to prevent mould developing within the appliance Filling the appliance The following tips show you how you can store foods in your appliance to keep them in the best possible condition over the longes...

Страница 45: ...ariations in temperature Ensure that there is enough space be tween the bottles to promote the circula tion of air inside the appliance The appliance s interior temperatures can increase and lead to i...

Страница 46: ...to oil and grease Remove con taminants as quickly as possible Only use soft cloths Checking and cleaning the door seals The door seals must be checked regularly so that no air can enter the appliance...

Страница 47: ...ng up liquid When wiping clean add a few drops of vinegar to the water to prevent mould from forming 7 Wipe the interior dry and leave the glass door 1 open for a while to air 8 Clean the door seal wi...

Страница 48: ...iance 1 Move the appliance using a dolly or with a second person 2 Unpack the appliance and carefully re move all packaging plastic moulding adhesive strips protective film and foam padding from the i...

Страница 49: ...areas that are cool if possible Unsuitable locations are ones with direct sunlight or which are directly next to an ov en hob or radiator The following minimum distances must be maintained from electr...

Страница 50: ...m H 130 I 960 mm Setting up and adjusting the appliance free standing appliance NOTICE Risk of damage If the ventilation slits are covered the heat from inside the appliance cannot be properly expelle...

Страница 51: ...ckwards slightly and screw in unscrew the screw feet 3 Stand the appliance back up again and check the alignment with a spirit level Repeat the process until the appliance is standing up vertically Th...

Страница 52: ...page EN 28 Do not connect to a timer or a sepa rate remote controlled system for dis tance monitoring and control Do not kink or pinch the mains cord or lay it over sharp edges This can re sult in a...

Страница 53: ...nce This work however requires you to have a certain degree of craftsmanship skills Please read the following steps com pletely before changing the hinges You will need the following tools to change t...

Страница 54: ...tion Then set the door aside 26 25 7 Unscrew the three screws 26 on the up per hinge 25 and remove it 26 27 8 Unscrew the three screws 26 on the lower hinge 27 and remove it 28 28 9 Remove the 6 dummy...

Страница 55: ...er side using the screws 26 29 30 12 Place the glass door first in the top hinge 29 then in the bottom hinge 30 Close the glass door 21 30 20 13 Screw the hinge plate 21 to the lower hinge 30 with the...

Страница 56: ...temperature rises the compressor automatically switches on Appliance cools too quickly Temperature has been set too low Select a higher setting see Setting the temperature on page EN 12 The appliance...

Страница 57: ...ses are functional and are not a sign of malfunction Humming Refrigeration unit is running Flowing noise Refrigerant is flowing through the pipes Clicking Compressor is switching on or off Disturbing...

Страница 58: ...riod of ten years Customers in Germany Please contact our technical service Phone 49 0 40 36 03 31 50 Customers in Austria Please contact your mail order company s customer service centre or product a...

Страница 59: ...ld electrical appliances free of charge at your local recycling centre Please contact your dealer directly for more information about this topic CAUTION Fire hazard Refrigerating appliances which cont...

Страница 60: ...found under Technical specifications Item number 18604956 Name of appliance Wine Cooler Model identifier HWC46GCIA Device measurements Height Width Depth 820 mm 595 mm 570 mm Unloaded weight 43 kg Ref...

Отзывы: