background image

Delivery

Page EN-3

Delivery

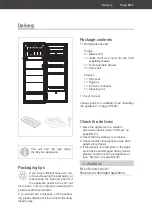
Package contents

1× Refrigerator-freezer

Fridge:
3× Glass shelf
1× Glass shelf as a cover for the fruit/

vegetable drawer

1× Fruit/vegetable drawer
3× Door shelf

Freezer:
1× Wire rack
1× Egg tray
1× Ice cube container
1× Cleaning rod

1× User manual

Various parts for installation (see “Installing 
the appliance” on page EN-26)

Check the delivery

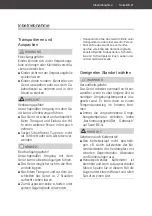
1. Move the appliance to a suitable 

place and unpack it (see “Start-up” on 
page EN-21).

2. Check that the delivery is complete.
3. Check whether the appliance was dam-

aged during transit.

4. If the delivery is incomplete or the appli-

ance has been damaged during transit, 
please contact our service department 
(see “Service” on page EN-30).

 WARNING

Risk of electric shock!
Never use a damaged appliance.

You will 

fi

 nd the type plate 

inside your appliance.

Packaging tips

If you have sufficient space, we rec-
ommend keeping the packaging, at 
least during the warranty period. If 
the appliance needs to be sent out 

for repairs, only the original packaging will 
provide sufficient protection.

If you would like to dispose of the packag-
ing, please dispose of it in an environmentally 
friendly way.

Содержание HEKS14454GF

Страница 1: ...K hl Gefrier Kombination Gebrauchsanleitung Anleitung Version 2001 01030 DE 20200918 Bestell Nr 30188612 Nachdruck auch auszugsweise nicht gestattet HEKS14454GF...

Страница 2: ...n DE 21 Geeigneten Standort w hlen DE 21 T ranschlag wechseln DE 23 Einbau DE 25 Teile f r den Einbau DE 25 Einbauschrank und Bel ftung DE 25 Ger t einbauen DE 26 Grundreinigung DE 28 Fehlersuchtabell...

Страница 3: ...vollst ndig ist 3 Kontrollieren Sie ob das Ger t Transport sch den aufweist 4 Sollte die Lieferung unvollst ndig sein oder das Ger t einen Transportschaden aufweisen nehmen Sie bitte Kontakt mit unser...

Страница 4: ...Sie das Ger t ausschlie lich wie in dieser Gebrauchsanleitung beschrieben Jede andere Verwendung gilt als nicht be stimmungsgem und kann zu Sachsch den oder sogar zu Personensch den f hren Der Herstel...

Страница 5: ...mnetz erfolgt bei diesem Ger t nur durch Ziehen des Netzsteckers aus der Steckdose Ger t daher nur an eine gut zug ngliche Steckdo se anschlie en damit es im St rfall schnell vom Stromnetz getrennt we...

Страница 6: ...ein separates Fernwirksystem zur Fern berwachung und steuerung ist unzul ssig Ortsver nderliche Mehrfachsteckdo sen oder Netzteile nicht an der R ck seite des Ger tes platzieren Risiken im Umgang mit...

Страница 7: ...keinen Fall Abtau sprays verwenden Sie k nnen explo sive Gase bilden Risiken f r Kinder WARNUNG Erstickungsgefahr Kinder k nnen sich in der Verpackungs folie verfangen oder Kleinteile verschlu cken u...

Страница 8: ...teht das Ger t ausschalten abtauen reinigen und die T r offen lassen um Schimmelbildung zu ver meiden Durch falsche Handhabung unzurei chende K hlung oder berlagerung k nnen die eingelagerten Lebensmi...

Страница 9: ...der das Gewicht des gef llten Ger tes tragen kann Beim Auspacken keine scharfen oder spitzen Gegenst nde verwenden Beim Auspacken auf keinen Fall das Isoliermaterial an der Ger ter cksei te besch dig...

Страница 10: ...ile Bedienelemente 1 Gitterablage im Gefrierbereich 2 T rablagen 3 3 Obst Gem seschublade 4 Tauwasserablauf 5 Glasablage als Abdeckung f r die Obst Gem seschublade 6 Glasablage im K hlschrank 3 7 Temp...

Страница 11: ...r Bedienung Einschalten 1 Stellen Sie den Temperaturregler 7 auf eine Einstellung zwischen 1 und 7 Das Ger t ist damit eingeschaltet Der Kompressor beginnt zu arbeiten das K l temittel str mt durch di...

Страница 12: ...bereich liegt bei 6 C Die ideale Temperatur im Gefrierbereich liegt bei 18 C Wenn Sie Lebensmittel ber l ngere Zeit einlagern m chten stellen Sie sicher dass die Temperatur im Gefrierbe reich mindeste...

Страница 13: ...Einfrieren von fri schen Lebensmitteln geeignet Wenn das K hl Gefrierger t l ngere Zeit leer steht das Ger t ausschalten abtauen reinigen und die T r offen lassen um Schimmelbildung zu ver meiden Tipp...

Страница 14: ...fest verschlossen Lassen Sie warme Lebensmittel abk hlen ehe Sie sie in den K hlschrank stellen Die Temperaturen im Ger t und damit der Energieverbrauch k nnen ansteigen wenn die T ren h ufig oder la...

Страница 15: ...agern Die maximale Lagerzeit bei ei ner St rung entnehmen Sie dem Typ schild des Ger ts Nach einer St rung berpr fen ob die eingelagerten Lebensmittel noch genie bar sind Auf oder angetaute Lebensmitt...

Страница 16: ...est ver schlossen einfrieren Kennzeichnen Sie Gefriergut nach Art Menge Einfrier und Verfalldatum Benut zen Sie m glichst wischfeste Filzschreiber oder Klebeetiketten Gefrierverm gen Die Angaben zum G...

Страница 17: ...m chten entnehmen Sie diesen und schlie en Sie die Packung sofort wie der Dadurch beugen Sie Gefrierbrand vor und vermindern die Eisbildung am verblei benden Lebensmittel Tauen Sie Fleisch Gefl gel un...

Страница 18: ...m ssen regelm ig kon trolliert werden damit keine warme Luft in das Ger t eindringt 1 Klemmen Sie zur Pr fung ein d nnes St ck Papier an verschiedenen Stellen ein Das Papier muss sich an allen Stellen...

Страница 19: ...t ab Zum Beschleunigen des Abtauvor gangs keine anderen Mittel verwen den als vom Hersteller empfohlen Z B keine elektrischen Heizger te Messer oder Ger te mit offener Flam me wie z B Kerzen verwenden...

Страница 20: ...Sp lmittel aus Geben Sie beim Nachwischen einige Tropfen Essig ins Wasser um Schimmel bildung vorzubeugen 12 Reinigen Sie die T rdichtung nur mit kla rem Wasser sie ist empfindlich gegen l und Fett 1...

Страница 21: ...stehen lassen Zum Auspacken keine scharfen oder spitzen Gegenst nde verwenden Transportieren Sie das Ger t mithilfe einer Transportkarre oder einer zweiten Person Packen Sie das Ger t aus und entfer...

Страница 22: ...Material Vom gew hlten Standort h ngt der Ener gieverbrauch des Ger ts ab Der Energie verbrauch kann ansteigen wenn die vor geschriebene Raumtemperatur ber oder unterschritten wird ber Klimaklassen H...

Страница 23: ...ste vom Ge r t ab Verwenden Sie dazu einen Kreuz schlitz Schraubendreher 4 Demontieren Sie die obere Scharnierplat te Verwenden Sie zum Herausdrehen der Schrauben einen 8er Schraubenschl ssel oder ein...

Страница 24: ...8 11 Montieren Sie das Mittelscharnier 8 und den Befestigungswinkel 9 auf der ge gen berliegenden Seite wieder an 12 Setzen Sie die T r f r den K hlbereich wieder ein und schlie en Sie sie 13 Montiere...

Страница 25: ...ckung f r Schleppschiene 14 Einbauschrank und Bel ftung Die folgenden Voraussetzungen muss der Einbauschrank erf llen 16 1 Abdeckung f r Befesti gungswinkel 17 27 kurze Schraube 18 1 Dichtungsprofil 1...

Страница 26: ...der Netzstecker nach dem Auf stellen nicht mehr zug nglich ist muss eine allpolige Trennvorrichtung gem berspannungskategorie III in der Hausinstallation mit minde stens 3 mm Kontaktabstand vorge scha...

Страница 27: ...ffnen Sie die M belt ren um zu pr fen ob sie sich komplett und leicht schlie en lassen Korrigieren Sie gegebenenfalls die Positi on des Ger ts 5 ffnen Sie die Ger te und die M belt ren gleichzeitig M...

Страница 28: ...ungsprofil 18 in den Spalt zwischen dem Ger t und dem Einbau schrank 15 Verschrauben Sie abschlie end die bei den Befestigungswinkel zwischen der oberen und unteren T r mit dem Einbau schrank Verwende...

Страница 29: ...ellen auf Seite DE 11 Ger t k hlt nicht ausreichend Temperaturregler 7 zu niedrig eingestellt H here Einstellung w hlen siehe Tempe ratur einstellen auf Seite DE 11 T r nicht fest verschlossen oder T...

Страница 30: ...h dem Inverkehrbringen des letzten Exemplars des Modells zur Ver f gung T rdichtungen stehen f r einen Zeit raum von zehn Jahren zur Verf gung Kunden in Deutschland Wenden Sie sich bitte an unseren Te...

Страница 31: ...welche fachgerecht ent sorgt werden m ssen Bei Austritt von K ltemittel besteht Brandgefahr Achten Sie darauf dass an einem K hlger t bis zur fachgerechten Ent sorgung keine K hlrippen oder Rohre bes...

Страница 32: ...en Die Modellkennung Ihres Ger ts finden Sie unter Technische Daten Bestellnummer 30188612 Ger tebezeichnung K hl Gefrier Kombination Modellkennung HEKS14454GF Ger tema e H he Breite Tiefe 1450 mm 540...

Страница 33: ...Refrigerator freezer User manual Manual version 2001 01030 EN 20200918 Article no 30188612 Reproduction even of excerpts is not permitted HEKS14454GF...

Страница 34: ...1 Changing the door hinges EN 23 Installation EN 25 Parts for installation EN 25 Built in cabinet and ventilation EN 25 Installing the appliance EN 26 Cleaning before use EN 28 Troubleshooting table E...

Страница 35: ...ry is complete 3 Check whether the appliance was dam aged during transit 4 If the delivery is incomplete or the appli ance has been damaged during transit please contact our service department see Ser...

Страница 36: ...e any technical changes to the appliance Use the appliance exclusively as described in this user manual Any other use is deemed im proper and may result in damage to property or even personal injury T...

Страница 37: ...power supply in the event of a breakdown If the mains plug is no longer acces sible after installation an all pole dis connecting device complying with overvoltage category III must be connected to t...

Страница 38: ...devices with an open ame such as a candle The thermal insulation and the interi or are scratch and heat sensitive and can melt Do not use electrical appliances in side the food storage compartments of...

Страница 39: ...sing of the appliance en sure that children cannot suffocate inside the appliance e g do not re move the fridge and freezer drawers unscrew the door cover Risks for certain groups of people CAUTION Da...

Страница 40: ...refully to ensure that adjacent food cannot be contaminated by sal monella or similar bacteria Abide by the storage times recom mended by food manufacturers Health hazard The appliance may not operate...

Страница 41: ...ppliancewhenitis lled Do not use sharp or pointed objects to unpack it When unpacking the appliance nev er damage the insulation material on the back of the appliance Do not use mechanical devices or...

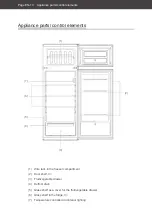
Страница 42: ...control elements 1 Wire rack in the freezer compartment 2 Door shelf 3 3 Fruit vegetable drawer 4 Defrost drain 5 Glass shelf as a cover for the fruit vegetable drawer 6 Glass shelf in the fridge 3 7...

Страница 43: ...ion Switching on 1 Set the temperature controller 7 to a set ting of between 1 and 7 The appliance is then switched on The compressor starts to work the refrigerant flows through the pipes and a quiet...

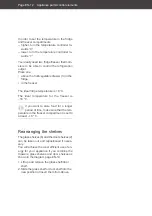
Страница 44: ...ature is 6 C The ideal temperature for the freezer is 18 C If you want to store food for a longer period of time make sure that the tem perature in the freezer compartment is set to at least 18 C Rear...

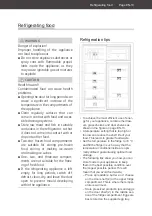
Страница 45: ...long periods switch off defrost clean dry and leave the door open to prevent mould developing within the appliance Refrigeration tips 3 3 2 2 2 2 2 2 2 2 2 2 2 2 2 2 2 5 5 6 6 6 6 6 6 6 6 6 1 1 1 1 1...

Страница 46: ...erator The temperatures in the appliance and thus the energy consumption can in crease if the doors are opened frequently or for a prolonged period if the temperature falls below or exceeds the prescr...

Страница 47: ...ly do not refreeze Risk of injury Improper handling of the appliance mayresultininjury Riskofburnscaused by low temperatures The food and the inside walls of the freezer have a very low temperature Ne...

Страница 48: ...ossible Up to the indicated maximum freezing capacity If you adhere to the maximum freezing ca pacity the food will freeze at the fastest rate The temperature in the freezer briefly rises af ter placi...

Страница 49: ...ay you will avoid freezer burn and will reduce ice formation on the remaining foods Always defrost meat poultry and fish in the refrigerator Make sure that the frozen food is not immersed in its own t...

Страница 50: ...nter the appliance 1 To test them clamp a thin piece of paper in various places The paper should be difficult to pull through at all points 2 If the seal is not uniform everywhere Warm the seal in the...

Страница 51: ...d the interior are scratch and heat sensitive and can melt When cleaning please note Never use harsh granular so da based solvent based or abrasive cleaners We recommend all purpose cleaners with a ne...

Страница 52: ...th clean wa ter they are sensitive to oil and fat 13 Rub everything completely dry including the door seals and allow to air briefly 14 Re insert wire rack and put food back in the freezer compartment...

Страница 53: ...e connecting Do not use sharp or pointed objects to unpack it Move the appliance using a dolly or with the help of a second person Unpack the appliance and carefully re move all packaging plastic moul...

Страница 54: ...appliance on an insulation plate made from solid material The use of energy depends on the appliance location selected The use of energy can in crease if the temperature is higher or lower than the p...

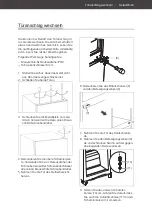
Страница 55: ...trip from the refrig erator Use the cross tip screwdriver 4 Remove the upper hinge plate Use a size 8 spanner or a cross headed screw driver to remove the screws 5 Remove the freezer compartment s doo...

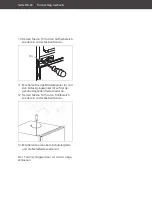
Страница 56: ...middle hinge plate 8 and the mounting bracket 9 on the opposite side 12 Reinsert the fridge compartment s door and close it 13 Reattach the upper hinge plate and the metal strip This is the final ste...

Страница 57: ...or runners 14 16 1 Cover for the mount ing bracket Built in cabinet and ventilation The built in cabinet must meet the following requirements 17 27 short screw 18 1 Sealing strip 19 2 long screw min 2...

Страница 58: ...ted to the house wiring with a contact gap of at least 3 mm this in cludes fuses circuit breakers and con tactors Do not kink or pinch the mains cable or lay it over sharp edges This can re sult in a...

Страница 59: ...net door 17 14 6 Remove the runners from the slides again 7 Use two screws to fasten each of the runners to the inside of the cabinet door in the marked positions 14 15 8 Press the covers 15 onto the...

Страница 60: ...Use two short screws each for this 16 16 Insert the cover 16 for the mounting bracket on the mounting bracket on the opposite side of the door The installation is now complete Cleaning before use To r...

Страница 61: ...ower setting see Setting the temperature on page EN 11 The appliance doesn t cool suffi ciently The temperature control ler 7 is set too low Select a higher setting see Setting the temperature on page...

Страница 62: ...minimum peri od of seven years after the final version of the model has been placed on the market Door seals are available for a period of ten years Customers in Germany Please contact our technical...

Страница 63: ...ain refrigerants and gases in the cooling systems and insulation must be proper ly disposed of Refrigerant leakage may cause a re hazard Until the point of proper disposal en sure that none of the coo...

Страница 64: ...e can be found under Technical specifications Item number 30188612 Name of appliance Refrigerator freezer Model identifier HEKS14454GF Device measurements Height Width Depth 1445 mm 540 mm 540 mm Unlo...

Отзывы: