background image

Table of contents

Page  EN-2

Table of contents

Delivery . . . . . . . . . . . . . . . . . . . . . . . . . . . . EN-3

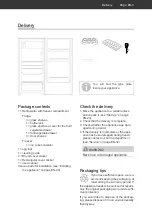
Package contents  . . . . . . . . . . . . . . . . . . EN-3
Check the delivery . . . . . . . . . . . . . . . . . . EN-3
Packaging tips . . . . . . . . . . . . . . . . . . . . . EN-3

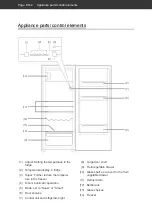
Appliance parts / control elements . . . . . . . . EN-4

For your safety  . . . . . . . . . . . . . . . . . . . . . . EN-5

Intended use  . . . . . . . . . . . . . . . . . . . . . . EN-5
Explanation of terms  . . . . . . . . . . . . . . . . EN-5
Explanation of symbols . . . . . . . . . . . . . . EN-5
Safety notices  . . . . . . . . . . . . . . . . . . . . . EN-5

Operation  . . . . . . . . . . . . . . . . . . . . . . . . . EN-12

Requirements for safe use. . . . . . . . . . . EN-12
Commissioning the appliance . . . . . . . . EN-12
Switching the appliance on and off . . . . EN-12
Setting the temperature . . . . . . . . . . . . . EN-13
Door alarm . . . . . . . . . . . . . . . . . . . . . . . EN-14
Rearranging the shelves . . . . . . . . . . . . EN-14

Refrigerating food . . . . . . . . . . . . . . . . . . . EN-15

Refrigeration tips . . . . . . . . . . . . . . . . . . EN-15
Maintaining quality . . . . . . . . . . . . . . . . . EN-16

Storing frozen food . . . . . . . . . . . . . . . . . . EN-17

Storing frozen food. . . . . . . . . . . . . . . . . EN-18
Freezing capacity . . . . . . . . . . . . . . . . . . EN-18
Defrosting food . . . . . . . . . . . . . . . . . . . . EN-18
Preparing ice cubes . . . . . . . . . . . . . . . . EN-19

Care and maintenance . . . . . . . . . . . . . . . EN-20

Checking and cleaning the door seals  . EN-20
Defrosting the fridge. . . . . . . . . . . . . . . . EN-20
Cleaning the fridge . . . . . . . . . . . . . . . . . EN-20
Defrosting and cleaning the freezer . . . . EN-21

Start-up . . . . . . . . . . . . . . . . . . . . . . . . . . . EN-23

Moving and unpacking . . . . . . . . . . . . . . EN-23
Choosing a suitable location . . . . . . . . . EN-23
Changing the door hinges . . . . . . . . . . . EN-25
Installation . . . . . . . . . . . . . . . . . . . . . . . EN-27
Installing the appliance  . . . . . . . . . . . . . EN-28
Cleaning before use . . . . . . . . . . . . . . . . EN-29

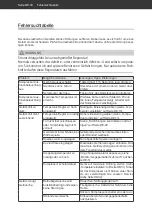
Troubleshooting table . . . . . . . . . . . . . . . . EN-30

Service  . . . . . . . . . . . . . . . . . . . . . . . . . . . EN-32

Advice, complaints and orders  . . . . . . . EN-32
Repairs and spare parts  . . . . . . . . . . . . EN-32

Environmental protection  . . . . . . . . . . . . . EN-33

Disposing of the appliance. . . . . . . . . . . EN-33
Our contribution to protecting the 
ozone layer  . . . . . . . . . . . . . . . . . . . . . . EN-33

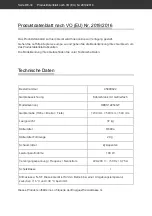
Product fiche concerning 
Regulation (EU) No. 2019/2016 . . . . . . . . EN-34

Technical specifications  . . . . . . . . . . . . . . EN-34

Please  read  through  the  safe-
ty  instructions  and  user  man-
ual  carefully  before  using  the 

appliance. This is the only way you can 
use all the functions safely and reliably.
Be sure to also observe the national reg-
ulations in your country, which are valid in 
addition to the regulations specified in this 
user manual.

Keep all safety notices and instructions 
for future reference. Pass all safety notic-
es and instructions on to the subsequent 
user of the product.

You  can  fi nd  more  information 
on installation and start-up from 
page EN-23.

Содержание HEKS12254GF

Страница 1: ...Einbau K hlschrank mit Tiefk hlfach Gebrauchsanleitung Anleitung Version 2001 01027_DE_20201110 Bestell Nr 45890622 Nachdruck auch auszugsweise nicht gestattet HEKS12254GF...

Страница 2: ...DE 21 Inbetriebnahme DE 23 Transportieren und Auspacken DE 23 Geeigneten Standort w hlen DE 23 T ranschlag wechseln DE 25 Installation DE 27 Ger t einbauen DE 28 Grundreinigung DE 29 Fehlersuchtabell...

Страница 3: ...2 Pr fen Sie ob die Lieferung vollst ndig ist Das Typschild nden Sie im Inneren Ihres Ger ts 3 Kontrollieren Sie ob das Ger t Transport sch den aufweist 4 Sollte die Lieferung unvollst ndig sein oder...

Страница 4: ...k hlfach weiter absenken 4 Smart Automatik Betrieb 5 Mode Super oder Smart einstellen 6 T rablagen 7 Bedienelement und K hlraumbeleuchtung 10 11 14 13 12 9 6 6 8 7 8 gro e T rablage 9 Obst Gem seschub...

Страница 5: ...sgem und kann zu Sachsch den oder sogar zu Personensch den f hren Der Hersteller bernimmt keine Haftung f r Sch den die durch nicht bestimmungsgem en Gebrauch entstanden sind Begriffserkl rung Folgend...

Страница 6: ...sschrauben ausschalten und unseren Service kontaktieren siehe Seite DE 32 Das Ger t entspricht der Schutzklas se I und darf nur an eine Steckdose mit ordnungsgem installiertem Schutzleiter angeschloss...

Страница 7: ...Geh use ffnungen stecken und si cherstellen dass auch Kinder keine Gegenst nde einstecken k nnen Ger t regelm ig auf Sch den pr fen Brandgefahr Unsachgem er Umgang mit dem Ger t kann zu einem Brand z...

Страница 8: ...im Ger t lagern da sie z ndf hige Gas Luft Gemische bilden k nnen Zum Abtauen auf keinen Fall Abtau sprays verwenden Sie k nnen explo sive Gase bilden Risiken f r Kinder WARNUNG Erstickungsgefahr Kin...

Страница 9: ...und Fisch in geeigneten Beh ltern im K hlschrank so aufbe wahren dass es andere Lebensmittel nicht ber hrt oder auf diese tropft Zwei Sterne Gefrierf cher sind f r die Aufbewahrung von bereits eingefr...

Страница 10: ...hr durch Tief temperaturen Die Lebensmittel und die Innenw n de des Tiefk hlbereichs haben eine sehr tiefe Temperatur Nie mit nassen H nden ber hren Dies kann zu Haut verletzungen f hren Auch bei tro...

Страница 11: ...ng mit dem Ge r t kann zu Sachsch den f hren Ger t nicht an den T ren oder T r griffen ziehen oder heben Ger t nur auf einem ebenen und festen Untergrund abstellen der das Gewicht des gef llten Ger te...

Страница 12: ...automatisch einschaltet sobald Sie den Netzstecker erstmals in die Steckdose stecken Schalten Sie die Sicherung f r die Steck dose ein an die das Ger t angeschlos sen ist Es ert nt ein Signalton und...

Страница 13: ...mperaturanzeige 2 wird die gew hlte Einstellung angezeigt Adjust Mode 1 4 2 3 5 Nur Anzeige 1 leuchtet schw chste K hlung Adjust Mode 1 4 2 3 5 Anzeigen 1 5 leuchten st rkste K hlung Passen Sie die Ei...

Страница 14: ...t Schlie en Sie die K hlschrankt r Der T ralarm verstummt Ablagen umsetzen Die Glasablagen 10 und 13 sowie die T rablagen 6 und 8 lassen sich herausneh men und bei Bedarf anders anordnen Die effizient...

Страница 15: ...elbildung zu ver meiden Tipps f r das K hlen 6 6 6 6 6 6 6 6 8 8 8 8 9 13 13 13 12 12 12 13 13 13 13 13 13 10 10 10 Kombinieren Sie die Schubladen Glas und T rablagen wie in der Abbildung oben gezeigt...

Страница 16: ...bk hlen ehe Sie sie in den K hlbereich stellen Die Temperaturen im Ger t und damit der Energieverbrauch k nnen ansteigen wenn die T ren h ufig oder lange ge ff net werden wenn die vorgeschriebene Raum...

Страница 17: ...fall Beachten dass sich die Lagerzeit des Tiefk hlguts aufgrund eines Tempe raturanstiegs im Ger teinneren ver k rzen kann Abtauen Reinigen oder Stromausfall Zwei Sterne Gefrierf cher sind f r die Auf...

Страница 18: ...inden Sie auf dem Typschild Ihres Ge r ts Halten Sie wenn m glich das maximale Gefrierverm gen ein Bis zum angegebenen maximalen Gefrierverm gen Wenn Sie das maximale Gefrierverm gen einhalten gefrier...

Страница 19: ...den Lebensmittel Tauen Sie Fleisch Gefl gel und Fisch im mer im K hlschrank auf Achten Sie darauf dass das Tiefk hlgut nicht in der eigenen Auftaufl ssigkeit liegt Eisw rfel bereiten F llen Sie den mi...

Страница 20: ...lieren und reinigen Die T rdichtungen m ssen regelm ig kon trolliert werden damit keine warme Luft in das Ger t eindringt 1 Klemmen Sie zur Pr fung ein d nnes St ck Papier an verschiedenen Stellen ein...

Страница 21: ...hltempera tur ein Tiefk hlfach abtauen und reinigen WARNUNG Explosionsgefahr Unsachgem er Umgang mit dem Ge r t kann zu einer Verpuffung Explosion f hren Auf keinen Fall Abtausprays verwen den Sie k n...

Страница 22: ...ch ssel mit hei em nicht kochendem Wasser in das Tief k hlfach Das Abtauen wird dadurch be schleunigt 7 Lassen Sie die T r w hrend des Ab tauens ge ffnet und legen Sie einen Scheuerlappen vor das Ger...

Страница 23: ...n Zum Auspacken keine scharfen oder spitzen Gegenst nde verwenden Transportieren Sie das Ger t mithilfe einer Transportkarre oder einer zweiten Person Packen Sie das Ger t aus und entfernen Sie vorsic...

Страница 24: ...immt gem igte Zone N Dieses K hlger t ist f r die Verwendung bei Umge bungstemperaturen von 16 C bis 32 C bestimmt subtropische Zone ST Dieses K hlger t ist f r die Verwendung bei Umge bungstemperatur...

Страница 25: ...Metallleiste vom K hl schrank ab Verwenden Sie dazu einen Kreuzschlitz Schraubendreher 4 L sen Sie die Schrauben vom oberen Scharnier mithilfe eines 8er Schraub schl ssels und entnehmen Sie das Scharn...

Страница 26: ...luss um 180 und befestigen Sie ihn auf der gegen ber liegenden Seite Verwenden Sie hierzu die Schrauben 17 Achten Sie dabei darauf dass die Schraub l cher des Veschlusst cks genau ber den Markierungen...

Страница 27: ...r Befestigung an der M belt r 21 2 Abdeckung f r Schleppschiene 20 Einbauschrank und Bel ftung Die folgenden Voraussetzungen muss der Einbauschrank erf llen 22 2 Schraube lang 23 13 Schraube kurz 24 1...

Страница 28: ...Schrauben Sie die Gleiter mithilfe der kurzen Schrauben 23 an der zu ffnenden Seite fest 4 Schieben Sie die Schleppschienen 20 in die Gleiter 18 Schlie en und ffnen Sie die M belt r um zu pr fen ob s...

Страница 29: ...ssen verschrauben Sie das K hlger t mit dem Einbauschrank Verwenden Sie daf r oben 3 kurze Schrauben 23 und unten die beiden langen Schrauben 22 24 14 Dr cken Sie bei ge ffneter T r das Dichtungsprofi...

Страница 30: ...nstellung w hlen siehe Tem peratur einstellen auf Seite DE 13 Ger t k hlt nicht ausreichend Temperatur Regler zu niedrig eingestellt H here Einstellung w hlen siehe Tempe ratur einstellen auf Seite DE...

Страница 31: ...1 Problem M gliche Ursache L sungen Tipps Erkl rungen Unten im K hlbe reich hat sich Was ser gesammelt Tauwasserablauf 11 ist ver stopft Verstopfung des Tauwasserablaufs mithilfe des mitgelieferten Re...

Страница 32: ...ndig ist das Ger t Transportsch den aufweist Sie Fragen zu Ihrem Ger t haben sich eine St rung nicht mithilfe der Fehler suchtabelle beheben l sst Sie weiteres Zubeh r bestellen m chten Reparaturen u...

Страница 33: ...et Weitere Informationen zu diesem Thema fin den Sie auch auf den Service Seiten unseres aktuellen Katalogs und auf unserer Internet seite unter der Rubrik Service Unser Beitrag zum Schutz der Ozonsch...

Страница 34: ...chnische Daten Technische Daten Bestellnummer 45890622 Ger tebezeichnung K hlschrank mit Gefrierfach Modellkennung HEKS12254GF Ger tema e H he Breite Tiefe 1230 mm 540 mm 540 mm Leergewicht 37 kg K lt...

Страница 35: ...Refrigerator with freezer compartment User manual Manual version 2001 01027_EN_20201110 Article no 45890622 Reproduction even of excerpts is not permitted HEKS12254GF...

Страница 36: ...r EN 21 Start up EN 23 Moving and unpacking EN 23 Choosing a suitable location EN 23 Changing the door hinges EN 25 Installation EN 27 Installing the appliance EN 28 Cleaning before use EN 29 Troubles...

Страница 37: ...the appliance to a suitable place and unpack it see Start up on page EN 23 2 Check that the delivery is complete 3 Check whether the appliance was dam aged during transit 4 If the delivery is incomple...

Страница 38: ...uce the tempera ture in the freezer 4 Smart Automatic operation 5 Mode set to Super or Smart 6 Door shelves 7 Control unit and refrigerator light 10 11 14 13 12 9 6 6 8 7 8 Large door shelf 9 Fruit ve...

Страница 39: ...r manual WARNING This symbol indicates a hazard with a medium level of risk which if not avoid ed could result in death or serious injury CAUTION This symbol indicates a hazard with a low level of ris...

Страница 40: ...complying with overvoltage category III must be connected to the house wiring with a contact gap of at least 3 mm this in cludes fuses circuit breakers and con tactors When positioning the appliance e...

Страница 41: ...liance unless they are of the type recommended by the man ufacturer Keep the appliance away from open ames and hot surfaces Mechanical intervention in the refrig eration system must only be carried ou...

Страница 42: ...f they have been given supervision or in struction concerning use of the ap pliance in a safe way and understand the hazards involved Children aged from 3 to 8 years are allowed to load and unload ref...

Страница 43: ...frozen food may be shortened due to a rise in the temperature inside the appli ance from defrosting cleaning or power failure If there is a mains failure the frozen food may remain suf ciently cold fo...

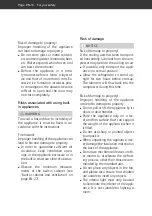
Страница 44: ...ilation on page EN 27 Risk of damage NOTICE Risk of damage to property If the cooling unit has been transport ed horizontally lubricant from the com pressor may get into the cooling circuit If possibl...

Страница 45: ...attack the plastic surfaces All purpose cleaners with a neutral pH are recommended Door seals and plastic parts are sensitive to oil and grease Remove contaminants as quickly as possi ble Use only so...

Страница 46: ...st insert the mains plug into the socket Switch off the fuse for the mains socket to which the refrigerator is connected A signal tone will sound and the refrigerator light 7 will illuminate when the...

Страница 47: ...e temperature indicator 2 shows the se lected setting Adjust Mode 1 4 2 3 5 Only indicator 1 illuminated weakest refrig eration Adjust Mode 1 4 2 3 5 Indicators 1 5 illuminated strongest refriger atio...

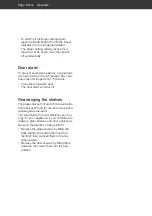
Страница 48: ...lose the refrigerator door The door alarm will shut off Rearranging the shelves The glass shelves 10 and 13 as well as the door shelves 6 and 8 can be removed and rearranged as required You will achie...

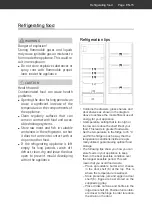
Страница 49: ...tion tips 6 6 6 6 6 6 6 6 8 8 8 8 9 13 13 13 12 12 12 13 13 13 13 13 13 10 10 10 Combine the drawers glass shelves and door shelves as shown in the diagram above to achieve the most efficient use of e...

Страница 50: ...thus the energy consumption can in crease if the doors are opened frequently or for a prolonged period if the temperature falls below or exceeds the prescribed interior temperature Energy consumption...

Страница 51: ...ortened due to a rise in the temperature inside the appli ance from defrosting cleaning or power failure Two star frozen food compartments are suitable for storing pre frozen food storing or making ic...

Страница 52: ...ce type plate Adhere to the maximum freezing capacity if possible Up to the indicated maximum freezing capacity If you adhere to the maximum freezing ca pacity the food will freeze at the fastest rate...

Страница 53: ...on the remaining foods Always defrost meat poultry and fish in the refrigerator Make sure that the frozen food is not immersed in its own thawing liquid Preparing ice cubes Fill the supplied ice cube...

Страница 54: ...e of paper in various places The paper should be difficult to pull through at all points 2 If the seal is not uniform everywhere Warm the seal in the appropriate places in front of you with a hair dry...

Страница 55: ...y electric heating equipment knives or devices with an open ame such as a candle The thermal insula tion and the interior are scratch and heat sensitive and can melt When cleaning please note Never us...

Страница 56: ...ng after approx 1 hour 8 Wipe down the inside with warm water and washing up liquid When wiping clean add a few drops of vinegar to the water to prevent mould from forming 9 Only clean the door seals...

Страница 57: ...le location CAUTION Dangers from the refrigerant Do not damage the refrigeration cir cuit for example by piercing the re frigerant channels of the condensate vaporiser with sharp objects cutting off t...

Страница 58: ...bient temperature Zone description Code Definition Extended temperate zone SN This refrigerator is designed for use at ambient temper atures of 10 C to 32 C Temperate zone N This refrigerator is desig...

Страница 59: ...not connect ed to the power supply 2 Close the door 3 Unscrew the metal strip from the refrig erator Use the cross tip screwdriver 4 Unfasten the screws for the upper hinge using an 8 mm spanner and...

Страница 60: ...e door latch 180 and fix it to the opposite side Use the screws 17 to do so Make sure that the locking tappet screw holes are placed exactly above the mark ings in the appliance wall 6 Push the two co...

Страница 61: ...to the cabinet door 21 2 Cover for runner 20 Built in cabinet and ventilation The built in cabinet must meet the following requirements 22 2 Long screw 23 13 Short screw 24 1 Sealing strip min 2 200...

Страница 62: ...out side edges of the appliance door for the slides 18 to be attached Use the short screws 23 to fasten the slides on the side that is to be opened 4 Push the runners 20 into the slides 18 Close and o...

Страница 63: ...gerating appliance to the built in cabinet To do so use 3 short screws 23 at the top and the two long screws 22 at the bottom 24 14 With the door open press the sealing strip into the gap between the...

Страница 64: ...e temperature rises the compressor automatically turns on Appliance cools too quickly The temperature controller is set at too high a level Select a lower setting see Setting the temperature on page E...

Страница 65: ...gn of malfunction Humming Refrigeration unit is running Flowing noise Refrigerant is flowing through the pipes Clicking Compressor is switching on or off Disturbing noises Check the installation and r...

Страница 66: ...is damaged during transport you have questions about your appliance a malfunction cannot be rectified using the troubleshooting table you would like to order further accessories Repairs and spare part...

Страница 67: ...d with the symbol shown here Further information on this topic can also be found on the service pages of our current cat alogue and on our website under the heading Service Our contribution to protect...

Страница 68: ...nical specifications Item number 45890622 Name of appliance Refrigerator with freezer compartment Model identifier HEKS12254GF Device measurements Height Width Depth 1230 mm 540 mm 540 mm Unloaded wei...

Отзывы: