background image

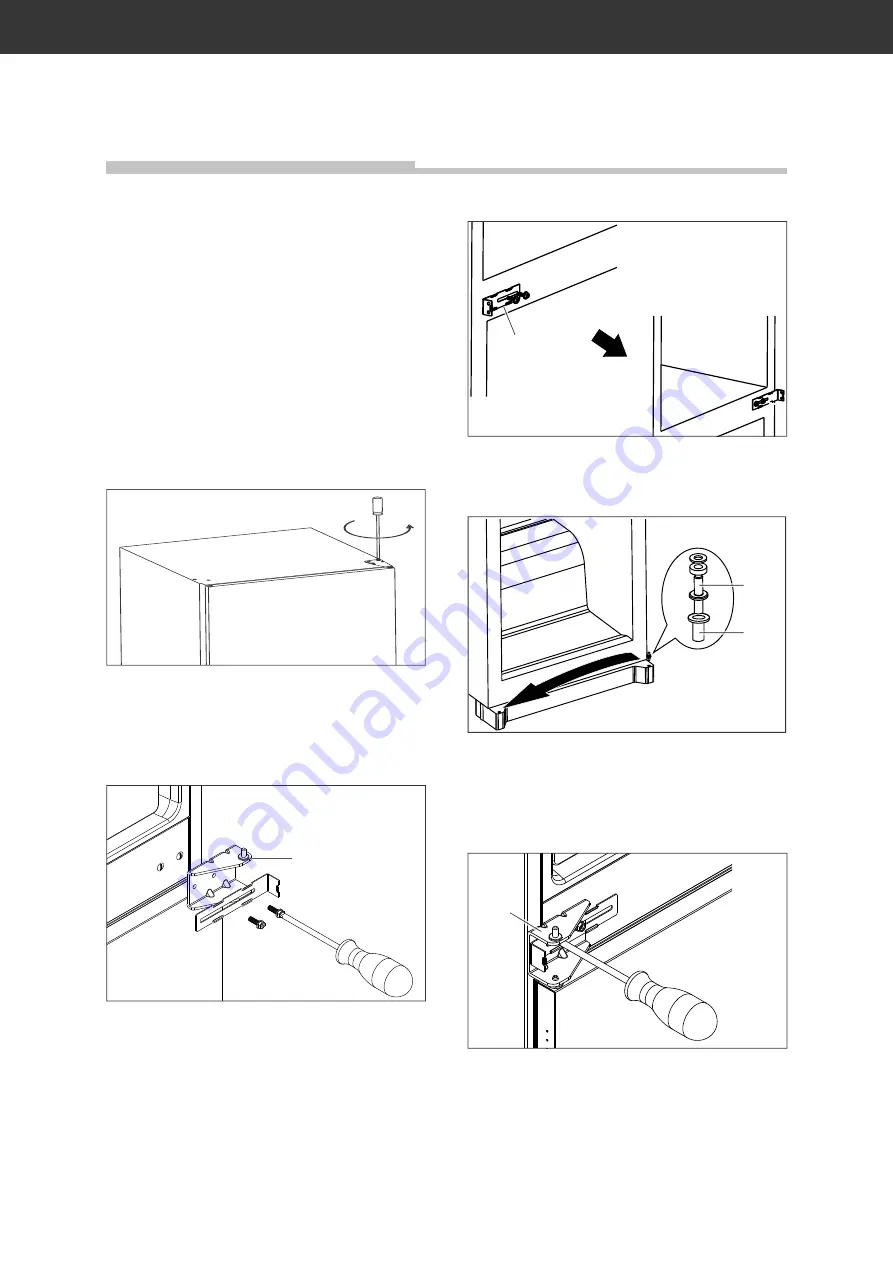
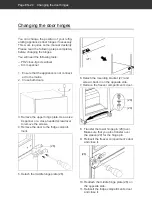
Changing the door hinges

Page EN-24

You can change the position of your refrig-
erating appliance’s door hinges if necessary. 
This work requires some manual dexterity. 
Please read the following steps completely 
before changing the hinges.

You will need the following tools:

– PH2 cross-tip screwdriver
– 8 mm spanner

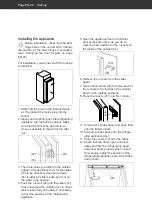
1.  Ensure that the appliance is not connect-

ed to the mains.

2.  Close both doors.

3. Remove the upper hinge plate. Use a size 

8 spanner or a cross-headed screwdriver 
to remove the screws.

4. Remove the door to the fridge compart-

ment.

(26)

5. Detach the middle hinge plate (26).

(27)

6. Detach the mounting bracket (27) and 

screw it back in on the opposite side.

7. Remove the freezer compartment’s door.

(28)

(29)

8.  Transfer the lower hinge pin (28) over. 

Make sure that you also transfer over 
the sleeve (29) for the hinge pin.

9.  Reinsert the freezer compartment’s door 

and close it.

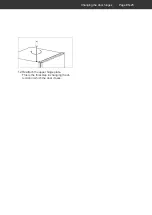
(26)

10. Reattach the middle hinge plate (26) on 

the opposite side.

11. Reinsert the fridge compartment’s door 

and close it.

 Changing the door hinges

Содержание HEKK17754A2

Страница 1: ...Einbau K hl Gefrier Kombination Gebrauchsanleitung Anleitung Version 93732 DE 20191023 Bestell Nr 375 546 Nachdruck auch auszugsweise nicht gestattet HEKK 17754A2 Hanseatic...

Страница 2: ...ortieren und Auspacken DE 20 Geeigneten Standort w hlen DE 21 Installation DE 22 Grundreinigung DE 24 Ger t in Betrieb nehmen DE 24 T ranschlag wechseln DE 25 Fehlersuchtabelle DE 27 Unser Service DE...

Страница 3: ...nahme auf Seite DE 20 2 Pr fen Sie ob die Lieferung vollst ndig ist 3 Kontrollieren Sie ob das Ger t Transport sch den aufweist 4 Sollte die Lieferung unvollst ndig sein oder das Ger t einen Transport...

Страница 4: ...t ein ausschalten 2 Temperaturanzeige im K hlbereich 3 Super Temperatur im Gefrierbereich weiter absenken 4 Smart Automatik Betrieb 5 Mode Super oder Smart einstellen 6 T rablagen 7 Bedienelement und...

Страница 5: ...mieden wird den Tod oder eine schwere Verlet zung zur Folge haben kann VORSICHT Dieser Signalbegriff bezeichnet eine Gef hrdung mit einem niedrigen Risiko grad die wenn sie nicht vermieden wird eine g...

Страница 6: ...ungsgem installiertem Schutzleiter angeschlossen werden Der Anschluss an eine Steckdosen leiste eine Mehrfachsteckdose eine Zeitschaltuhr oder ein separates Fern wirksystem zur Fern berwachung und ste...

Страница 7: ...ie beauf sichtigt oder bez glich des sicheren Gebrauchs des Ger tes unterwiesen wurden und die daraus resultieren den Gefahren verstehen Kinder ab 3 Jahren und j nger als 8 Jahre d rfen das K hl Gefri...

Страница 8: ...ft Zwei Sterne Gefrierf cher sind f r die Aufbewahrung von bereits eingefro renen Lebensmitteln und die Aufbe wahrung oder Zubereitung von Spei seeis oder Eisw rfeln geeignet Ein Zwei und Drei Sterne...

Страница 9: ...mier mittel in den Kompressor zur ck Unsachgem er Umgang mit dem Ge r t kann zu Sachsch den f hren Keine Glas oder Metallgef e mit Fl ssigkeit im Gefrierbereich lagern Beh lter k nnen bersten Ger t ni...

Страница 10: ...oda s ure oder l semittelhaltige oder schmirgelnde Putzmittel ver wenden Empfehlenswert sind All zweckreiniger mit einem neutralen pH Wert T rdichtungen und Ger teteile aus Kunststoff sind empfindlich...

Страница 11: ...n ten etwas anheben Die T rf cher nach oben herausnehmen Bedienung Temperatur einstellen VORSICHT Gesundheitsgefahr Das Ger t arbeitet eventuell nicht ein wandfrei wenn es ber l ngere Zeit zu geringer...

Страница 12: ...tellen Die Temperatur im Gefrierbereich wird auto matisch auf 18 C gehalten Adjust Mode Super Smart 1 4 2 3 5 5 2 3 Um die Temperatur weiter abzusenken dr cken Sie die Taste Mode 5 so oft bis die Anze...

Страница 13: ...e F cher sind nicht f r das Einfrieren von fri schen Lebensmitteln geeignet Wenn das K hl Gefrierger t l ngere Zeit leer steht das Ger t ausschalten abtauen reinigen und die T r offen lassen um Schimm...

Страница 14: ...Der Energieverbrauch ist auch abh ngig vom gew hlten Standort n here Informa tionen siehe Seite DE 21 Qualit t erhalten Damit Aroma und Frische der Nahrungs mittel im K hlbereich erhalten bleiben lege...

Страница 15: ...agerzeit des Gefrierguts aufgrund eines Tempe raturanstiegs im Ger teinneren ver k rzen kann Abtauen Reinigen oder Stromausfall Bei l ngerem Stromausfall oder ei ner St rung am Ger t das eingela gerte...

Страница 16: ...llte als Ge frierverpackung ausgewiesen sein Das Portionieren M glichst flache Portionen formen diese frieren schneller bis in den Kern durch Luft aus dem Gefrierbeutel herausstrei chen denn sie beg n...

Страница 17: ...sie am besten bei Raumtemperatur oder im K hlschrank auftauen Um Lebensmittel schnell aufzutauen nut zen Sie z B die Auftaufunktion Ihrer Mi krowelle Beachten Sie dabei die Herstel lerangaben und bea...

Страница 18: ...arme Luft in das Ger t eindringt 1 Klemmen Sie zur Pr fung ein d nnes St ck Papier an verschiedenen Stellen ein Das Papier muss sich an allen Stellen gleich schwer durchziehen lassen 2 Falls die Dicht...

Страница 19: ...gangs keine anderen Mittel verwen den als vom Hersteller empfohlen Z B keine elektrischen Heizger te Messer oder Ger te mit offener Flam me wie z B Kerzen verwenden Die W rmed mmung und der Innenbe h...

Страница 20: ...ung vorzubeugen 9 Reinigen Sie die T rdichtung nur mit kla rem Wasser sie ist empfindlich gegen l und Fett 10 Reiben Sie alles einschlie lich der T r dichtung gr ndlich trocken und l ften Sie kurze Ze...

Страница 21: ...n Packen Sie das Ger t aus und entfer nen Sie vorsichtig alle Verpackungsteile Kunststoffprofile Klebestreifen Schutzfo lien und Schaumpolster innen au en und auf der Ger ter ckseite Geeigneten Stando...

Страница 22: ...an der M belt r 21 4 Abdeckung f r Schleppschiene 20 25 mm m m 9 6 7 1 1036 5 mm 52 mm 671 5 mm 7 1 m m 5 8 7 1 0 7 m m 5 8 7 1 Einbauschrank und Bel ftung Die folgenden Voraussetzungen muss der Einba...

Страница 23: ...18 Schlie en und ffnen Sie die M belt ren um zu pr fen ob sie sich komplett und leicht schlie en lassen Kor rigieren Sie gegebenenfalls die Position des K hlger ts 5 ffnen Sie die Ger te und die M be...

Страница 24: ...tfernen der allen neuen Ger ten anhaftet reinigen Sie das Ger t be vor Sie es benutzen siehe K hlbereich rei nigen auf Seite DE 18 und siehe Gefrierbe reich abtauen und reinigen auf Seite DE 19 Ger t...

Страница 25: ...Verwenden Sie zum Herausdrehen der Schrauben einen 8er Schraubenschl ssel oder einen Kreuzschlitz Schraubendreher 4 Nehmen Sie die T r des K hlbereichs heraus 26 5 Demontieren Sie das Mittelscharnier...

Страница 26: ...nschlag wechseln Seite DE 26 11 Setzen Sie die T r f r den K hlbereich wieder ein und schlie en Sie sie 12 Montieren Sie die obere Scharnierplatte wieder an Der T ranschlagwechsel ist damit abge schlo...

Страница 27: ...drig eingestellt H here Einstellung w hlen siehe Tempe ratur einstellen auf Seite DE 11 T r nicht fest verschlossen oder T rdichtung liegt nicht voll auf Siehe T rdichtungen kontrollieren und rei nige...

Страница 28: ...on 040 36 03 31 50 Kunden in sterreich Wenden Sie sich bitte an das Kundencen ter oder die Produktberatung Ihres Ver sandhauses Damit wir Ihnen schnell helfen k nnen nennen Sie uns bitte Ger tebezeich...

Страница 29: ...et Weitere Informationen zu diesem Thema fin den Sie auch auf den Service Seiten unseres aktuellen Katalogs und auf unserer Internet seite unter der Rubrik Service Unser Beitrag zum Schutz der Ozonsch...

Страница 30: ...r auf der Grundlage von Ergebnissen der Normpr fung ber 24 Stunden Der tats chliche Verbrauch h ngt von der Nutzung und vom Standort des Ger ts ab Nutzinhalt K hlbereich 185 L Nutzinhalt Gefrierbereic...

Страница 31: ...K hl Gefrier Kombination Modell HEKK17754A2 Ger tema e H he Breite Tiefe 1785 mm 540 mm 540 mm Leergewicht 54 kg K ltemittel R600a K ltemittel F llmenge 55 g Schaummittel Zyklopentan Leistungsaufnahm...

Страница 32: ...Technische Daten Seite DE 32...

Страница 33: ...Built in fridge freezer combination User manual Manual version 93732 EN 20191023 Article no 375 546 Reproduction even of excerpts is not permitted HEKK 17754A2 Hanseatic...

Страница 34: ...ing EN 19 Choosing a suitable location EN 20 Installation EN 21 Cleaning before use EN 23 Commissioning the appliance EN 23 Changing the door hinges EN 24 Troubleshooting table EN 26 Our Service Centr...
Страница 35: ...nd unpack it see Start up on page EN 19 2 Check that the delivery is complete 3 Check whether the appliance was dam aged during transit 4 If the delivery is incomplete or the appli ance has been damag...

Страница 36: ...ance on off 2 Temperature display in fridge com partment 3 Super Further reduce the tempera ture in the freezer compartment 4 Smart Automatic operation 5 Mode set to Super or Smart 6 Door shelves 7 Co...

Страница 37: ...ymbol warns against possible damage to property This symbol refers to useful addi tional information Explanation of symbols Caution Fire hazard Safety notices In this chapter you will nd general safet...

Страница 38: ...nk or pinch the mains cord or lay it over sharp edges When positioning the appliance en sure the supply cord is not trapped or damaged Do not locate multiple portable socket outlets or portable power...

Страница 39: ...ilt in cabinet see Installa tion on page EN 21 Dangers from the refrigerant Your appliance s refrigerant circuit con tains the environmentally friendly but ammable refrigerant R600a isobu tane Mechani...

Страница 40: ...onella or similar bacteria Abide by the storage times recom mended by food manufacturers Note that the shelf life of the frozen food may be shortened due to a rise in the temperature inside the appli...

Страница 41: ...any mechanical devices or means other than those recommend ed by the manufacturer Only use original accessories After switching off wait for 5 min utes before switching the appliance back on again To...

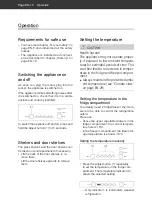
Страница 42: ...ds to remove them Operation Setting the temperature CAUTION Health hazard The appliance may not operate proper ly if exposed to low ambient tempera tures for extended periods of time This can then lea...

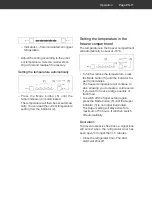
Страница 43: ...in the freezer compartment will automatically be kept at 18 C Adjust Mode Super Smart 1 4 2 3 5 5 2 3 To further reduce the temperature press the Mode button 5 until the indicator Su per 3 illuminates...

Страница 44: ...f fresh food If the refrigerating appliance is left empty for long periods switch off defrost clean dry and leave the door open to prevent mould developing within the appliance Refrigeration tips 10 1...

Страница 45: ...rior temperature Energy consumption is also dependent on the selected location for more detailed information see page EN 20 Maintaining quality To maintain the flavour and freshness of food in the fri...

Страница 46: ...n food may be shortened due to a rise in the temperature inside the appliance from defrosting cleaning or power failure In case of prolonged power failure or appliance malfunction remove stored frozen...

Страница 47: ...suitable for freezer use Portions Create flat portions if possible these freeze through to the core faster Expel the air from the freezer bag as this causes the contents to dry out and takes up space...

Страница 48: ...m temperature or in the refrigerator To defrost food quickly use the defrost function on your microwave for example Observe the manufacturer s instructions and note that bacteria and germs can form in...

Страница 49: ...r should be difficult to pull through at all points 2 If the seal is not uniform everywhere Warm the seal in the appropriate places in front of you with a hair dryer and pull it out with your fingers...

Страница 50: ...ver use harsh granular so da based solvent based or abrasive cleaners We recommend all purpose cleaners with a neutral pH The door seal is sensitive to oil and grease the rubber becomes porous and bri...

Страница 51: ...d allow to air briefly 11 Reinsert the drawers and put the food back into the fridge and freezer compart ments 12 Connect the mains plug to the socket or switch on the fuse again 13 Set the desired te...

Страница 52: ...ck the appliance and carefully re move all packaging plastic moulding adhesive strips protective film and foam padding from the inside outside and back of the appliance Choosing a suitable location NO...

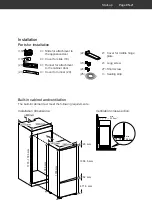
Страница 53: ...binet door 21 4 Cover for runner 20 25 mm m m 9 6 7 1 1036 5 mm 52 mm 671 5 mm 7 1 m m 5 8 7 1 0 7 m m 5 8 7 1 Built in cabinet and ventilation The built in cabinet must meet the following requirement...

Страница 54: ...e opened 4 Push the runners 20 into the slides 18 Close and open the cabinet door to check that it closes fully and easily If necessary correct the position of the refrigerating appliance 5 Open the a...

Страница 55: ...before using it see Cleaning the fridge compartment on page EN 17 and see Defrosting and clean ing the freezer compartment on page EN 18 Commissioning the appliance NOTICE Risk of damage to property...

Страница 56: ...per hinge plate Use a size 8 spanner or a cross headed screwdriver to remove the screws 4 Remove the door to the fridge compart ment 26 5 Detach the middle hinge plate 26 27 6 Detach the mounting brac...

Страница 57: ...Changing the door hinges Page EN 25 12 Reattach the upper hinge plate This is the final step in changing the di rection in which the door closes...
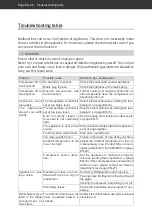
Страница 58: ...roller is set at too low a level Select a higher setting see Setting the tem perature on page EN 10 Door not tightly closed or door seal is not completely tight See Checking and cleaning the door seal...

Страница 59: ...echnical service Phone 49 0 40 36 03 31 50 Customers in Austria Please contact your mail order company s customer service centre or product advice centre In order for us to help you quickly please tel...

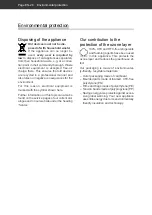
Страница 60: ...ith the symbol shown here Further information on this topic can also be found on the service pages of our current cat alogue and on our website under the heading Service Our contribution to the protec...

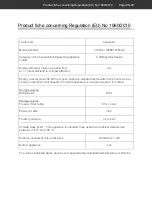
Страница 61: ...208 kWh per year based on standard test results for 24 hours Actual energy consumption will depend on how the appliance is used and where it is located Storage volume Refrigerator 185 L Storage volum...

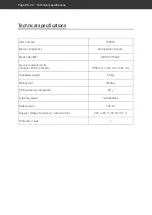
Страница 62: ...erator freezer Model identifier HEKK17754A2 Device measurements Height Width Depth 1785 mm 540 mm 540 mm Unloaded weight 54 kg Refrigerant R600a Filling capacity refrigerant 55 g Foaming agent cyclope...

Страница 63: ......

Страница 64: ......

Отзывы: