background image

Page EN-20

Connection to the power supply – notes for the installer

 WARNING

Electric shock / fi re hazard!
Improperly installed electrical connec-
tions can cause electrical shocks and/or 
short circuits.


Connection to the mains supply 

may 

be made only by an authorised elec-
trician

 approved by the local energy 

supply company, e.g. our Service de-
partment (see page EN-24). Only then 
will you benefi t from our warranty 
and a suffi cient level of safety.


Since all poles of the appliance can-
not be disconnected from the mains 
via an accessible disconnecting de-
vice, an all-pole disconnecting device 
in accordance with overvoltage cat-
egory III must be connected within 
the house installation with at least 3 
mm contact clearance; this includes 
fuses, miniature circuit breakers and 
protective devices.

Connection conditions


– The oven is designed for the following al-

ternating voltages:


– 230 V 1N~ / 50 Hz, 40 A


– 400 V 2N~ / 50 Hz, 25 A


– 400 V 3N~ / 50 Hz, 16 A


– A separate power supply is required.


– The  power  cord  used  must  comply  with 

the requirements of DIN EN 60335-1 (e.g. 
H05RR-F model).


– Depending on the type of connection, the 

conductor cross-section must be selected 
and  the  contact  bridges  inserted  or  re-
moved (see following figures).


– When connecting the appliance, VDE re-

quirements and the ‘Technical connection 
requirements’ must be observed.
Contact protection must be guaranteed.

Connecting to the mains

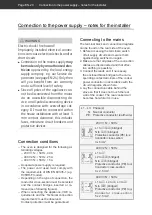
The terminal block and connection diagrams 
can be found on the rear side of the oven.
1. Before accessing the terminals, switch 

off all supply circuits and secure them 
against being switched on again.

2. Make sure that all poles of the connection 

cables are disconnected and that effec-
tive earthing is possible.

3. Connect the leads and, if necessary, 

the enclosed brass bridges to the corre-
sponding contact terminals of the cooker 
power connection in accordance with the 
circuit diagrams shown here.

4. Lay the connection cable behind the 

stove so that it does not touch the rear 
wall of the cooker. The rear cooker wall 
becomes hot while it is in use.

 L1 – L3:  Phase(s)
 

N:  Neutral conductor


PE:  Protective conductor (earth wire)

230 V 1N~ / 50 Hz

L1

N

PE

3
2
1

4
5

L1 to 





 (bridged)

N to 



 (bridged)

Protective conductor (PE) to 
Conductor cross-section: 
3 x 6 mm

2

400 V 2N~ / 50 Hz

L1

N

PE

3
2
1

4
5

L1 to 

L2 to 



 (bridged)

N to 



 (bridged)

Protective conductor (PE) to 
Conductor cross-section: 
4 x 2.5 mm

2

400 V 3N~ / 50 Hz

L2

L3

L1

N

PE

3
2
1

4
5

L1 to 

, L2 to 

, L3 to 


N to 



 (bridged)

Protective conductor (PE) to 
Conductor  cross-section: 
5 x 2.5 mm

2

 Connection to the power supply – notes for the installer

Содержание 5905 9963

Страница 1: ...Standherd mit Guss Kochfeld Gebrauchsanleitung Anleitung Version 196845_DE_20190425 Bestell Nr 59059963 Nachdruck auch auszugsweise nicht gestattet 5022EE1 37eDW...

Страница 2: ...chalten DE 15 Tipps zum Energiesparen DE 15 Besonderheiten beim Ansetzen von Hefeteig DE 16 Backofen reinigen DE 16 Grundreinigung DE 17 Geh useoberfl chen reinigen DE 17 Garrraum reinigen DE 17 Dampf...

Страница 3: ...1 Brosch re Backen Braten Garen a b c Lieferung kontrollieren 1 Transportieren Sie das Ger t an einen ge eigneten Standort und packen Sie es dort aus siehe Aufstellen auf Seite DE 22 2 Pr fen Sie ob d...

Страница 4: ...e Backofen Leuchte 8 Gelbe Netzkontroll Leuchte 9 Temperaturregler f r Kochplatte 3 10 Temperaturregler f r Kochplatte 4 11 Funktionsschalter f r die Beheizungsart des Backofens 12 Temperaturregler f...

Страница 5: ...Dieser Signalbegriff bezeichnet eine Gef hr dung mit einem mittleren Risikograd die wenn sie nicht vermieden wird den Tod oder eine schwere Verletzung zur Folge haben kann VORSICHT Dieser Signalbegrif...

Страница 6: ...rie ren Sie k nnen sich und sp tere Benut zer in Gefahr bringen Nur autorisierte Fachkr fte d rfen diese Reparaturen ausf hren Das Ger t darf weder mit einer externen Zeitschaltuhr noch mit einem sepa...

Страница 7: ...sgefahr VORSICHT Risiken im Umgang mit dem Ger t Brandgefahr Der Kochvorgang ist zu berwachen Ein kurzer Kochvorgang ist st ndig zu ber wachen Den Backofen grunds tzlich nur mit ge schlossener Backofe...

Страница 8: ...um eine Kippgefahr des Ger tes zu vermei den HINWEIS Besch digungsgefahr Vor dem nen der Abdeckplatte eventu ell Versch ttetes entfernen Abdeckplatte nicht zuklappen solange noch eine Kochplatte hei i...

Страница 9: ...chienen nicht im Ge schirrsp ler reinigen Die Backofent r ist schwer und hat eine Glasfront Beim Aush ngen nicht fallen lassen Soll das Ger t mit einer Transportkarre gefahren werden muss es so angeho...

Страница 10: ...k auf und sind auch nach dem Ausschalten noch hei HINWEIS bergekochtes sofort entfernen Kochplatten in cm Temperatur regler 1 Blitz Kochplatte 18 0 5 2 Normal Kochplatte 14 5 6 3 Normal Kochplatte 18...

Страница 11: ...Kochgeschirre d rfen jedoch nicht innen zerkratzt sein und auch nicht berhitzt wer den Benutzen Sie nur T pfe mit glattem und ebenem Boden Eingedr ckte oder ausge beulte T pfe sind nicht geeignet Benu...

Страница 12: ...fensprays Hoch druck oder Dampfreiniger verwenden Sie k nnen die Ober che besch di gen Hochdruckreiniger k nnen einen Kurzschluss verursachen Kochplatten reinigen 1 Nach dem Abk hlen gr ndlich mit war...

Страница 13: ...m Ofen VORSICHT Brandgefahr Den Backofen grunds tzlich nur mit geschlossener Backofent r betreiben Bei Feuer im Backofen die Sicherungen ausschalten herausdrehen die Backofent r nicht ffnen bis das Fe...

Страница 14: ...en Temperaturemp ndliche brennbare oder feuergef hrliche Gegenst nde nicht im Backofen aufbewahren Den Herd nicht unbeaufsichtigt las sen wenn Sie Speisen in l in Fett oder mit Alkohol zubereiten Die...

Страница 15: ...rs geeignet Stellen Sie den Funktionsschalter auf das Lampen Symbol um den Backofen zu beleuchten Die Beleuchtung wird auch eingeschaltet sobald Sie die Backofent r ffnen Informationen zum Austausch d...

Страница 16: ...18 2 Heizen Sie den Backofen auf 50 C vor 3 Schalten Sie den Backofen aus wenn die Temperatur erreicht ist 4 Stellen Sie die Backsch ssel mit dem Hefeteig in den Garraum Sie k nnen die Sch ssel direk...

Страница 17: ...e dabei aber sehr vorsichtig da sie nur an einigen Stellen befestigt ist im brigen jedoch lose anliegt Dampfreinigung Bei der Dampfreinigung handelt es sich um ein Nassreinigungsverfahren das mithilfe...

Страница 18: ...cher in den Seiten w nden 3 Dr cken Sie abschlie end die vorderen Haken in die vorgesehenen L cher in den Seitenw nden Backofent r reinigen HINWEIS Bruch und Verletzungsgefahr Die Backofent r enth lt...

Страница 19: ...r leichtg ngig ffnen und schlie en l sst Scheiben reinigen Die Backofent r enth lt drei Glasscheiben die Sie hin und wieder beidseitig reinigen soll ten Dazu ben tigen Sie einen Schlitzschrau bendrehe...

Страница 20: ...en zur Fol ge haben Vor dem Gl hlampenwechsel unbe dingt den Netzstecker ziehen oder die Sicherungen f r die Steckdose aus schalten an die der Backofen ange schlossen ist Die Gl hlampe erst auswechsel...

Страница 21: ...w entfernt werden siehe nachfolgende Abbildungen Beim Anschluss m ssen die VDE Bestimmungen sowie die Technischen Anschlussbedingungen beachtet werden Ber hrungsschutz muss gew hrleistet sein Netzleit...

Страница 22: ...den Geschirrwagen ganz heraus Zum Verstel len verwenden Sie am besten eine M n ze die Sie in den Gewindeschlitz stecken und drehen Kippschutz montieren VORSICHT Wenn Sie den Kippschutz nicht montie r...

Страница 23: ...chrauben Sie den Kippschutz mit den mitgelieferten Schrauben fest Bei einer Leichtbauwand Besorgen Sie sich f r die Wand geeignete Speziald bel Lassen Sie sich ggf von einem Fachmann beraten Schrauben...

Страница 24: ...ung Verst ndigen Sie im Zweifelsfall unseren Service siehe Seite DE 25 Backofen Leuchte erlischt Die eingestellte Backofen Temperatur ist erreicht Die Leuchte schal tet sich bei sinkender Temperatur a...

Страница 25: ...r bestellen m chten Reparaturen und Ersatzteile Kunden in Deutschland Wenden Sie sich bitte an unseren Technik Service Telefon 0 18 06 18 05 00 Festnetz 20 Cent Anruf Mobilfunk max 60 Cent Anruf Kunde...

Страница 26: ...Kochgeschirr Schalten Sie die Kochstufe rechtzeitig zu r ck und kochen Sie mit einer m glichst niedrigen Einstellung weiter Kochen Sie wann immer es m glich ist mit Schnellkocht pfen Dadurch halbiert...

Страница 27: ...50 160 20 30 Wasserbiskuit 1 2 Ober Unterhitze 2 180 190 15 25 Apfelhefekuchen 1 4 Ober Unterhitze 2 185 195 25 40 20 Muffins 1 2 Ober Unterhitze 160 170 15 25 Toast 1 3 Grill 3 240 1 3 Pizza 2 7 1 3...

Страница 28: ...eeffizienzindex 95 2 Energieeffizienzklasse auf einer Skala A h chste Effizienz bis D geringste Effizienz A Energieverbrauch konventionellen Modus 0 80 kWh Zyklus Energieverbrauch Umluft Modus kWh Zyk...

Страница 29: ...tes 41 0 kg Anzahl der Garr ume 1 W rmequelle elektrisch Volumen 70 l Energieverbrauch im konventionellen Modus 0 80 kWh Zyklus Energieverbrauch im Umluftmodus kWh Zyklus Energieeffizienz Index 95 2 D...

Страница 30: ...Ma e Kochzone hinten links 14 5 cm Ma e Kochzone vorne rechts 14 5 cm Ma e Kochzone hinten rechts 18 0 cm Energieverbrauch Kochzone vorne links 190 5 Wh pro kg Energieverbrauch Kochzone hinten links...

Страница 31: ...Guss Kochfeld Modell 5022EE1 37 eDW Bemessungsspannung 230 V 400 V 3N Frequenz 50 Hz Bemessungsaufnahme Backofen 2000 W Ger tema e H x B x T 850 mm x 500 mm x 600 mm Maximal Temperatur 275 C Beleucht...

Страница 32: ......

Страница 33: ...Electric cooker with cast iron hob User manual Manual version 196845_EN_20190425 Article no 59059963 Reproduction even of excerpts is not permitted 5022EE1 37eDW...

Страница 34: ...ugh EN 15 Cleaning the oven EN 15 Basic cleaning EN 15 Cleaning the housing surface EN 15 Cleaning the cooking compartment EN 16 Steam cleaning EN 16 Cleaning the baking tray guides EN 16 Cleaning the...

Страница 35: ...Tilt protection see page EN 21 1 User manual 1 Baking roasting and cooking brochure a b c Check the delivery 1 Transport the appliance to a suitable loca tion and unpack it 2 Check that the delivery i...

Страница 36: ...7 Red oven light 8 Yellow power indicator light 9 Temperature controller for solid plate 3 10 Temperature controller for solid plate 4 11 Function switch for oven heating type 12 Temperature controll...

Страница 37: ...on Safety notices In this chapter you will find general safety notices which you must always observe for your own protection and that of third parties Please also observe the warning notices in the in...

Страница 38: ...elements inside the oven Children less than 8 years of age shall be kept away unless continously supervised Fire hazard Unattended cooking on a hob with fat or oil can be dangerous and may result in f...

Страница 39: ...Children aged 8 years or younger must be kept away from the device unless they are under constant supervision Hot steam can ow from the extraction hood ventilation when the oven is in use Never pour...

Страница 40: ...hes directly on the bottom of the cooking compartment the oven temperature must not exceed 50 C Be careful when handling cookware the enamel can be easily scratched Turn the temperature controller clo...

Страница 41: ...remain hot after they are switched off NOTICE Immediately remove anything that boils over The cast iron hob has two Turbo and two nor mal solid plates The Turbo solid plates have a red cross in the m...

Страница 42: ...g and time saving steam pressure cookers The relatively high purchase costs are quickly recovered like steel pots and pans Coated cookware must not be scratched on the inside and also must not be over...

Страница 43: ...g NOTICE For cleaning purposes do not use any harsh cleaning agents or scouring pow ders steel wool oven sprays steam cleaners or high pressure cleaners They can damage the surface High pressure clean...

Страница 44: ...rate the oven with the oven door closed In case of an oven re Switch off the circuit break ers unscrew fuses Do not open the oven door until the fire is extinguished Never extinguish burning oil or fa...

Страница 45: ...selected the heating meth od set the desired oven temperature using the temperature controller 12 The oven can be set from 50 C to 250 C This means that the oven is switched off 0 Use the function swi...

Страница 46: ...ed in the cooking tables provided Use dark coloured baking dishes and trays when possible They effectively absorb the heat Avoid frequently opening the oven door during cooking baking or roasting Bake...

Страница 47: ...water from the oven to cool before pouring it out Only change the oven light bulb when the oven has cooled down NOTICE Improper cleaning may lead to dam age For cleaning purposes do not use any harsh...

Страница 48: ...ls are only lukewarm 5 Use potholders or something similar to re move the dripping pan from the oven and pour away the remaining water 6 Wipe the cooking compartment off with a damp cloth or sponge 7...

Страница 49: ...individual glass panels fall Do not hit the oven door and the indi vidual panels of glass anywhere Do not use the oven when the glass is damaged because the oven is no longer safe Please contact our S...

Страница 50: ...ed a PH1 flat head screwdriver 1 Take the oven door off its hinges see Re moving the oven door from its hinges on page EN 17 2 Remove both screws that secure the top metal grid 3 Carefully removed the...

Страница 51: ...s plug or switch off the fuses for the socket to which the oven is connected Replace the bulb only when the oven is no longer hot and there is no risk of burns 1 Switch off and or unscrew the mains fu...

Страница 52: ...ted or re moved see following figures When connecting the appliance VDE re quirements and the Technical connection requirements must be observed Contact protection must be guaranteed Connecting to the...

Страница 53: ...n into the slot and turn it Removing transport locks If you have not already done so remove any plastic strips from the sides of the baking sheets Remove all protective films Mounting the tilt protect...

Страница 54: ...drill 8 For solid walls Place the supplied dowels into the holes Screw the tilt protection tight with the supplied screws For drywalls Obtain suitable special dow els for the wall If necessary consult...

Страница 55: ...heck the fuse for the stove in the fuse box in the apartment In case of doubt connect our Ser vice Centre see page EN 24 Oven light goes out The oven temperature has been reached The light switches on...

Страница 56: ...ooting table you would like to order further accesso ries Repairs and spare parts Customers in Germany Please contact our technical service Telephone 0 18 06 18 05 00 landline 20 cents call mobile max...

Страница 57: ...n quickly and continue to cook at the lowest possible setting Always use pressure cooking saucepans whenever possible This will halve the cooking process and you will save a lot of energy Only use as...

Страница 58: ...t 2 150 160 20 30 Water sponge cake 1 2 Top bottom heat 2 180 190 15 25 Leavened apple cake 1 4 Top bottom heat 2 185 195 25 40 20 muffins 1 2 Top bottom heat 160 170 15 25 Toast 1 3 Grill 3 240 1 3 P...

Страница 59: ...ues indicated above have been measured under standardised laboratory conditions pursuant to EN 60350 1 Model identification 5905 9963 5022EE1 37 eDW Type of oven freestanding Mass of the appliance 41...

Страница 60: ...ion back left cooking zone 14 5 cm Dimension front right cooking zone 14 5 cm Dimension back right cooking zone 18 0 cm Energy consumption front left cooking zone 190 5 Wh pro kg Energy consumption ba...

Страница 61: ...tric cooker with Cast iron hob Modell 5022EE1 37 eDW Rated voltage 230 V 400 V 3N Frequency 50Hz Rated power input oven 2000 W Oven measurements H x W x D 850 mm x 500 mm x 600 mm Maximum temperature...

Страница 62: ......

Отзывы: