background image


Hansa C27hs O&M Manual - Issue 1 - 04/10/2016 


© Hansa Chippers 2016 


M

AINTENANCE 

&


S

ERVICE


Blade Resharpening 

When the blades are blunt, the machine will not operate efficiently. Often material comes out in long strips.   

The blades need to be removed for sharpening.  Procedure to remove and sharpen blades: 

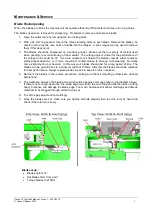
1.  Open the outlet chute by removing the two locking bolts.  

2.  With a 24 mm ring spanner loosen the three clamping bolts on each blade. Remove the blades, be 

careful not to drop the nuts, bolts or blades into the chipper.  A stick magnet can be used to retrieve 
them if this does occur. 

3.  The  blades  should  be  sharpened  on  a  surface  grinder.    Make  sure  there  is  plenty  of  coolant  used 

when grinding, to avoid softening of the material.  The cutting angle is critical for the performance of 
the chipper and should be 31°. If you are unable to re-sharpen the blades yourself, either contact a 
professional  sawdoctor,  or  if  more  convenient  contact  Hansa  to  arrange  re-sharpening.    Normally 
only a slight touch up is needed.  In this way your  blades should last for a long period of time. The 
blades can be ground back to a minimum width of 105mm. After this the blades should be replaced 
for best performance. Always replace blades in pairs to keep the rotor in balance. 

4.  Remount the  blades  in  the  reverse  procedure, making  sure  that all  mounting  surfaces  are  cleaned 

beforehand.  

5.  The clearance between the blade and anvil should be approx 3mm (as shown in the diagram below).  

If there is not enough clearance, the blade edge may touch the anvil through deflection when cutting 
heavy branches and damage the blade edge. Too much clearance will allow small twigs and fibrous 
materials to be dragged through without being cut. 

6.  To set the gap adjust anvil accordingly. 

7.  Once  the  blades  are  set,  make  sure  you  tighten  all  bolts  properly  then  turn  the  rotor  by  hand  and 

check if the rotor turns freely. 

Blade set-up:


Blade angle is 31° 


Set blades 3mm from anvil 


Torque blades to 215Nm 

Содержание C27HS

Страница 1: ...tructions are fully read and understood before the Hansa Chipper Model C27hs is used HANSA NEW ZEALAND CONTACT DETAILS FREEPHONE 0508 442 672 EMAIL info hansaproducts co nz www hansaproducts co nz HAN...

Страница 2: ...Procedure 4 Operation 4 Automatic Feed Controller AFC 5 Maintenance Service 6 Blade Resharpening 6 Anvil Adjustment 7 Belt Tension 7 Greasing Bearings Pivot Points 8 Hydraulic System 8 Engine Servicin...

Страница 3: ...ontrol lever for proper operation of feed wheel Check all hydraulic components for leaks Check Automatic Feed Controller AFC Check the AFC is on when key is in the ON position Check the AutoTrip posit...

Страница 4: ...hout full and proper instruction in the use of the machine adjustments maintenance and the factors of safe operation Operating Safety Setup the work site so there is no danger to traffic or public and...

Страница 5: ...objects weight of machine and components and the operating environment OPERATION Caution Position the machine level and stable to avoid unnecessary vibrations Make sure the inlet chute is empty before...

Страница 6: ...feeding any flax and cabbage tree leaves into the machine as these stringy materials can wrap around the rotor shaft and work their way into the bearing If any stringy material becomes wrapped around...

Страница 7: ...as 19 different pre set positions at which the feed will stop Adjusting the AutoTrip setting 1 Turn the ignition key into the ON position Alternatively this can be adjusted when the machine is in oper...

Страница 8: ...professional sawdoctor or if more convenient contact Hansa to arrange re sharpening Normally only a slight touch up is needed In this way your blades should last for a long period of time The blades c...

Страница 9: ...dging principle proper tensioning of v belts is the single most important factor necessary for long satisfactory operation Too little tension will result in slippage causing rapid belt and sheave wear...

Страница 10: ...gs on the rotor shaft one under the engine cover and the other above the inlet opening 2 Two bearings on the feed wheel 3 Two bearings on either side of the feed wheel pivot 4 Outlet chute swivel two...

Страница 11: ...t using a bearing puller If the bearing is corroded to the shaft try applying some heat to the bearing or cut open using an angle grinder Ensure the shaft is not damaged 5 Replace bearing with FAG bra...

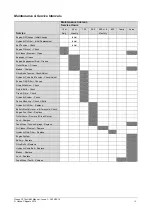
Страница 12: ...e Outlet Swivel Grease Blades Sharpen Drive Belts Tension Check Adjust Hydraulic Pump Belt Tension Check Adjust Engine Oil Filter Change Overall Machine Check Nuts Bolts Check Tires Rims Check Hydraul...

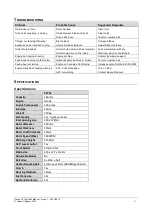
Страница 13: ...bable Cause Suggested Remedies Rotor does not turn Rotor blocked Clear rotor Drive belts squealing smoking Chips between blade and anvil Clear chips Drive belts loose Tension replace belt Chipper not...

Страница 14: ...Chippers 2016 12 Bolt torque Relative Strength Bolt Marking 4 6 8 8 Maximum Torque Maximum Torque Bolt Dia Wrench Size lb ft Nm lb ft Nm M8 13mm 7 9 5 18 25 M10 16mm 14 19 37 50 M12 18mm 26 35 65 85...

Страница 15: ...ollowing the date of purchase The warranty registration must accompany the HANSA product when warrantable repairs are requested If the warranty registration is lost or destroyed proof of purchase docu...

Страница 16: ...lf Compensation for loss of time commercial losses or rental costs of a substitute product during the period of adjustment Any damage which results from unavoidable natural disasters fire collision th...

Отзывы: