24
25
Deutsch
English
Italiano
Deutsch
English
Italiano
Vorbereitung Montage Trägerrahmen
Preparing the Support Frame Installation
Preparativi per il montaggio del telaio
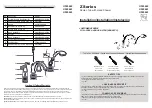
Abdichten:
•
Dichtung in Ausgleichsprofile einziehen
und kürzen
•
Silikonraupe (2) entlang der Dichtung auf-
tragen.
•
Die Ausgleichsprofile (1) links und rechts
auf den Trägerrahmen aufsetzen und unter
Verwendung der Schrauben M4 x12 (3)
festschrauben.
• Auf die Ausgleichsprofile (1) unten mit
einem Tupfer Silikon die Blende aufsetzen
(Abb. A)
Hinweis:
Die Schiebetüre kann auf der linken oder auf
der rechten Seite eingebaut werden.
In der Abbildung B ist die Schiebetüre links
(4) platziert!
In der Abbildung C ist die Schiebetüre rechts
(5) platziert!
•
Trägerrahmen nach Montage der Aus-
gleichsprofile auf Montageböcke vorsichtig
ablegen, um Beschädigungen zu vermeiden
(Abb. D).
•
Silikonraupe an der Unterseite des Träger-
rahmens auf der gesamten Länge auftragen.
(Abb. E (6)).
•
Silikonraupe am Übergang Kunstoffabde-
ckung / Trägerrahmen auftragen. (Abb. E
(7)) .
Ermetizzazione:
• Inserire la guarnizione nei profilati di
compensazione ed accorciarla
•
Applicare un cordone di silicone (2) nel
profilo compensatore.
•
Collocare i profilati di compensazione (1 e
2) a sinistra ed a destra sul telaio e serrare a
fondo le viti M4 x12 (3).
•
Con un punto di silicone applicare lo
schermo sul profilato di compensazione 1 in
basso (fig. A)S.
Avvertenza:
La porta scorrevole può essere montata a
sinistra o a destra.
In figura B la porta è situata a sinistra (4)!
In figura C la porta è situata a destra (5)!
•
Dopo il montaggio dei profilati di compen-
sazione collocare il telaio con cautela sui ca-
valletti per evitare di danneggiarlo (fig. D).
•
Applicare un cordone di silicone nella
parte inferiore della chiusura (Fig E (6)).
•
Applicare un cordone di silicone nella
parte tra l‘angolare ed il montante della
chiusura (Fig E (7)).
Sealing:
• Insert the sealing in the compensation
profiles and shorten them.
•
Apply a silicone bead (2) to the compensa-
tion profiles.
•
Attach the compensation profiles (1) to the
right and left of the support frame and secure
them using the M4 x12 screws (3).
•
Fixate the panel to the bottom of
compensation profile 1 using a drop of
silicone (Fig. A)S.
Note:
The slide door can be installed on the left or
right side.
In Figure B, the slide door is positioned at the
left! (4)
In Figure C, the slide door is positioned at the
right! (5)
•
Carefully deposit the support frame on
mounting blocks after the compensation pro-
files' installation to avoid any damage (Fig.
D).
•
Apply a silicone bead to the lower side of
the support frame on the whole length (Fig.
E (6)).
•
Apply a silicone bead between plastic
cover and support frame (Fig. E (7)).
24
Содержание Pharo Aquafun 75 M 40
Страница 17: ...17 Deutsch English Italiano Benötigte Werkzeuge Required Tools Attrezzi necessari ...
Страница 47: ...47 Deutsch English Italiano Brausenfunktionen Shower Functions Setting Funzioni della doccia D A B C E F D E ...
Страница 50: ...50 ...
Страница 51: ...51 Deutsch English Italiano ...